

Start your free trial
Verify all code. Find and fix issues faster with SonarQube.
Get startedSonarQube Server is a comprehensive code quality and security solution that acts as a centralized hub for assessing and improving the code quality of your large-scale projects throughout the Software Development Life Cycle (SDLC). SonarQube Server Enterprise Edition is easily deployed into the infrastructure of your choice, on-premises or in the cloud. It integrates seamlessly into your preferred DevOps platforms: GitHub, GitLab, Azure DevOps, and BitBucket. Analysis of code in pull requests and branches is triggered automatically by your automated build process. It aggregates results into portfolios and provides enterprise-ready project reports and security reports to aid you with your regulatory and compliance needs.
Deploying SonarQube Server Enterprise Edition in your AWS Elastic Kubernetes Service (EKS) cluster enables you to operate SonarQube Server’s high-efficiency code analysis with the high availability and scalability of AWS services. You can automate your code review process to identify bugs and vulnerabilities as part of your CI/CD pipeline with an orchestrated SonarQube Server node.
This step-by-step guide walks you through deploying the SonarQube Server Enterprise Edition server in an AWS EKS cluster and provisioning it with everything it needs to function efficiently.
How Does the SonarQube Server Deployment Work?
SonarQube Server Docker images of the currently active versions for each edition can be found in our SonarQube Server Docker Hub to meet your specific business needs, whether a small team or a large Fortune 500 company.
Keep in mind that SonarQube Server Enterprise Edition has higher memory requirements than the Developer Edition. Additional computing power and hardware are required for large teams or enterprise-scale installations of SonarQube Server. Your SonarQube Server instance should include at least eight cores and 16GB of RAM to support running with multiple compute engine workers for high performance. It’s also recommended that a node be dedicated to SonarQube Server operations to avoid backlogs and orchestration conflicts with other services. There are also general requirements when deploying SonarQube Server on Kubernetes to ensure efficient installation and operation.
Helm charts are a convenient way to install and manage your SonarQube Server Kubernetes deployment. Sonar provides an official SonarQube Server Helm chart in a GitHub project that enables a default SonarQube Server deployment with advanced configurations to suit your environment and software needs. You can also find additional instructional details in our SonarQube Server Artifact Hub.
Database Options for Your Kubernetes Deployment
SonarQube Server requires a database for its operations. While the default installation comes with an embedded file-based database system, it’s not for use outside of testing and evaluation.
SonarQube Server supports several external databases, such as Microsoft SQL Server, Oracle Database, and PostgreSQL. You have several options for deploying Enterprise Edition on AWS, including self-managed database deployments on EC2 instances or leveraging managed database services like Amazon RDS.
You can configure SonarQube Server to connect to your chosen database by providing additional JDBC settings in your deployment Helm chart, including the database host URL, username, and password.
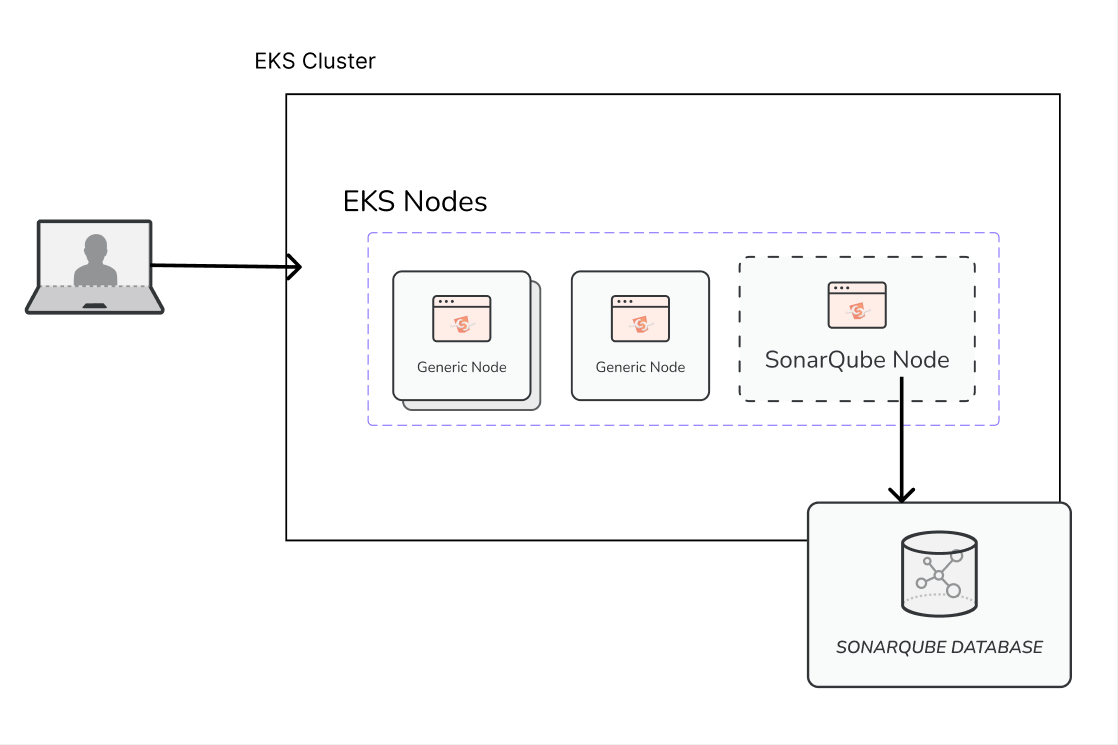
SonarQube Server Deployment Architecture
Deploying SonarQube Server on AWS EKS lets you use the orchestration and scaling of resources available with the Kubernetes cluster. Your SonarQube Server deployment can be attached to a single node or distributed across compute resources to create pods as needed for fault tolerance and scalability. This tutorial uses an attached database and volume as a backend service to store SonarQube Server data and ensure persistence across node and pod restarts.
SonarQube Server is bundled with Elasticsearch and will reindex each time a SonarQube Server pod is started from being stopped. This reindexing slows down the time it takes for a SonarQube Server pod to start up. You can enable persistence in SonarQube Server to reduce pod startup time, but with persistence enabled, regular pod stopping and restarting operations by the Kubernetes Cluster can corrupt your indexes resulting in weird behavior of data in the SonarQube Server UI. Persistence is disabled by default to eliminate this risk of corrupted indexes, so consider your production use case and weigh the need for faster scaling response time against the risk of corrupted indexes.

Installing SonarQube Server Enterprise Edition on AWS EKS
Let’s go through the steps to install the Enterprise Edition of SonarQube Server on your AWS Kubernetes Service.
The only requirement for following this guide is an AWS account.
Setting Up Your RDS Database
Start by creating an EC2 instance. For this tutorial, you can use a free-tier resource instance, which you’ll use for networking purposes only.
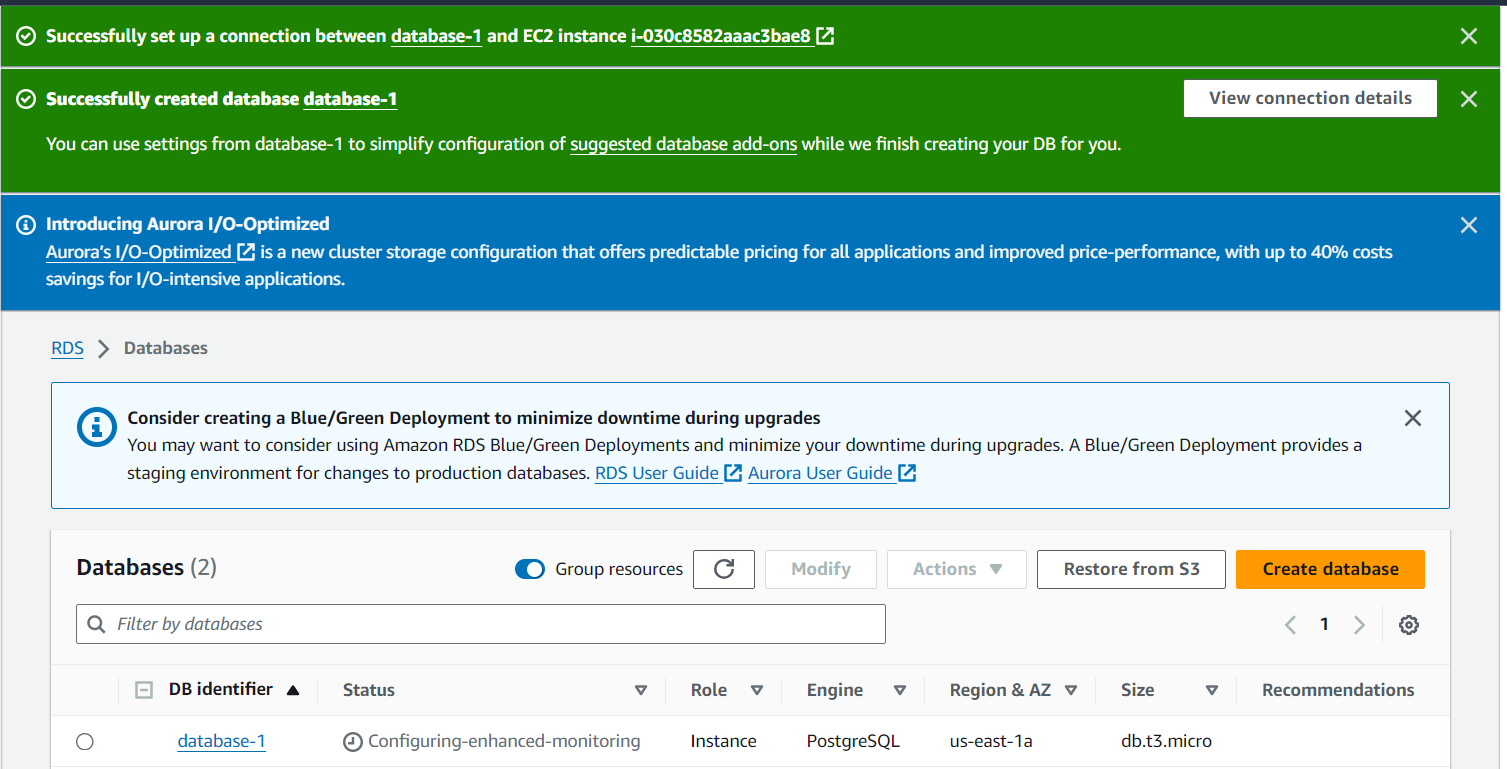
Once your instance is running, go to the AWS RDS console and create a database.

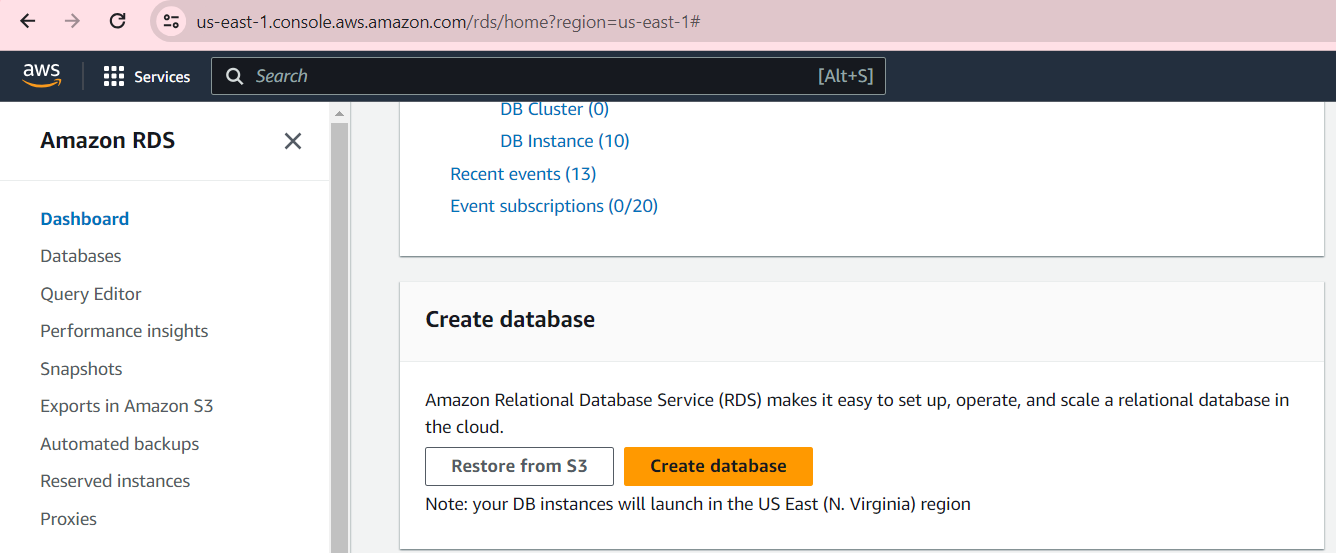
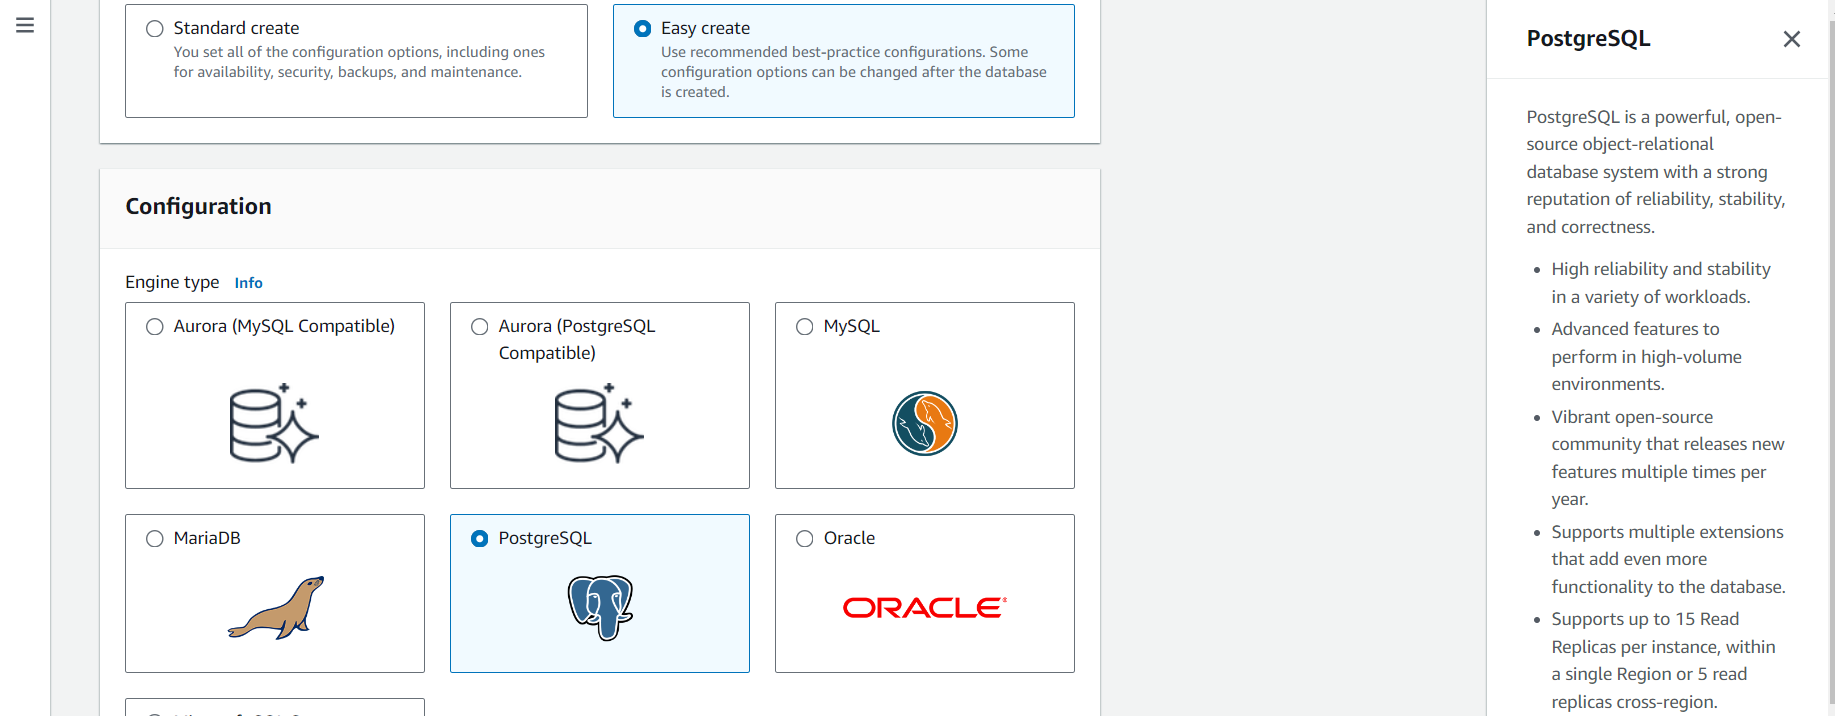
Choose the Easy create option, and select a PostgreSQL database. You can use the Self-managed password option, which lets you set your own database password, to make the connection process easier.

Navigate to Set up EC2 connection section to connect the EC2 instance you created earlier to your RDS deployment, and then create your database.

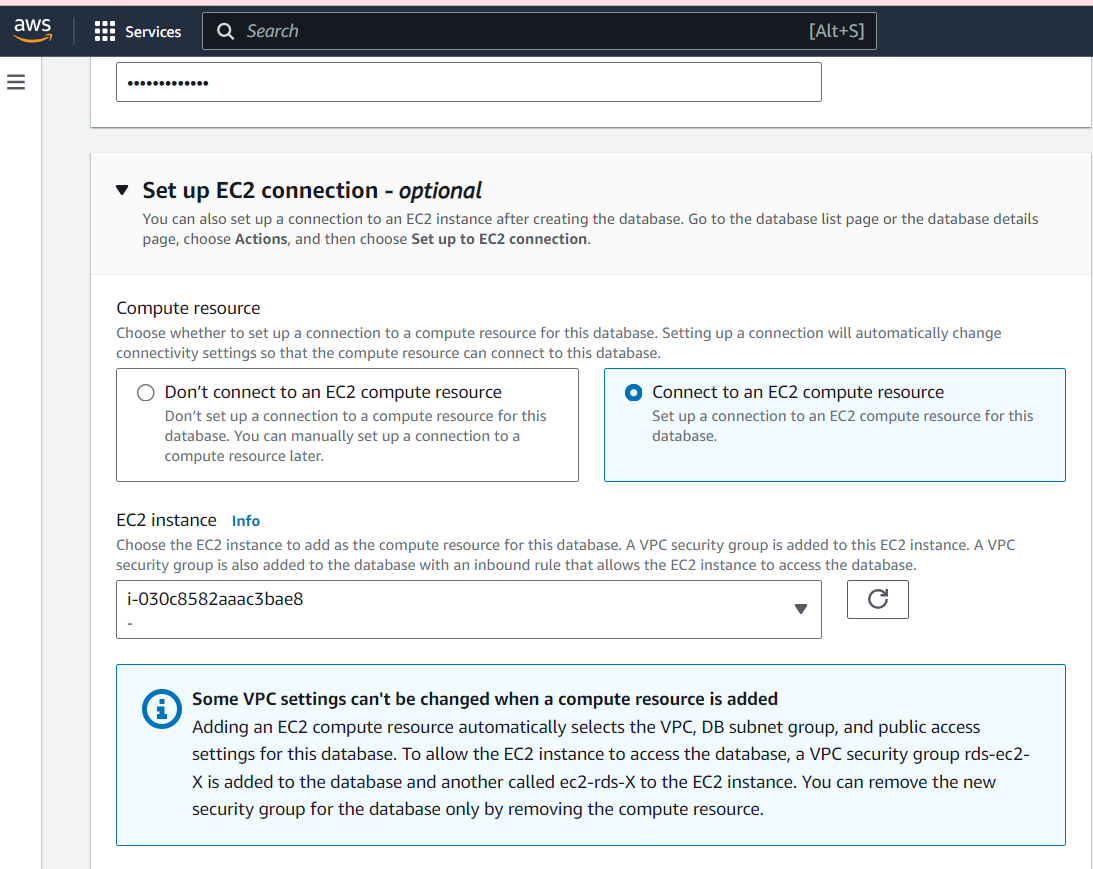
Your database will become available in a few minutes.
Note the View connection details notification that shows the username, password, and public endpoint for the database you created. You’ll use it for later connections to the Postgres database.

Once your database has been created and shows as Available, click Modify within the database interface and edit the Connectivity RDS settings to allow public IP access, allowing for external connectivity. Implement the changes immediately.

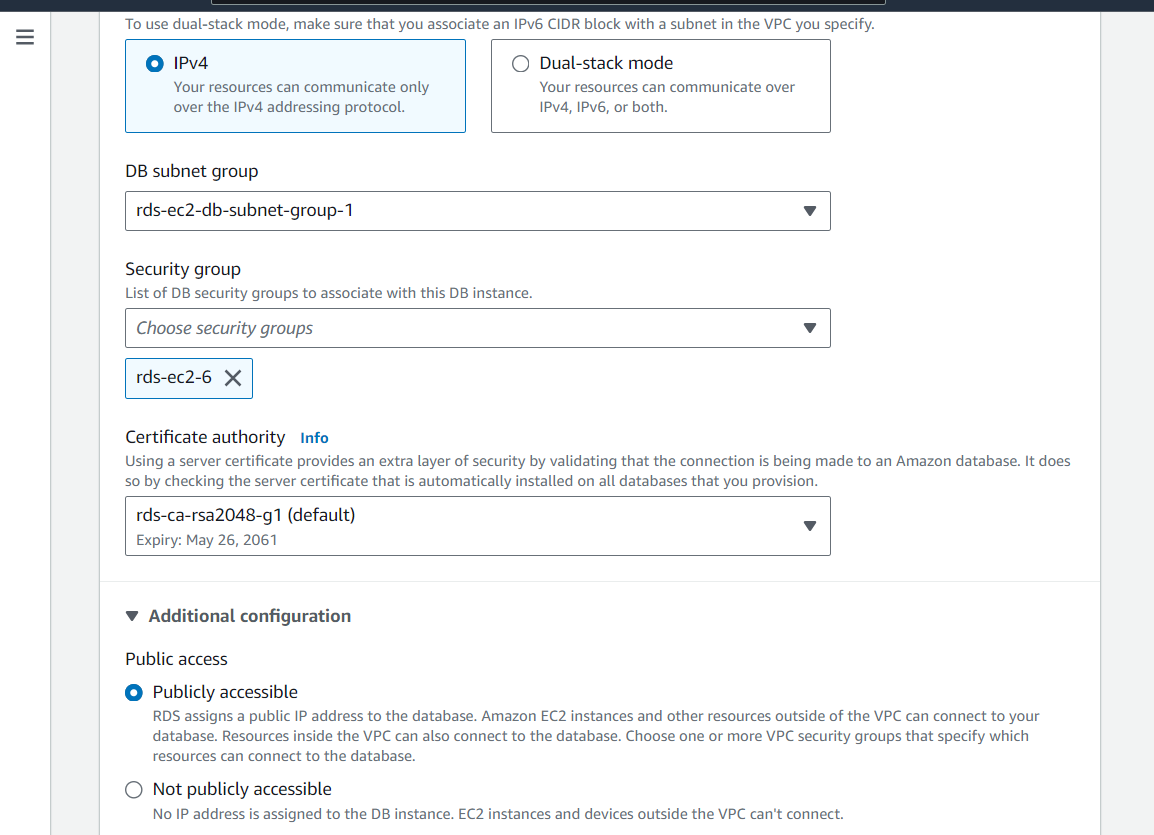
This step ensures that the SonarQube Server application running on the EC2 instance can communicate with the RDS database over the network.
Creating Your AWS Cluster
Let’s now create the AWS cluster for your SonarQube Server deployment. You can use either the AWS CloudShell platform or a connected CLI that has permission to execute commands with your AWS resources.
Start by installing eksctl on your CLI. Using eksctl simplifies the creation of a Kubernetes cluster on AWS EKS by letting you set up your cluster and attached nodes with a single CLI command.
Use the command below to create a named cluster within your selected region:
#structure
eksctl create cluster --name {NAME-OF-CLUSTER} --region {REGION} --version 1.28 --node-ami-
family Ubuntu2004 --vpc-private-subnets={2-PRIVATE-SUBNETS} --vpc-public-subnets={2-PUBLIC-SUBNETS}

#Sample command
eksctl create cluster --name my-cluster --region eu-north-1 --version 1.28 --node-ami-
family Ubuntu2004 --vpc-private-subnets=subnet-024d3a1a6aa9c87ed,subnet-
0af5b646bd53d3eff,subnet-017ec2dc5a6447f77 --vpc-public-subnets=subnet-
04fe9d36a5a4b8586,subnet-007907130b2913505,subnet-0f0bfae32c842346a
It specifies Kubernetes 1.28 as well as the exact Amazon Machine Image (AMI) to use in provisioning your cluster nodes. Add in your cluster name, AWS region, and the subnets.
Specifying the subnets ensures that your Kubernetes cluster and nodes are deployed within the same VPC network as your RDS database, which facilitates communication between your RDS instance and the Kubernetes cluster. You can directly check for subnets under the VPC interface of your AWS console.

The “RDS-Pvt…” subnets are private subnets from when you created your RDS database. You can use two of them for your cluster. The public subnets can be obtained from the instance you created, or you can see any public IPv4-provided subnet within the same VPC as your AWS RDS instance.
After the eksctl command is executed, AWS CloudFormation will take a few minutes to set up your cluster and managed node group.
The final output should look like this:
…
2024-04-23 13:34:46 [i] waiting for at least 2 node(s) to become ready in "ng-fa68b100"
2024-04-23 13:34:46 [i] nodegroup "ng-fa68b100" has 2 node(s)
2024-04-23 13:34:46 [i] node "ip-172-31-10-44.eu-north-1.compute.internal" is ready
2024-04-23 13:34:46 [i] node "ip-172-31-24-227.eu-north-1.compute.internal" is ready
2024-04-23 13:34:47 [i] kubectl command should work with
"/Users/lucienchemaly/.kube/config", try 'kubectl get nodes'
2024-04-23 13:34:47 [✔] EKS cluster "my-cluster" in "eu-north-1" region is ready
Note that giving your cluster the necessary roles and permissions is essential for your SonarQube Server deployment to function. You need Amazon VPC CNI and Amazon EBS to provide networking and create volumes for your cluster, respectively. To use them in your cluster, you must create IAM roles with the necessary policies and attach the addon to your cluster.
Finalizing Database and Cluster Connections
Now that your database and cluster are ready and available for deployment, you’ll ensure they can communicate with each other.
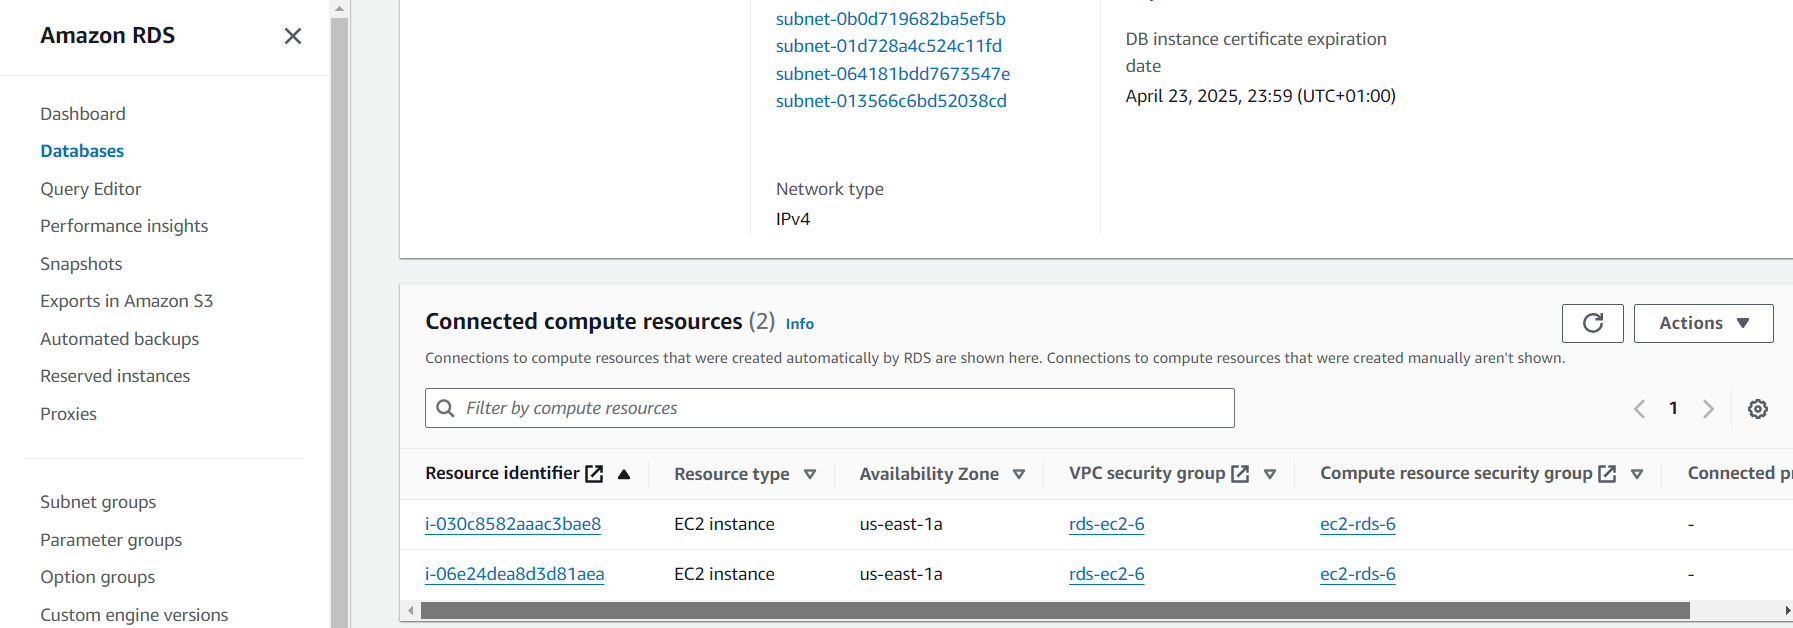
Navigate to your RDS database interface. Scroll down to the Connected instance section. Add one of your cluster node instances, and note which one you use.


Navigate to the instance interface and click on the security group within the interface.
Next, you’ll add inbound and outbound rules to that security group that will allow TCP ports 5432 and 9000—the ones for the Postgres database and your eventual SonarQube Server deployment, respectively. Click Add rule, and edit your port range (ie 5432) and source address (ie 0.0.0.0/0).


Your security group should look like this when you’re done:

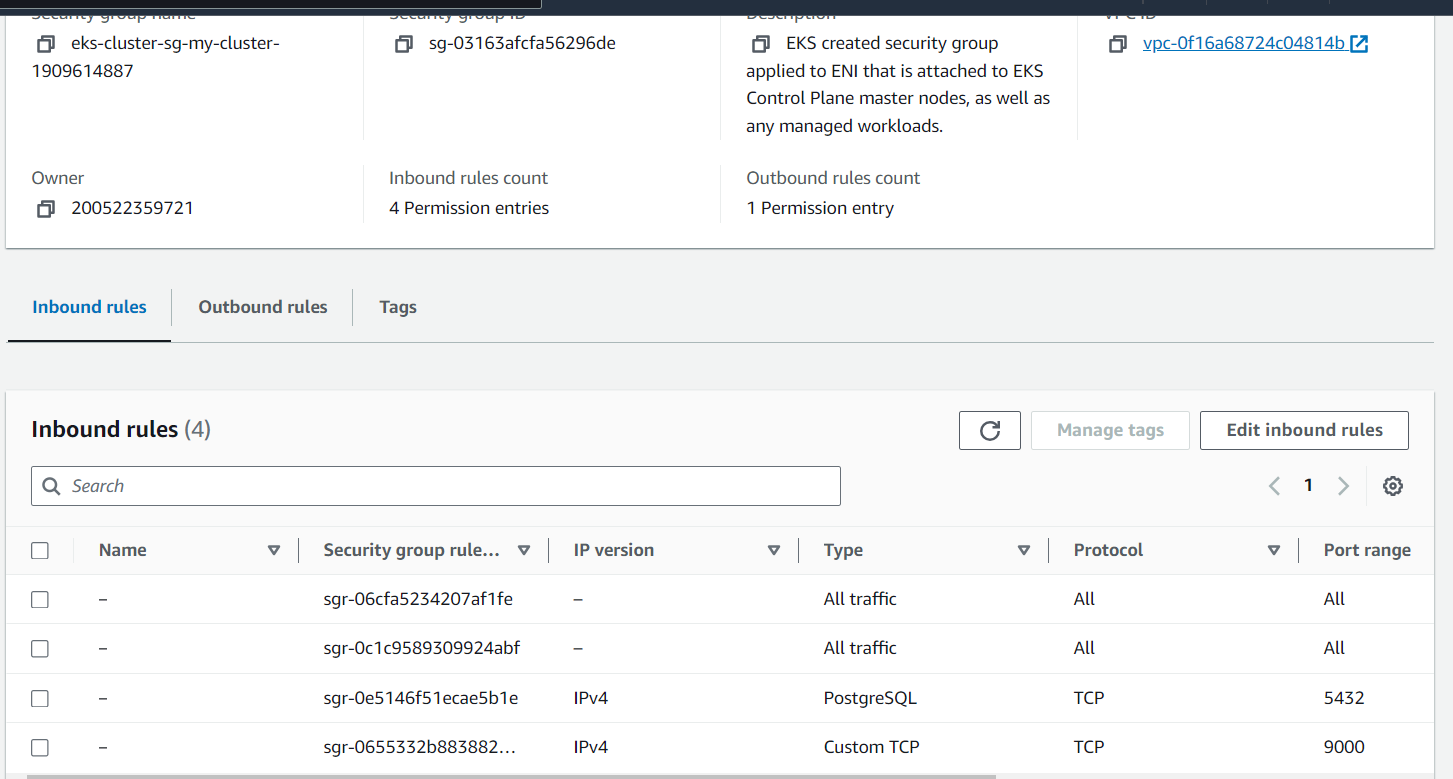
This allows you to connect to your database from within the instance and access your SonarQube Server deployment publicly.
Deploy SonarQube Server Enterprise Edition
Check that your EKS cluster is set up with actively running nodes using this command:
kubectl get nodes -o wide

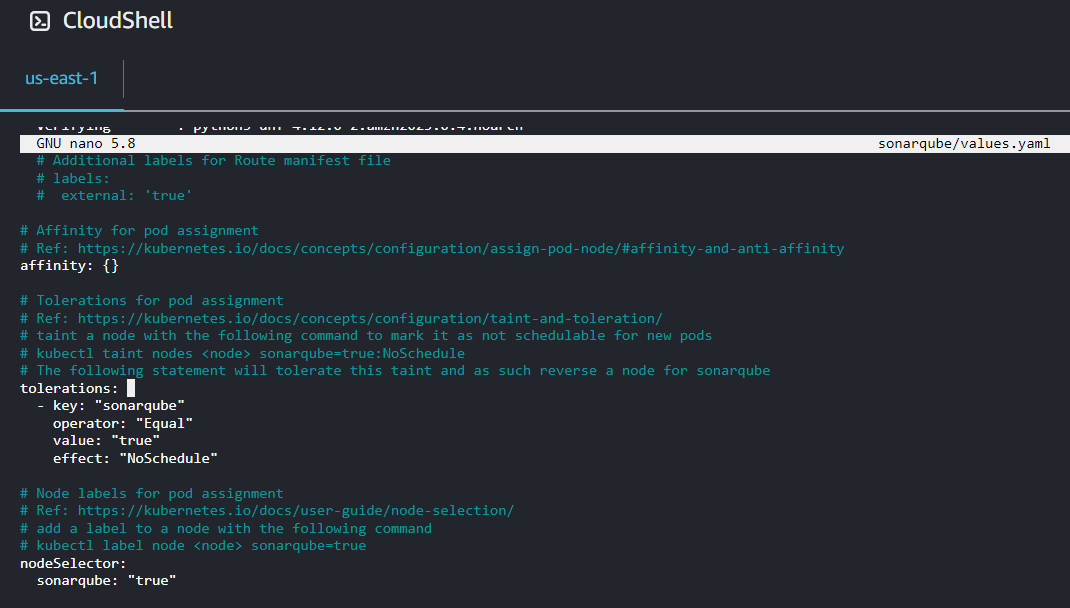
It lists all nodes in your cluster and their health status. It is recommended that you assign a node for your SonarQube Server deployment to occupy. You can restrict your orchestrator from assigning jobs to a node by giving it a taint. Let’s use this to explicitly choose the node with an attached instance that you connected to your RDS earlier.
Here’s a sample command to taint a node for SonarQube Server:
kubectl taint nodes <node id> sonarqube=true:NoSchedule

Once tainted, the node is restricted from taking on new jobs. To fully assign it to your SonarQube Server deployment, you have to configure SonarQube Server to ignore the taint. Adding a node selector label helps with that. Here‘s an example command labeling a specific node for your SonarQube Server deployment:
kubectl label node <node id> sonarqube=trueAfter ensuring your cluster and nodes are ready, you can install SonarQube Server using Helm.
First, you must install Helm. The following commands download the Helm installation package, change file permissions to better suit your environment, and then execute the installation:
curl https://raw.githubusercontent.com/helm/helm/master/scripts/get-helm-3 > get_helm.sh
chmod 700 get_helm.sh
./get_helm.sh
Once Helm is installed, download the Sonar-managed Helm chart for SonarQube Server that contains all the parameters to deploy simple and advanced use cases of SonarQube Server.
The commands below add the code repository as a valid source for Helm charts within your environment, update the internal listing of valid Helm charts, and then pull and extract the SonarQube Server Helm chart. You’re extracting the Helm chart to edit the default variables to better suit your deployment.
helm repo add sonarqube https://SonarSource.github.io/helm-chart-sonarqube

helm repo update

helm pull sonarqube/sonarqube --untar
Use the following command to access and view the Yaml file containing your SonarQube Server installation settings:
nano sonarqube/values.yamlChange the following variables for your deployment:
- Change the edition parameter from “community” to “enterprise”. You are deploying the Enterprise edition of SonarQube Server, so you need to specify that here.
- Remove comments (i.e. # hashtags) from the taint toleration and node label section since you have added taints and node selector labels to your cluster node. You can use the commented-out text, which instructs your SonarQube Server deployment to select a particular node. Remember to remove the empty brackets that represent no available taints and labels for the default deployment.

- Set memory and ephemeral storage requests to 5G, which are the recommended settings for the enterprise edition.
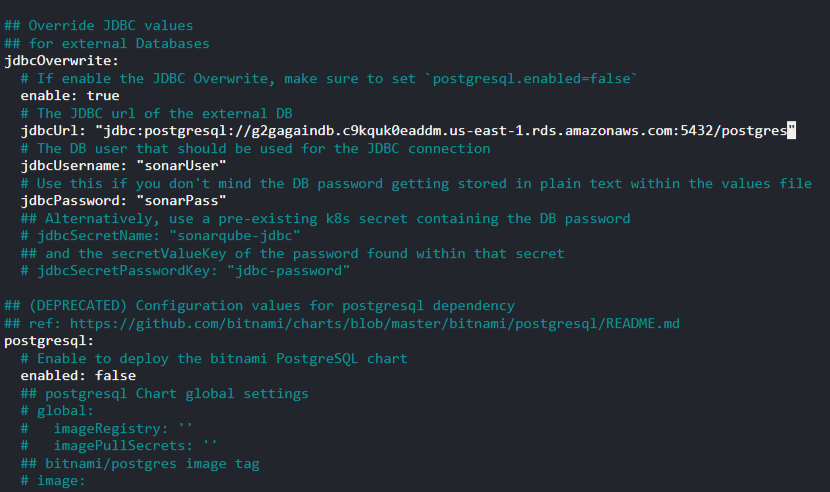
- Set JDBC overwrite to
true. The default deployment uses a limited Postgres instance as its database. You can connect your external database using the JDBC parameters in this section. Add your URL endpoint (egjdbc:postgresql://<rds_endpoint>:<port>/postgres), master username, and password. While setting this variable totrueshould overwrite the default setting, you can also manually change the postgres.enabled section tofalse.

Once your installation file is edited and saved, create a Kubernetes namespace for your SonarQube Server deployment:
kubectl create namespace sonarqubeNext, run the following command to install SonarQube Server on your cluster in the namespace you created:
helm install -n sonarqube sonarqube sonarqube/It initializes the SonarQube Server application in your Kubernetes environment, making it accessible for code analysis and quality management tasks.
Use the following command to check on your deployment:
kubectl get pods -o wide -n sonarqubeIt might take a while to be Running and Ready.


Depending on the privacy and networking details of your Kubernetes cluster, communicating with your SonarQube Server deployment outside your cluster can be an issue. These issues typically arise when external access to the SonarQube Server service is restricted due to network policies or security constraints within the cluster. If you experience such an issue, set up an Ingress to enable external traffic to reach your cluster deployments. The official SonarQube Server helm chart also offers an Ingress configuration.
Deploy an Ingress controller, configure your chosen DNS to this controller load balancer IP, and then add your DNS name to the Ingress host section in the helm chart.


Update the changes to your deployment with the following command:
helm upgrade --install -n sonarqube sonarqube sonarqube/Use your DNS address with your deployed port, 9000, to access your SonarQube Server instance (ie http://{yourIP}:9000).
When you log in for the first time, your login details for the username and password are both admin. After signing in for the first time you will be required to change the admin password.


The enterprise edition also requires a license. You can request your license with your SonarQube Server ID.


If you want to stop ongoing charges for the resources you deployed in this tutorial, you can stop and delete your cluster using the following command:
eksctl delete cluster --name {my-cluster}When you are done with this tutorial, you will need to manually delete the RDS database deployment and the EC2 instance attached to it using the AWS console.
Conclusion
In this guide, you saw how to install the SonarQube Server Enterprise Edition in an AWS EKS cluster by deploying on a single node and configuring it with its dependencies to enable an efficient deployment.
While this demonstration is a good starting point for operating SonarQube Server in a Kubernetes cluster, we recommend SonarQube Server Data Center Edition (DCE) to take full advantage of autoscaling in a Kubernetes cluster. Running SonarQube Server DCE in your EKS cluster allows you to dynamically scale SonarQube Server resources according to demand and changing workloads, which is especially important for large organizations with many projects and large codebases. SonarQube Server provides a similar Helm chart to the one used in this tutorial specifically for SonarQube Server DCE to ensure easy deployments.
Are you not already using SonarQube Server Data Center Edition? Contact sales to request a demo and ask for a 14-day trial.