
Start your free trial
Verify all code. Find and fix issues faster with SonarQube.
Get startedTL;DR overview
- Quality gates are predefined thresholds in SonarQube Server that automatically block code from advancing in a CI/CD pipeline when it fails criteria such as bugs, vulnerabilities, or code coverage below 80%.
- The default Sonar Way quality gate uses the quality code approach, requiring a reliability, security, and maintainability rating of A on all new or modified code.
- Integrating quality gates into CI/CD pipelines enforces standards continuously, reducing production risk and encouraging developers to fix issues within their own pull requests.
- This guide covers SonarQube Server project setup, GitHub Actions integration, and verification of quality gate results.
Quality gates are predefined criteria that ensure only high-quality code progresses through the development pipeline. Integrating quality gates into your CI/CD pipelines ensures these checks are performed automatically and continuously, which reduces the risk of bugs and vulnerabilities in production and improves software reliability and security.
In this article, you’ll learn how to integrate quality gates into your CI/CD pipeline using SonarQube Server, an open source platform that enables continuous static analysis of code to detect bugs, security vulnerabilities, and code smells across various programming languages.
SonarQube Server helps in the early detection of these issues, ensuring the delivery of high-quality software with improved security and maintainability.
Understanding Quality Gates
Quality gates in SonarQube Server are sets of predefined conditions and thresholds that let you determine whether the project is ready to be released. Thresholds define the acceptable levels for each condition, and if any condition fails to meet its threshold, the quality gate prevents the code from advancing in the pipeline.
Quality gates use a combination of metrics such as code coverage, code duplications, and the presence of bugs or vulnerabilities:
- The code coverage metric checks test coverage on newly added code. If it’s lower than the specified threshold, the check fails.
- The bugs metric evaluates the new bugs and total number of bugs in the project. It calculates a reliability rating based on the bug’s severity.
- The vulnerabilities metric identifies potential security weaknesses in the codebase and calculates a security rating for it.
SonarQube Server, by default, uses the Sonar way quality gate, which follows the Clean as You Code (CaYC) approach.
The principle of CaYC is to focus on maintaining high code-quality standards for any newly added code or existing code that is modified along the way.
A CaYC quality gate fails if any of these are true:
- The number of issues exceeds 0.
- The reliability, security, or maintainability rating is below A.
- The percentage of duplicated lines of code is above the set threshold.
- Code coverage for newly added code is below the set threshold. By default, this threshold is set to 80 percent.
- Any new security hotspots are not reviewed.
If the CaYC conditions are not met during code analysis, the quality gates for your project will fail.
Generally, code analysis is performed using CI/CD pipelines.
You can add a quality gate check to your pipeline to ensure the release is only performed if the quality gates pass.
Blocking releases on quality gates forces developers to fix newly introduced issues in their changes.
Prerequisites
Before starting, you need to prepare the following:
- Install Java on your development machine.
- Fork the starter code for a Gradle-based Java project. Make sure to uncheck the Copy the main branch only option while forking so that all branches are copied.
- Set up a SonarQube Server instance. You will need a remote URL to connect your instance with GitHub Actions. If you run it locally, you can use ngrok or a similar service to obtain a remote URL.
- Generate a SonarQube Server global analysis token.
You also need access to GitHub Actions and familiarity with its configuration syntax.
Setting Up the SonarQube Server Project
There are several ways to add a project in SonarQube Server. This tutorial uses the manual setup option on the SonarQube Server dashboard.
Click on Create Project > Local Project to add a new project to SonarQube Server. Fill in the display name, project key, and default branch name to add the project.

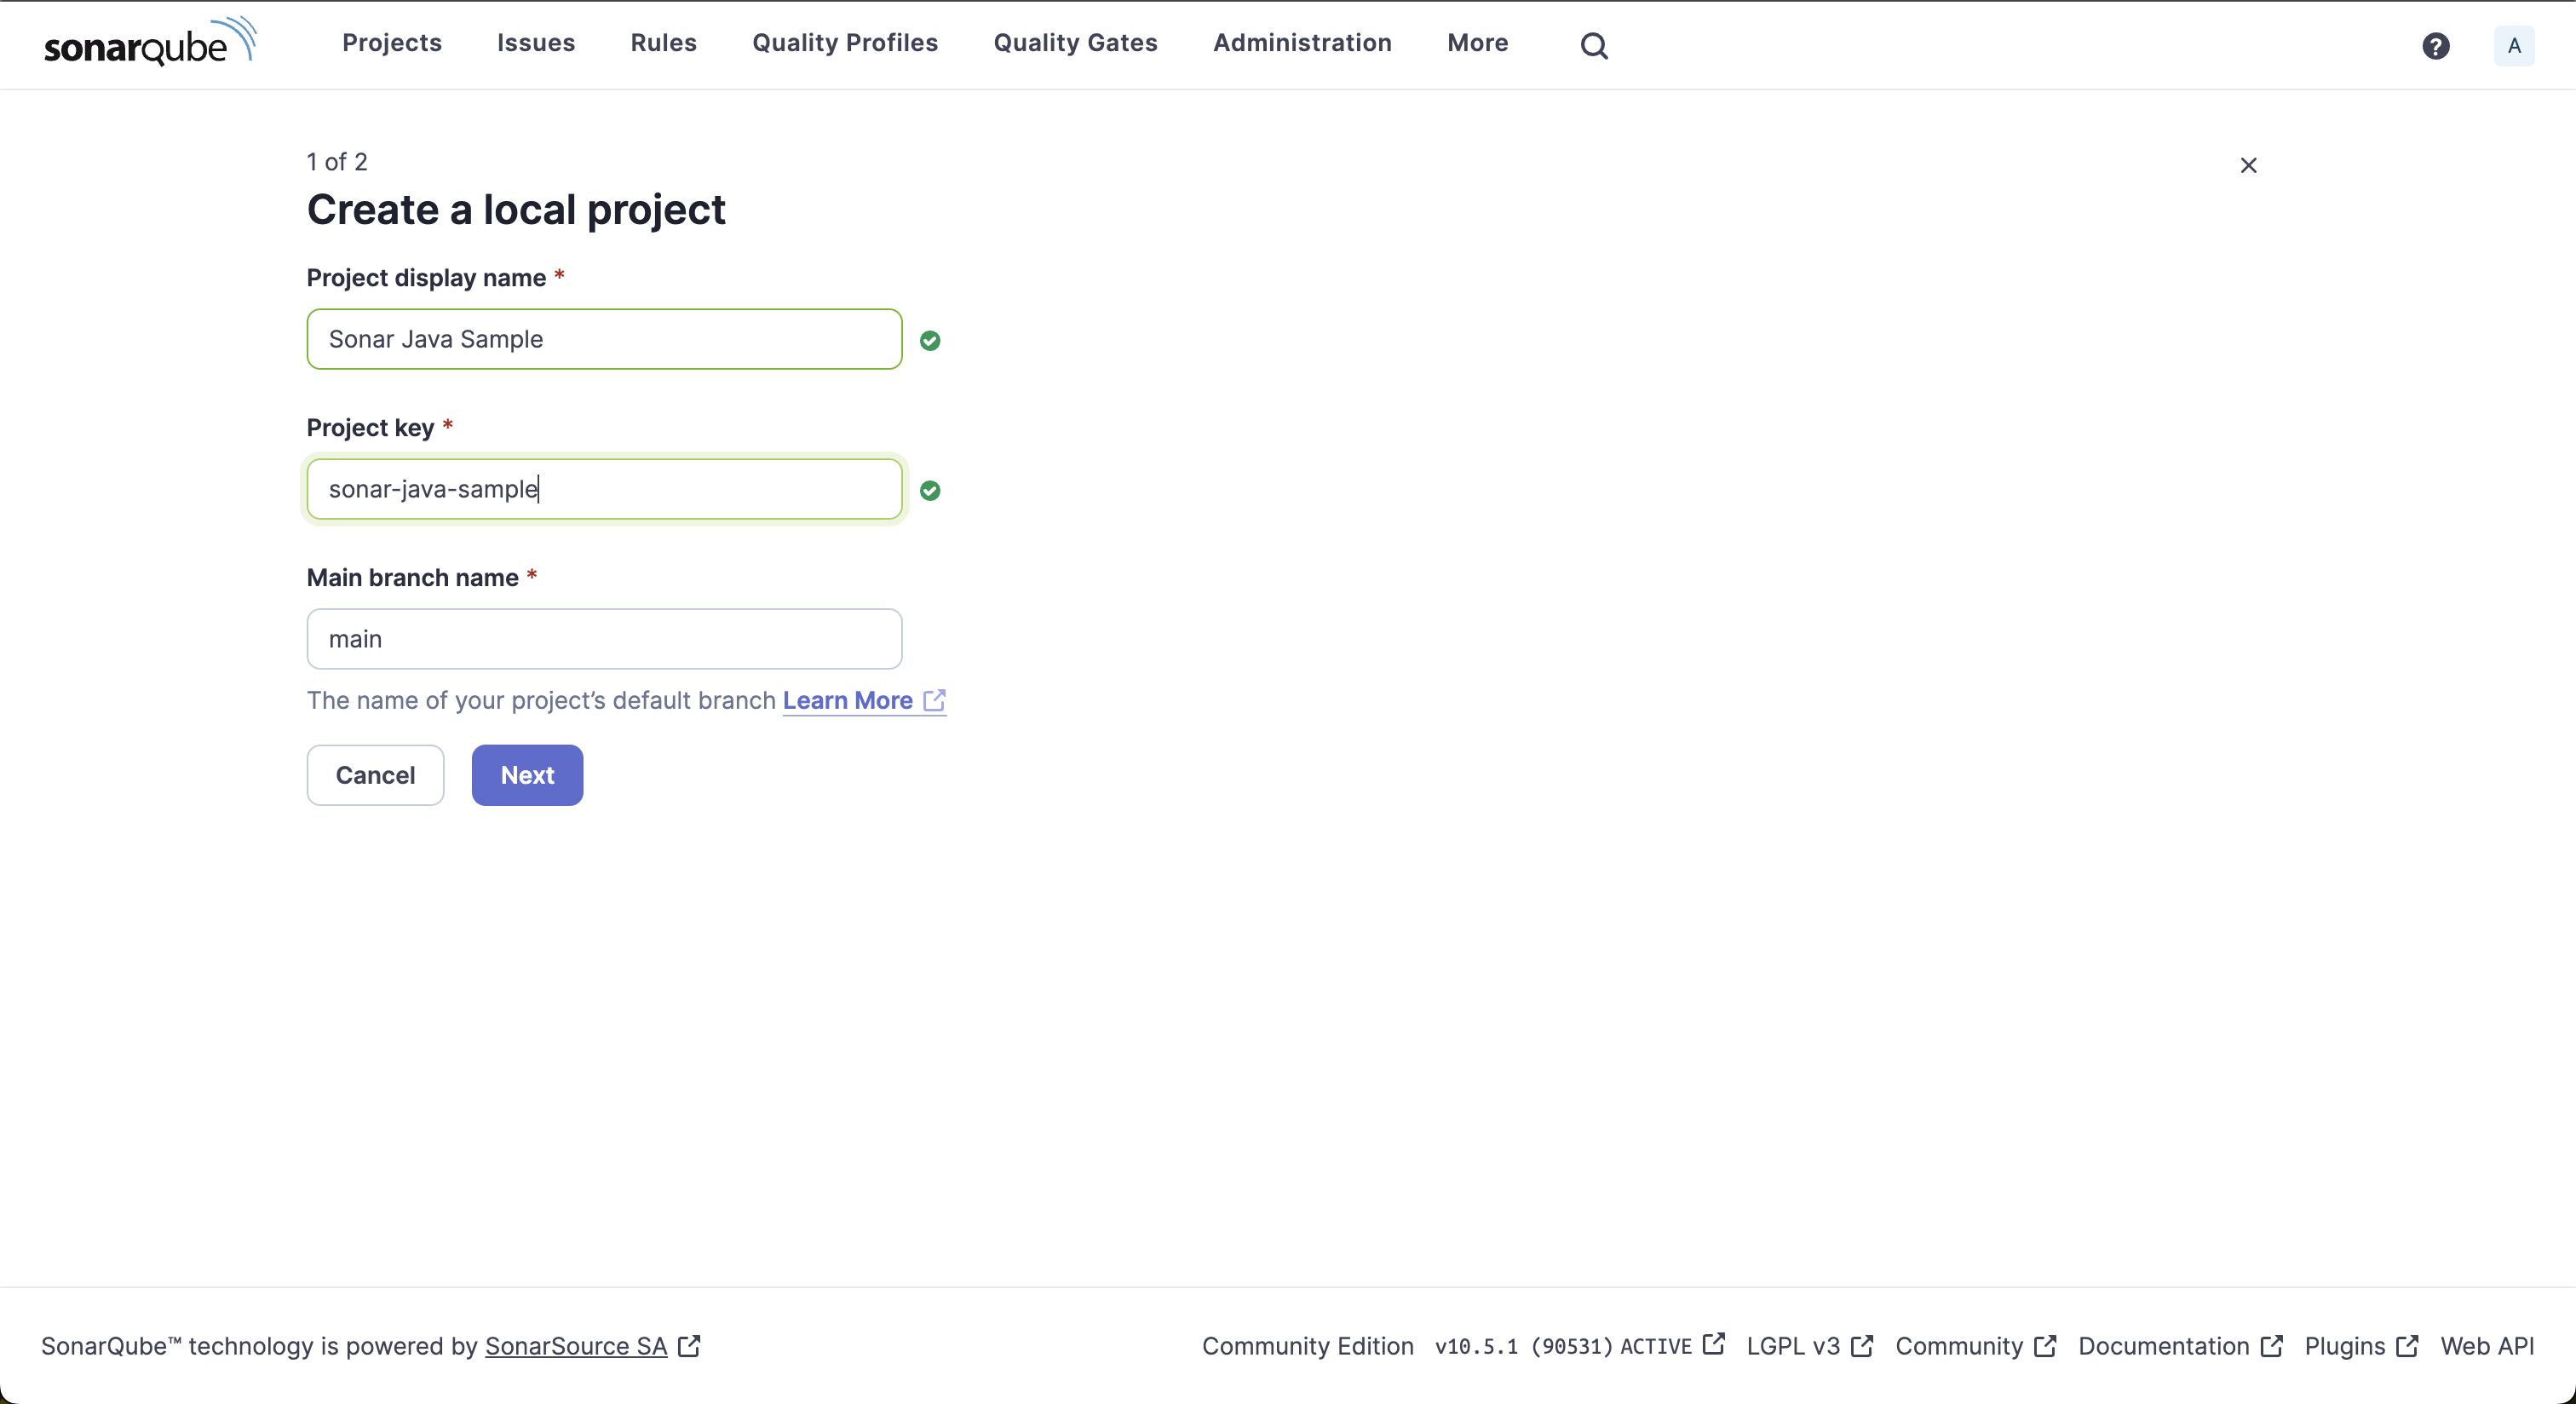
Note: If you’ve set up a new instance of SonarQube Server, you can create your first project by selecting the Create a local project option on the welcome screen.
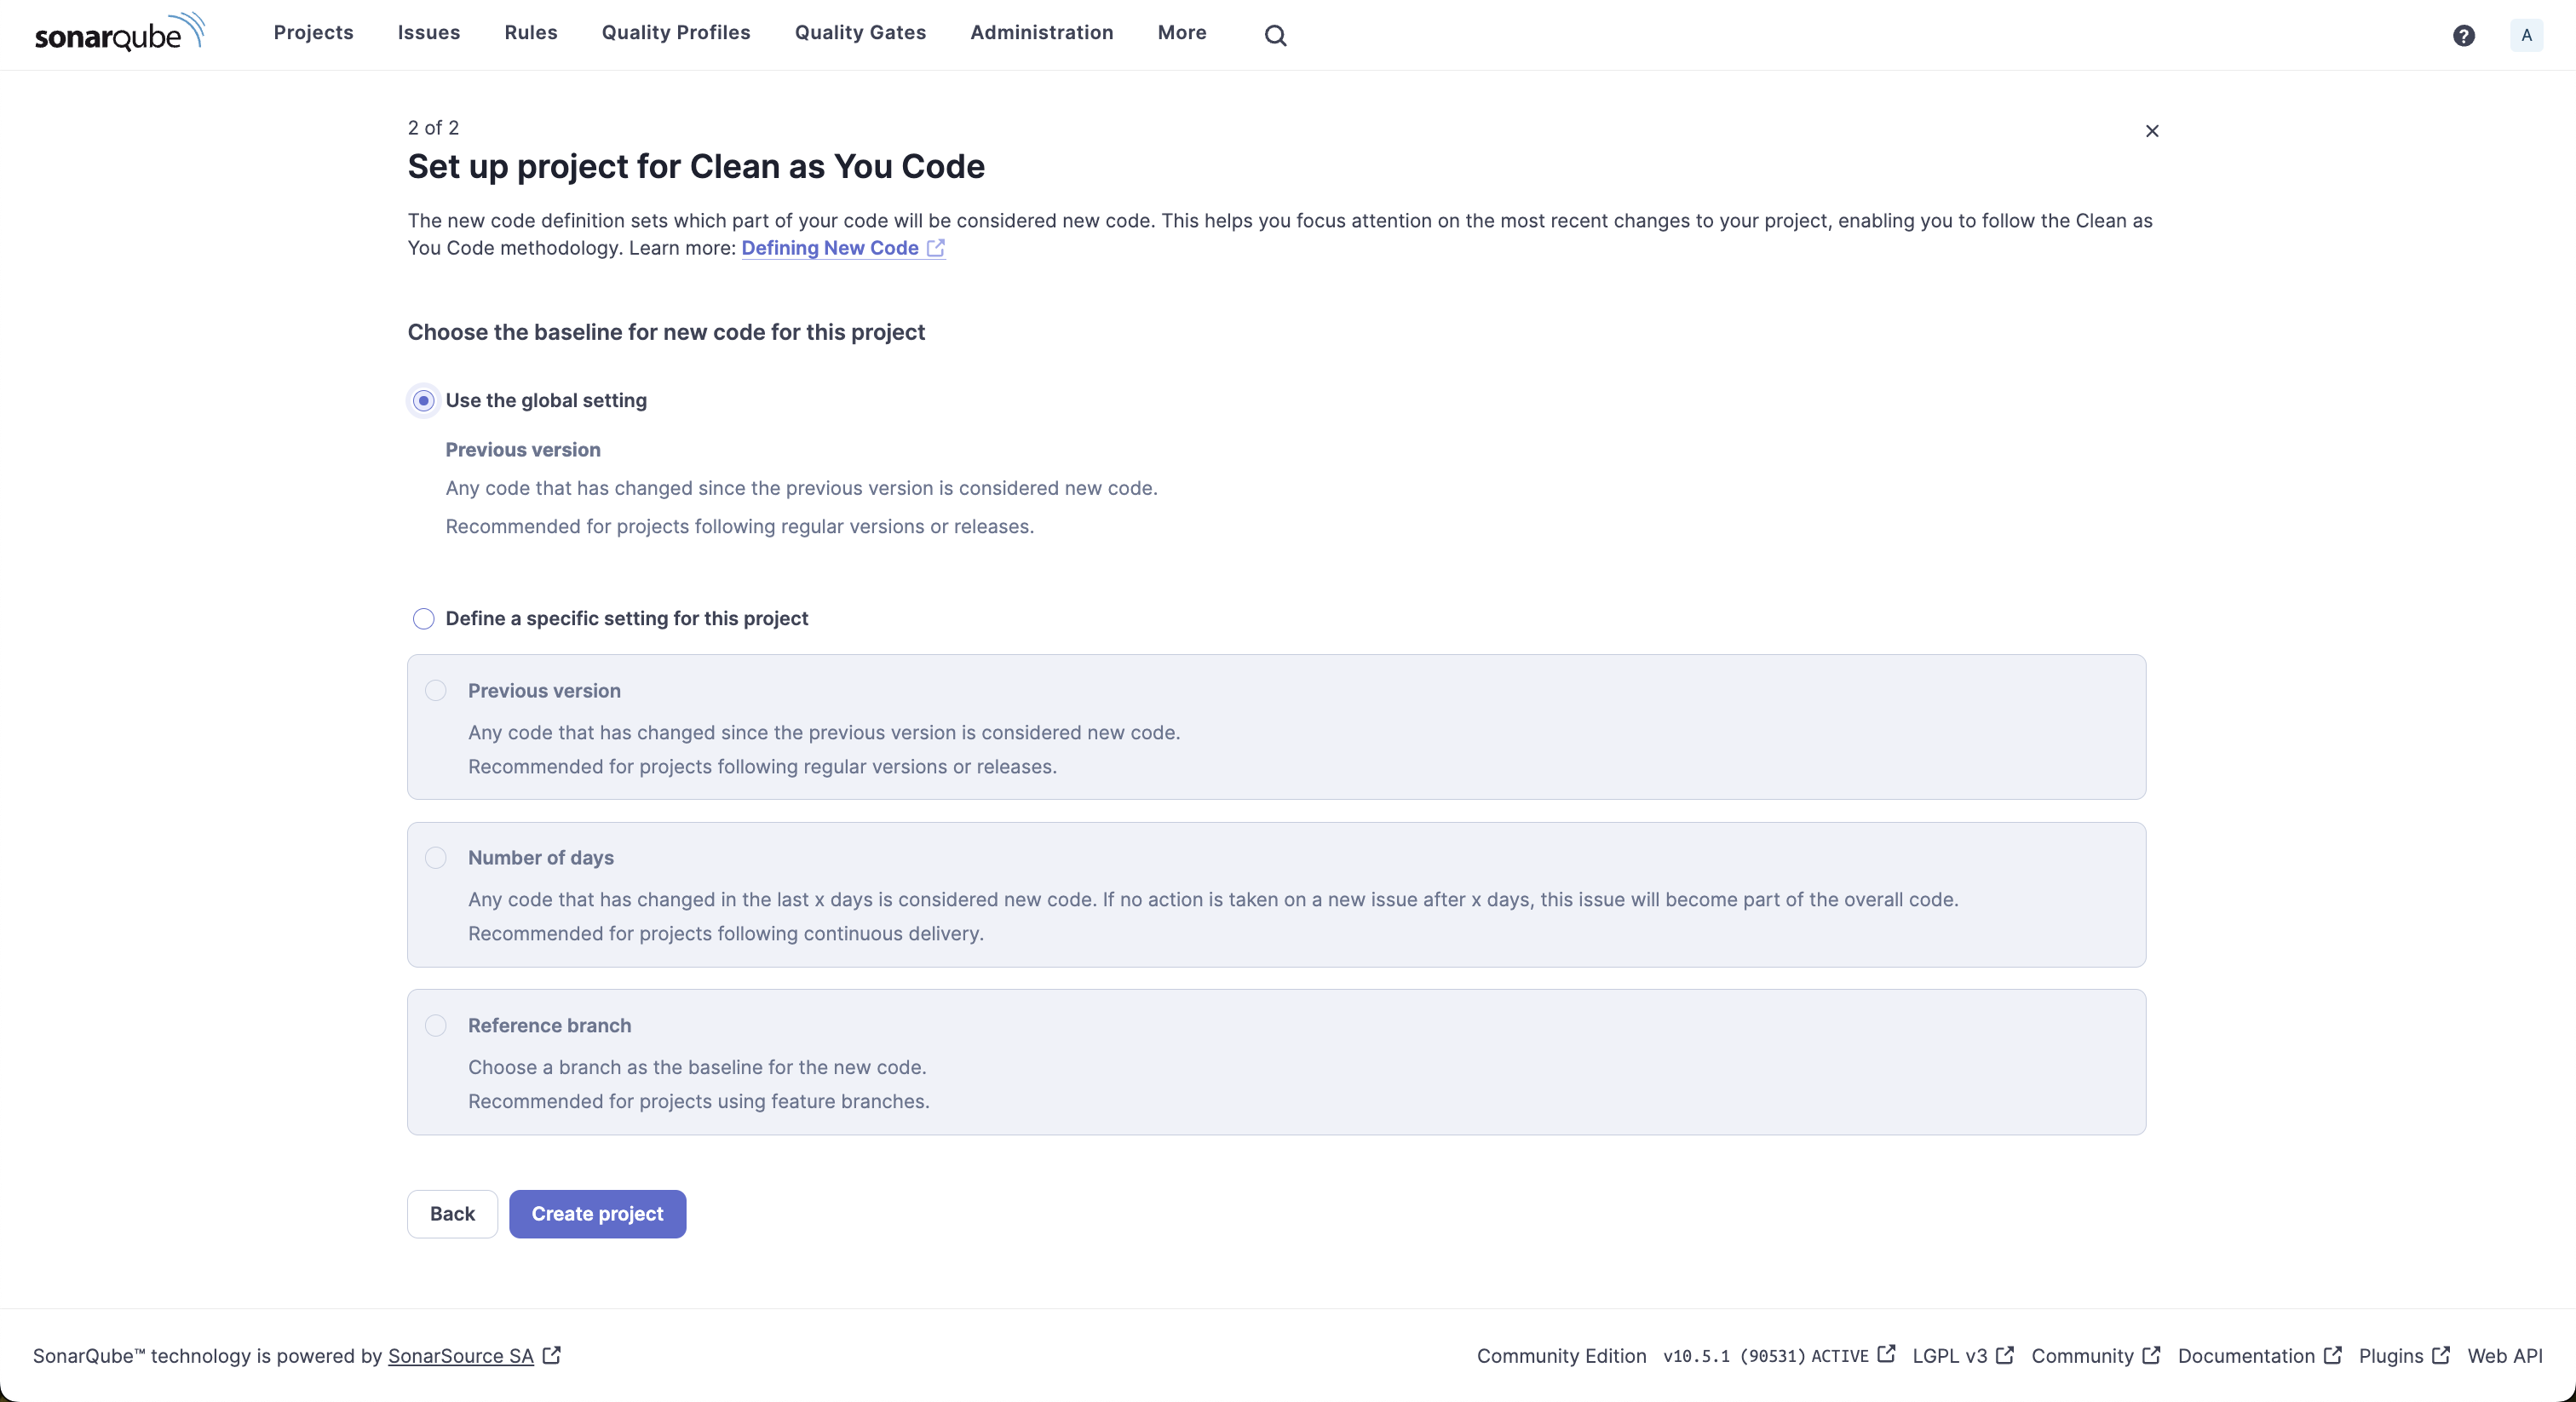
The next screen lets you configure which part of your code should be considered new.
Choose Use the global setting and click Create Project to complete the creation of a new project.

The next screen prompts you to choose the Analysis Method, which will be covered in later sections.
Skip selecting any of the options and navigate to Project Settings > General Settings to set the project language and optionally edit other settings:
- Select the Languages tab and use the language dropdown to choose Java as the project language. You can optionally edit the file suffixes to restrict the scope of analysis to files matching a set of extensions.
- You can configure exclusions for the project under the Analysis Scope tab if you want to exclude specific source files from analysis. This can be used to exclude generated code, library-specific code, or test files from analysis. SonarQube Server offers various options to precisely configure the scope of analysis and its parameters, aiding in narrowing down the focus as needed.
As you learned in the previous section, the Sonar way quality gate will be used for your project by default.
To view, edit, or create a quality gate, navigate to the Quality Gates tab on the SonarQube Server dashboard.
This tab displays the built-in Sonar way quality gate, which is not editable.
Use the Copy button to duplicate this configuration to a new quality gate profile.
Under the new profile, click Unlock editing to enable editing options for all conditions.
When you click on Add condition, you can choose a quality gate you wish to add.
For illustrative purposes, add a quality gate for code smells to block releases if the number of code smells exceeds 0 on the overall code.

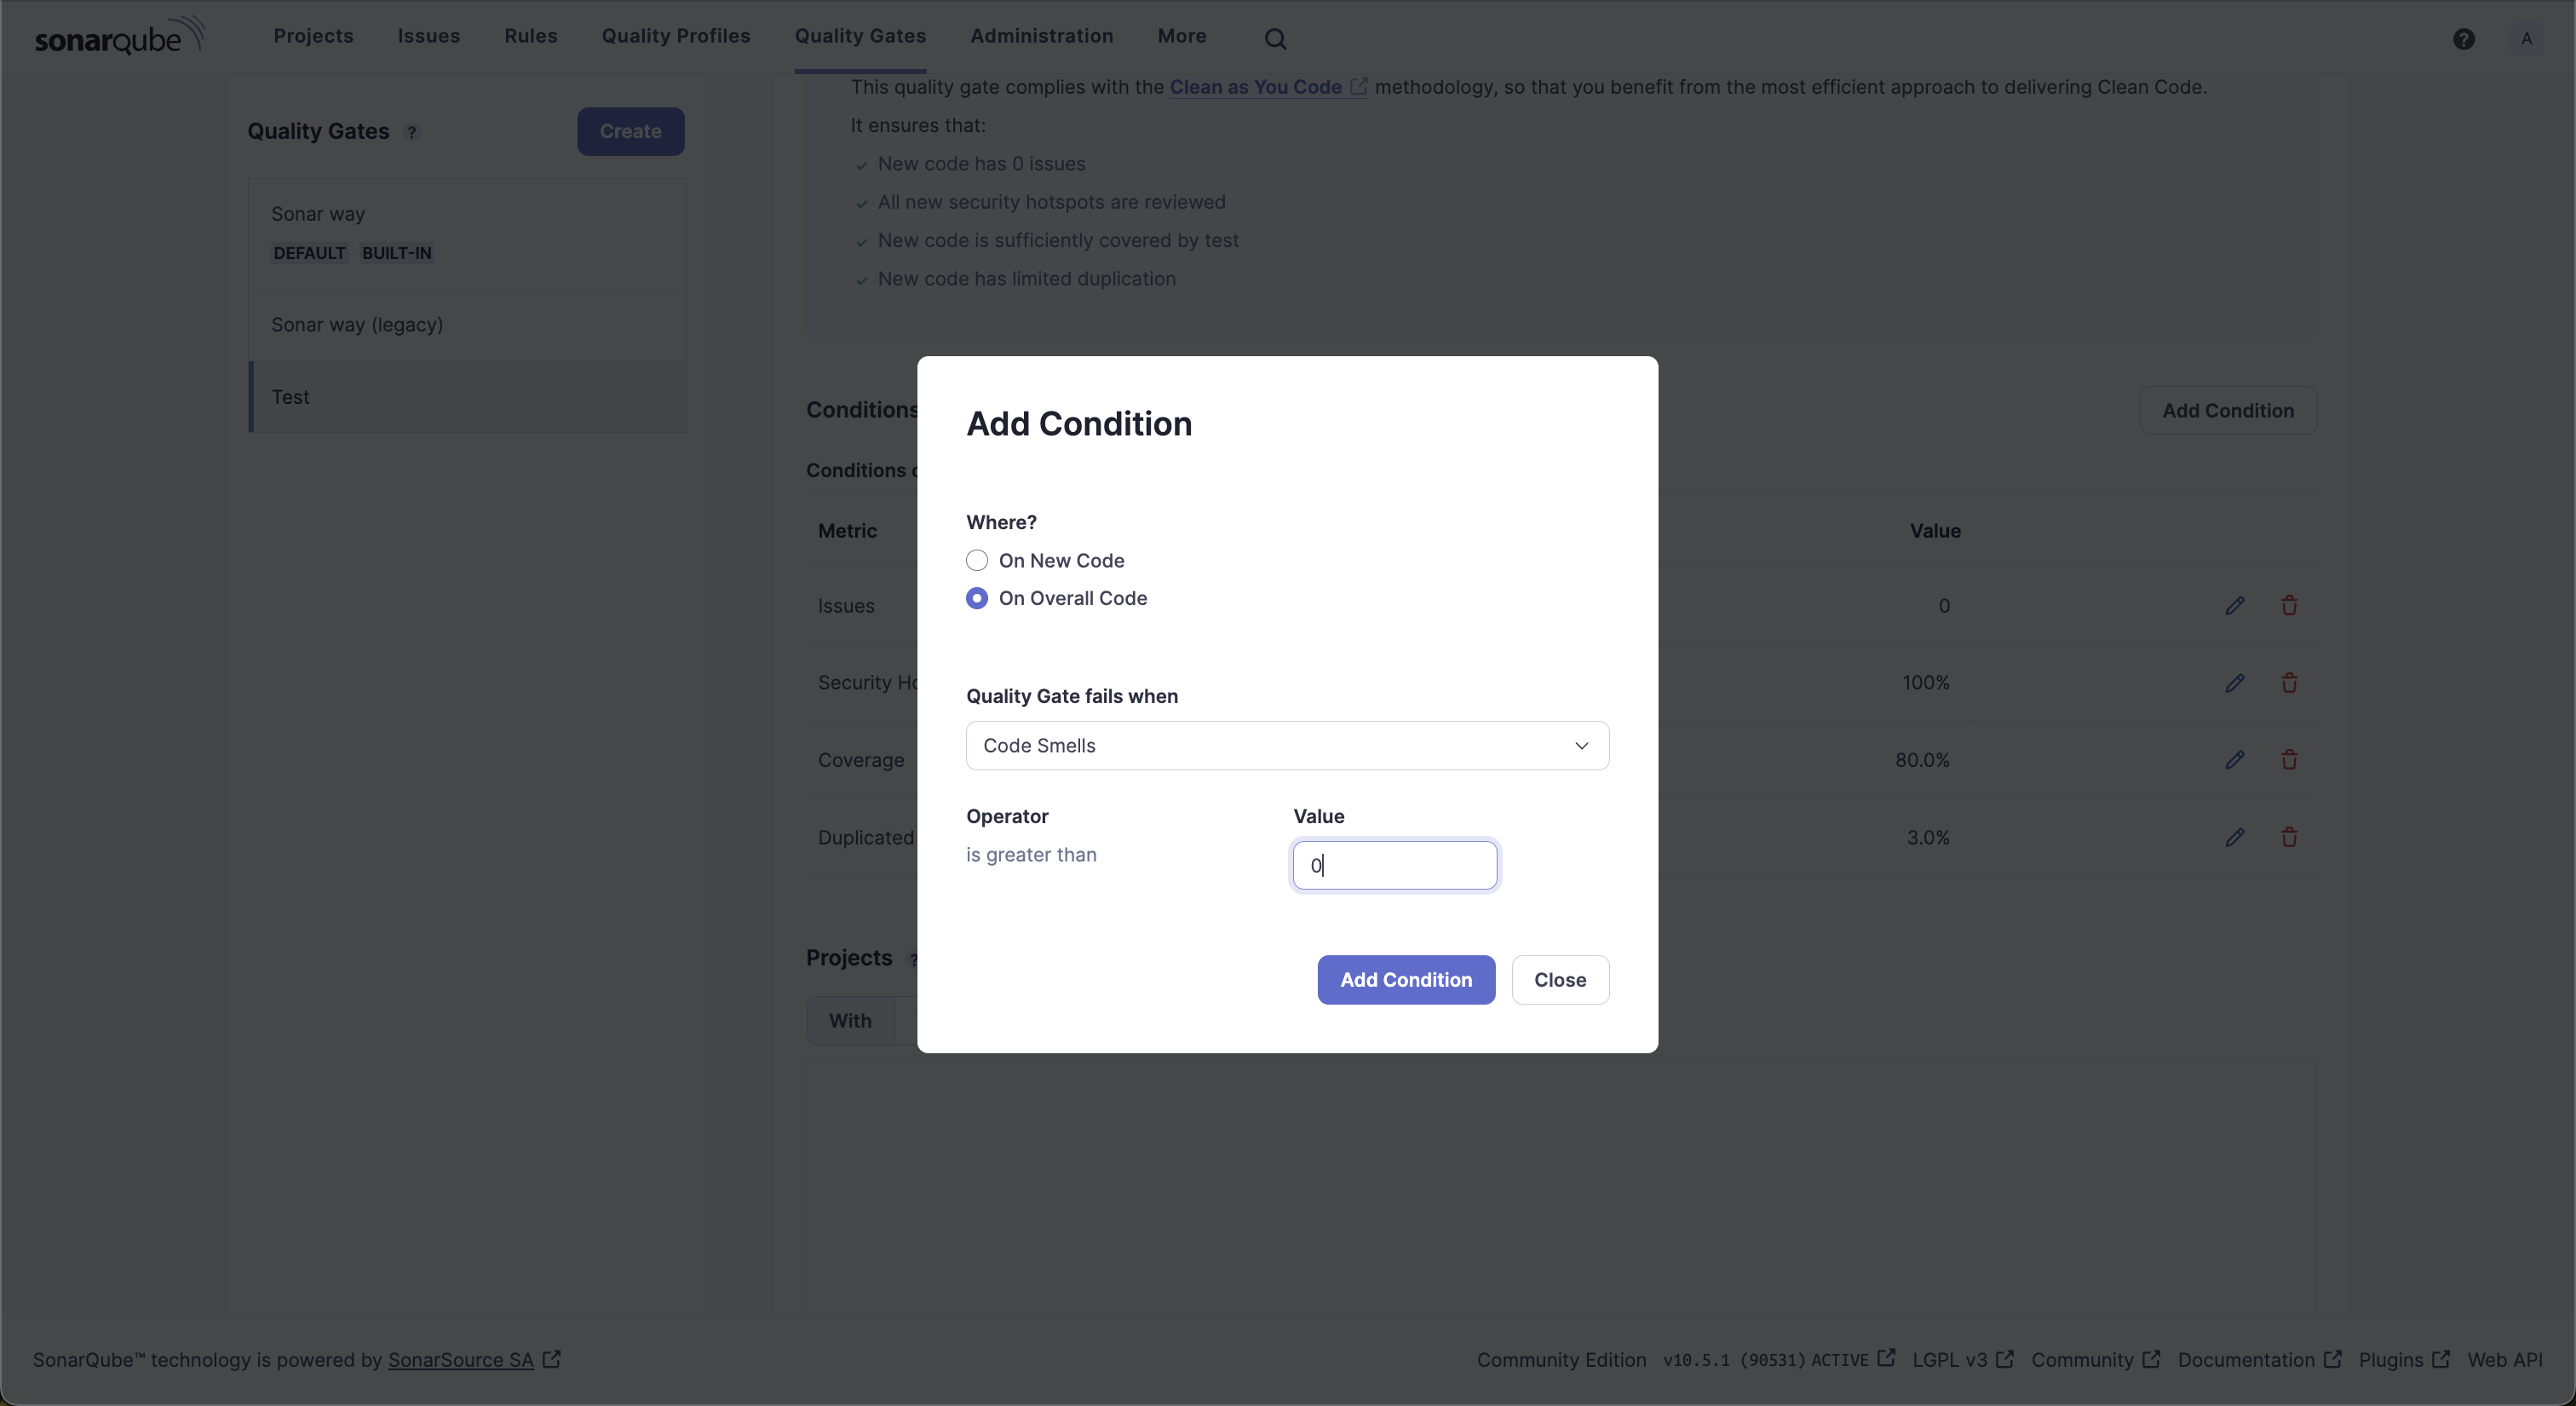
You can use the same steps to add other quality gates to either newly added code or overall code.
Integrating Your CI/CD Platform with Your Project
You can integrate SonarQube Server with your CI/CD pipeline for continuous code analysis and quality gate checks. SonarQube Server natively supports CI/CD integration with multiple platforms:
- Jenkins: For centralized installation on Jenkins, you can use the SonarQube Server Scanner plugin. It enables the scanner to be set up directly from the Jenkins dashboard. You can learn more about the integration details in this guide.
- GitLab: You can integrate GitLab projects with SonarQube Server for quality and security analysis of your GitLab projects. Follow this guide for integration instructions.
- BitBucket: You can integrate BitBucket Server or BitBucket Cloud repositories with SonarQube Server for continuous analysis.
- GitHub: You can register SonarQube Server as a GitHub app in your organization to enable it globally or use the SonarQube Server GitHub Actions scanner plugin to add it to a specific project.
In this tutorial, you’ll configure the SonarQube Server GitHub Actions scanner plugin to trigger code analysis and quality gate evaluation.
Creating Secrets
The SonarQube Server GitHub Actions scanner plugin needs the URL of the SonarQube Server instance and the project token for authentication. You can add these values as GitHub Actions secrets and use them in your GitHub Actions workflow.
For more details on creating secrets, including encrypted secrets, refer to the GitHub secrets docs.
To add new secrets, navigate to your GitHub repo’s Settings > Secrets and Variables > Actions page.
Add the following secrets to it:
- Replace
SONAR_TOKENwith the value of the token you generated previously. - Replace
SONAR_HOST_URLwith the URL of your SonarQube Server instance.
Configuring GitHub Actions Workflows
The starter code you previously cloned is a Gradle-based Java project. You’ll now add a config file with a GitHub workflow to build the Java app and run static analysis on it.
Navigate to the root of the project and create a file named .github/workflows/build.yml with the following content:
name: Analyze
on:
  push:
    branches:
      - main # the name of your main branch
  pull_request:
    types: [opened, synchronize, reopened]
jobs:
  build:
    name: Build
    runs-on: ubuntu-latest
    steps:
      - uses: actions/checkout@v4
        with:
          fetch-depth: 0
      - name: Set up JDK 17
        uses: actions/setup-java@v1
        with:
          java-version: 17
      - name: Cache Gradle packages
        uses: actions/cache@v1
        with:
          path: ~/.gradle/caches
          key: ${{ runner.os }}-gradle-${{ hashFiles('**/*.gradle') }}
          restore-keys: ${{ runner.os }}-gradle
      - name: Build project with Gradle
        run: ./gradlew build
The workflow contains the build job that checks the repo and builds the application.
Note that the workflow is configured to execute when any of the following events occur:
- A new commit is pushed to the
mainbranch. - A pull request is opened, synced, or reopened.
Add the SonarQube Server Scan Plugin
Next, you’ll add the SonarSource SonarQube Server-scan-action to scan the project.
Add the following code snippet after the build step in the .github/workflows/build.yml file:
# Add this after the build step
- name: SonarQube Scan
  uses: sonarsource/sonarqube-scan-action@master
  env:
    SONAR_TOKEN: ${{ secrets.SONAR_TOKEN }}
    SONAR_HOST_URL: ${{ secrets.SONAR_HOST_URL }}
  with:
    args: >
      -Dsonar.projectKey=sonar-java-sample
      -Dsonar.sources=src/main
      -Dsonar.tests=src/test
The code snippet above does the following:
- It sets the
SONAR_TOKENandSONAR_HOST_URLenvironment variables using the secrets you created in the previous section. - You can pass arguments to the plugin to customize its behavior. The code snippet above sets the project name and key corresponding to the SonarQube Server project you created earlier.
- It also includes arguments for setting the project’s
sourcesandtestsdirectories.
Add the Quality Gate Plugin
Next, you’ll add the SonarSource SonarQube Server-quality-gate-action to perform quality gate checks.
After the SonarQube Server scan step, add the following code snippet to the .github/workflows/build.yml file:
# Add this after the SonarQube Scan step
- name: SonarQube Quality Gate check
  id: sonarqube-quality-gate-check
  uses: sonarsource/sonarqube-quality-gate-action@master
  # Force to fail step after specific time.
  timeout-minutes: 5
  env:
    SONAR_TOKEN: ${{ secrets.SONAR_TOKEN }}
    SONAR_HOST_URL: ${{ secrets.SONAR_HOST_URL }}

- name: "SonarQube Quality Gate Status"
  run: echo "The Quality Gate status is ${{ steps.sonarqube-quality-gate-check.outputs.quality-gate-status }}"
This step checks the quality gate status for your project and ensures that subsequent steps are skipped if the check fails.
Verifying Integration and Results
Now that you’ve configured your GitHub Actions workflow, you can verify the integration by pushing code to GitHub and reviewing the code analysis results using the SonarQube Server dashboard.
To trigger the execution of your GitHub Actions workflow, push your changes to the main branch. Navigate to your GitHub repo’s Actions tab and click on the latest workflow run to view the execution status.

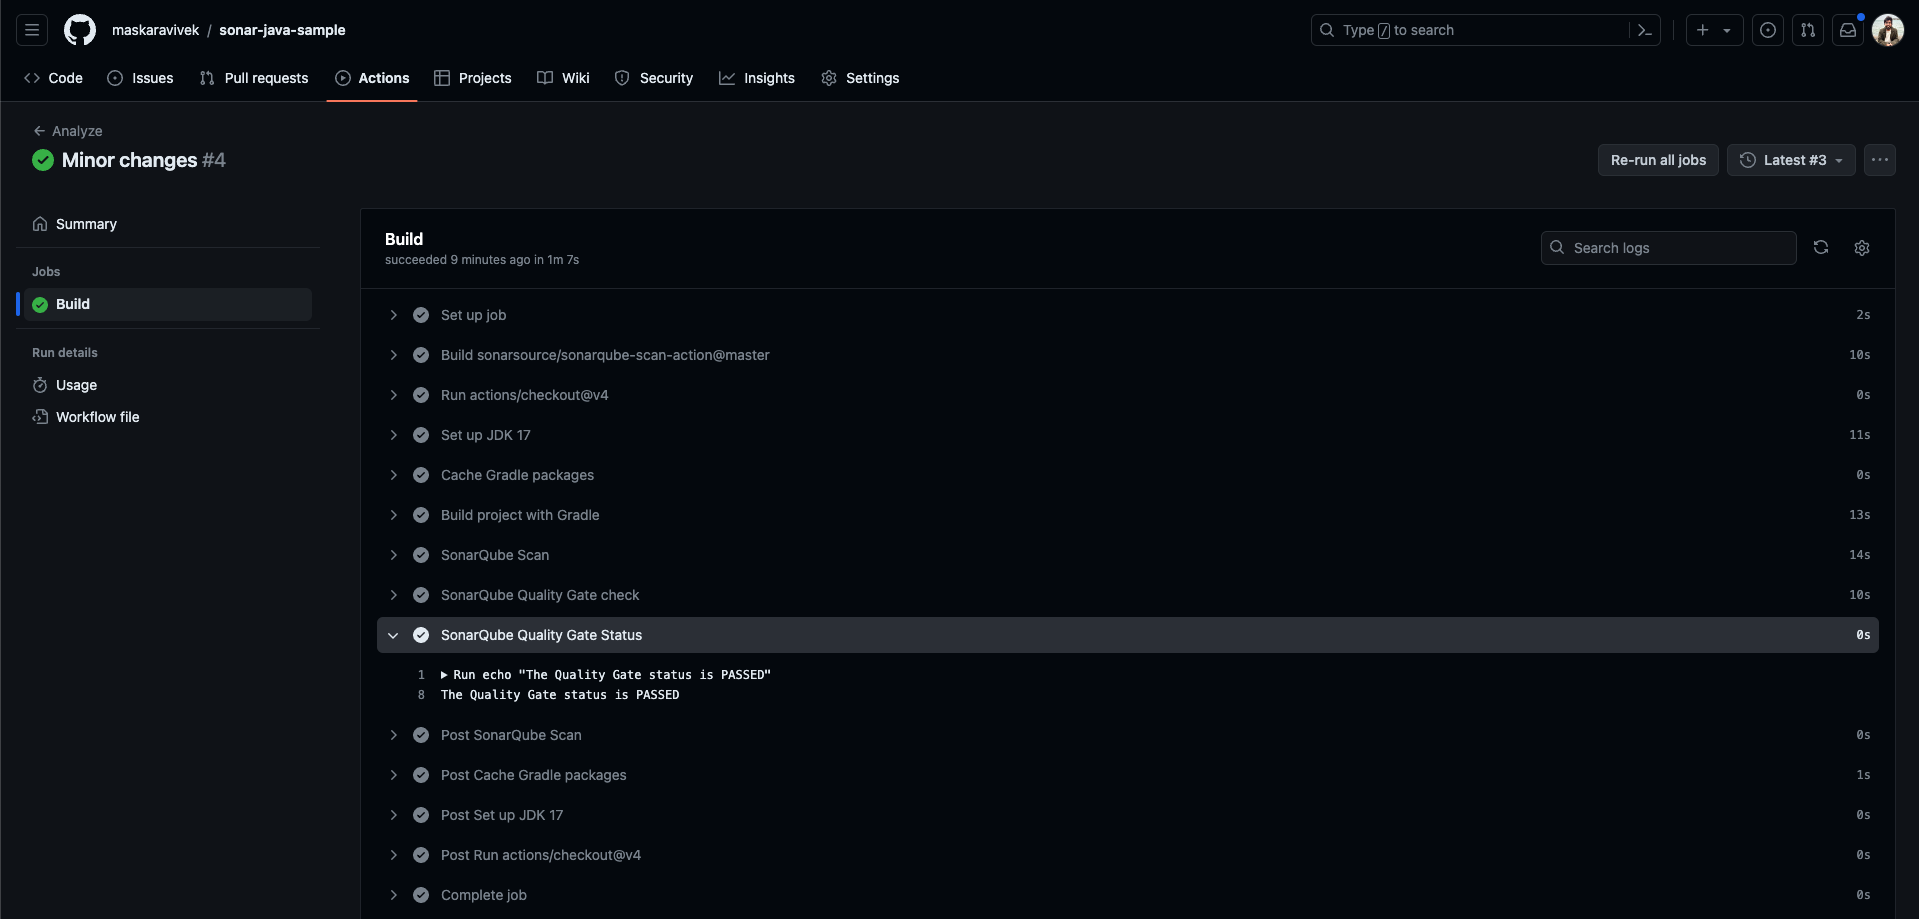
Notice that the quality gate status check shows as PASSED.
You can view code analysis results and details of the quality gate checks using the SonarQube Server dashboard.
Navigate to the project’s page on the SonarQube Server dashboard to view the analysis results.
It shows the quality gate status, new code metrics, and overall code metrics.

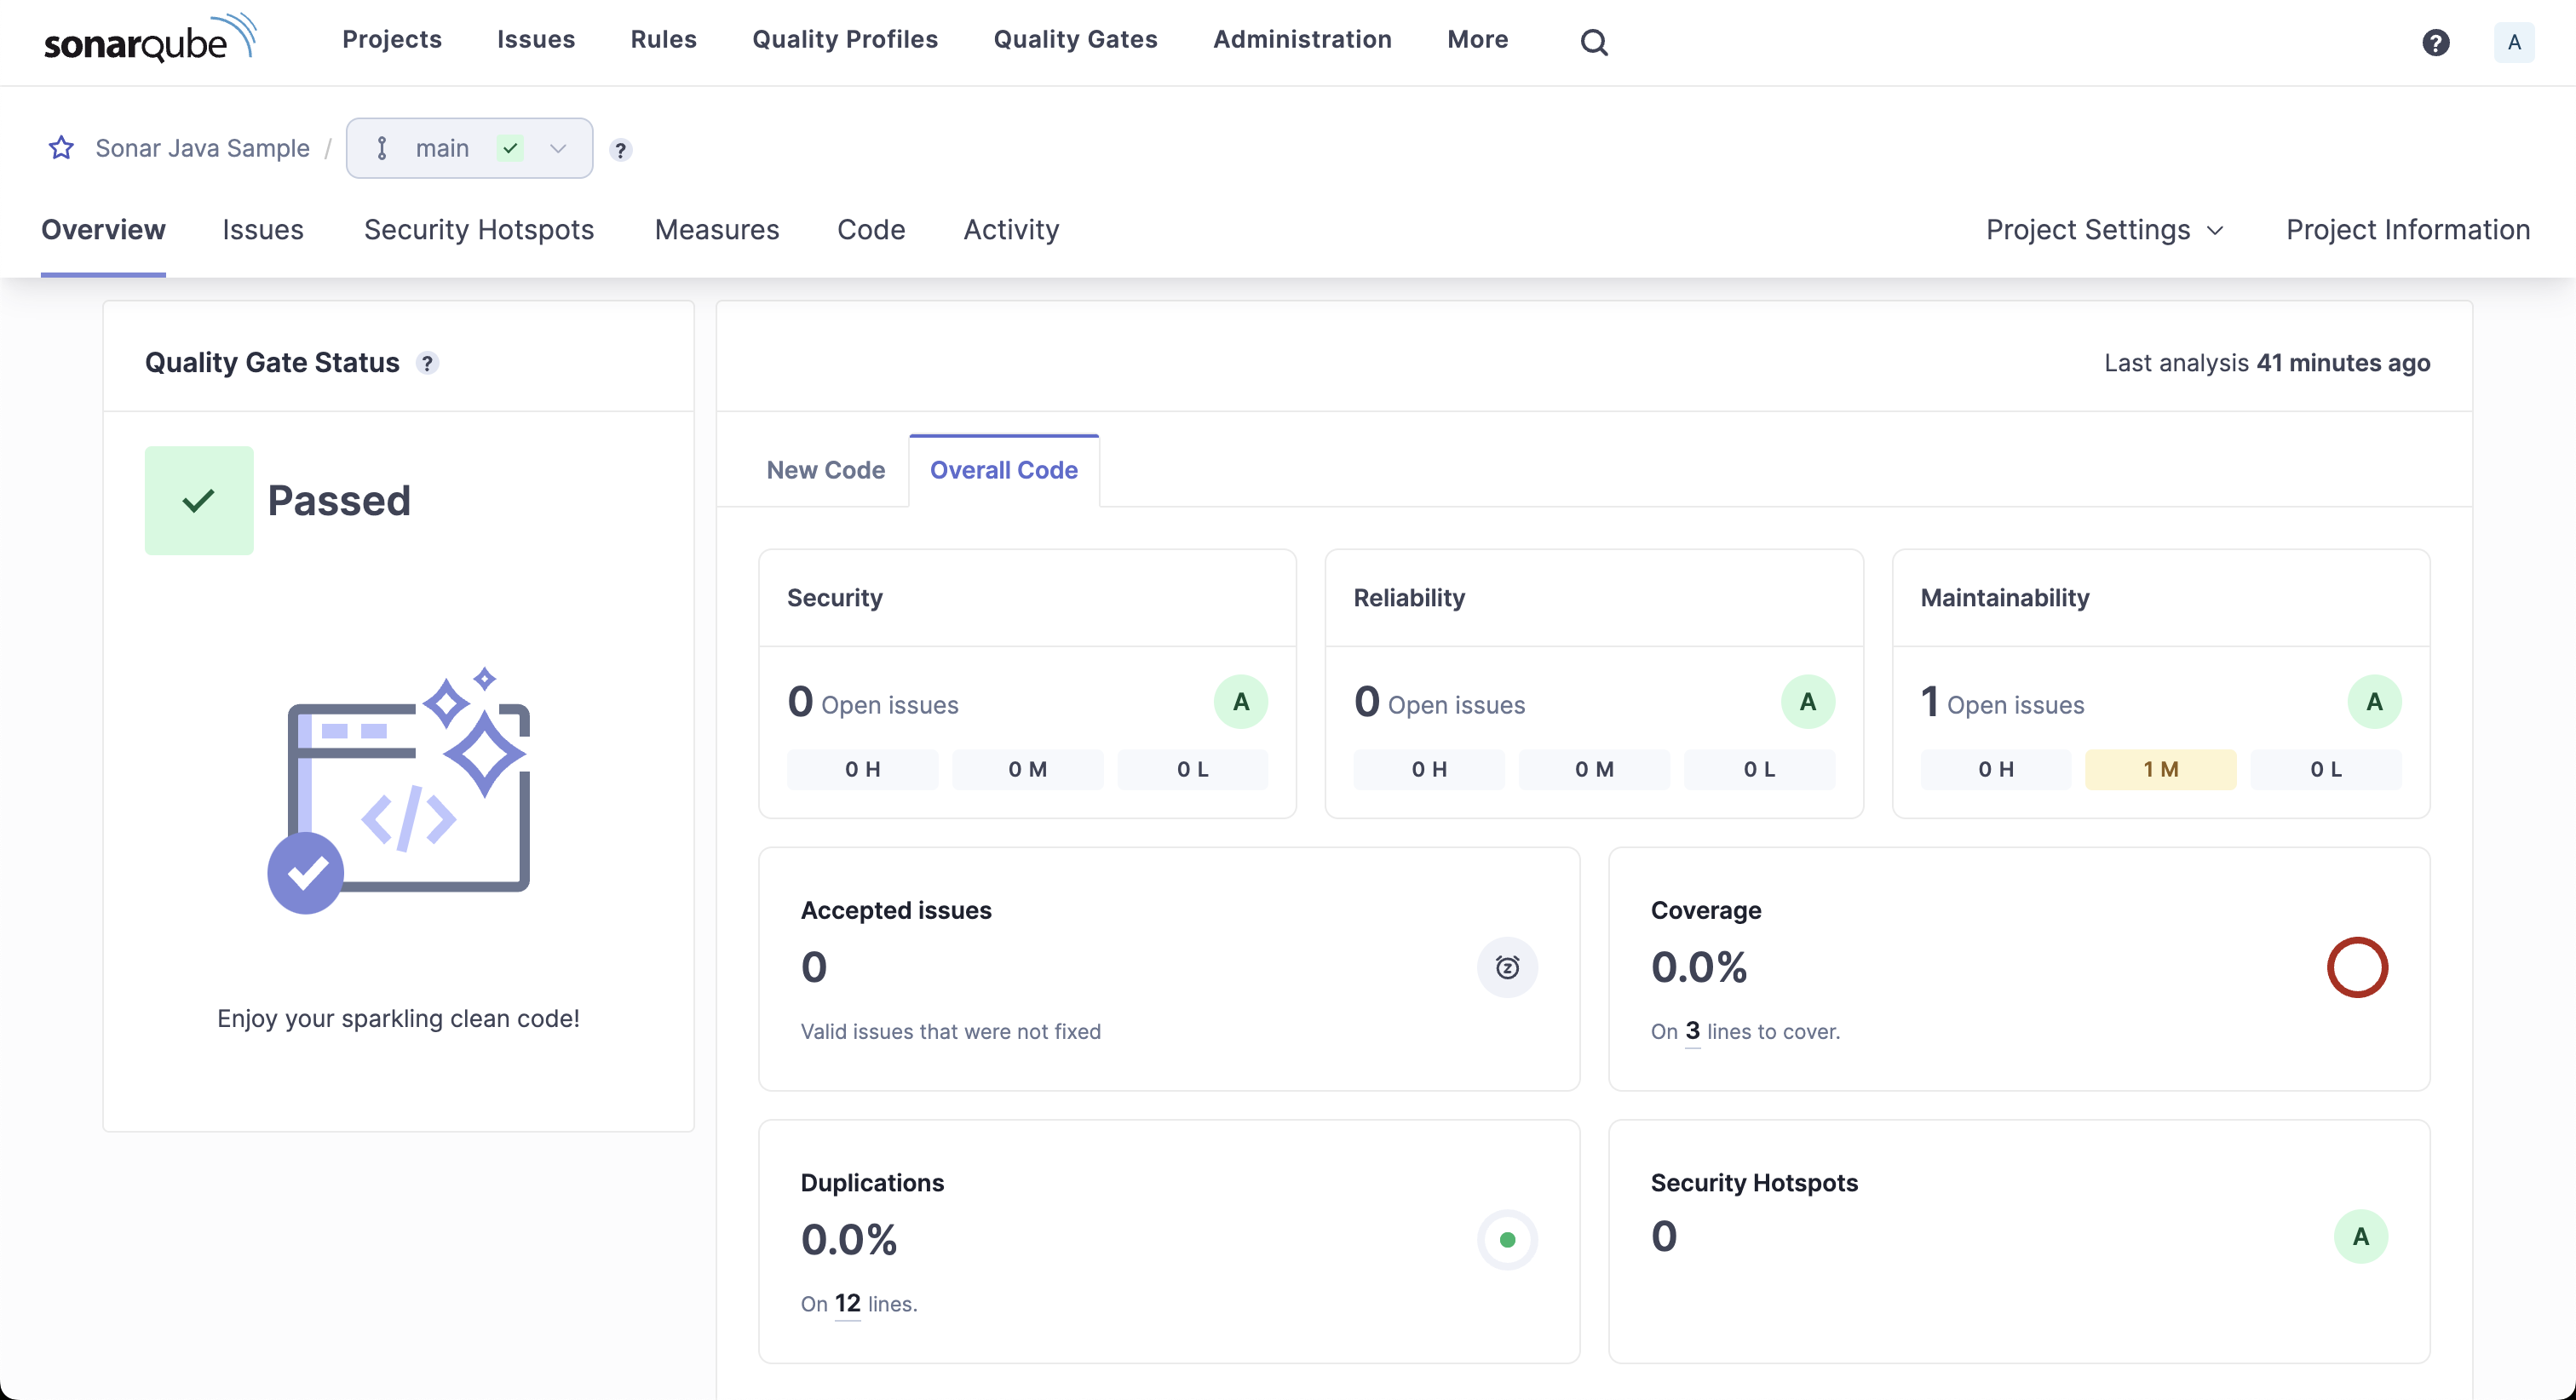
The dashboard shows one maintainability issue. Click on it to get more details about the issue.
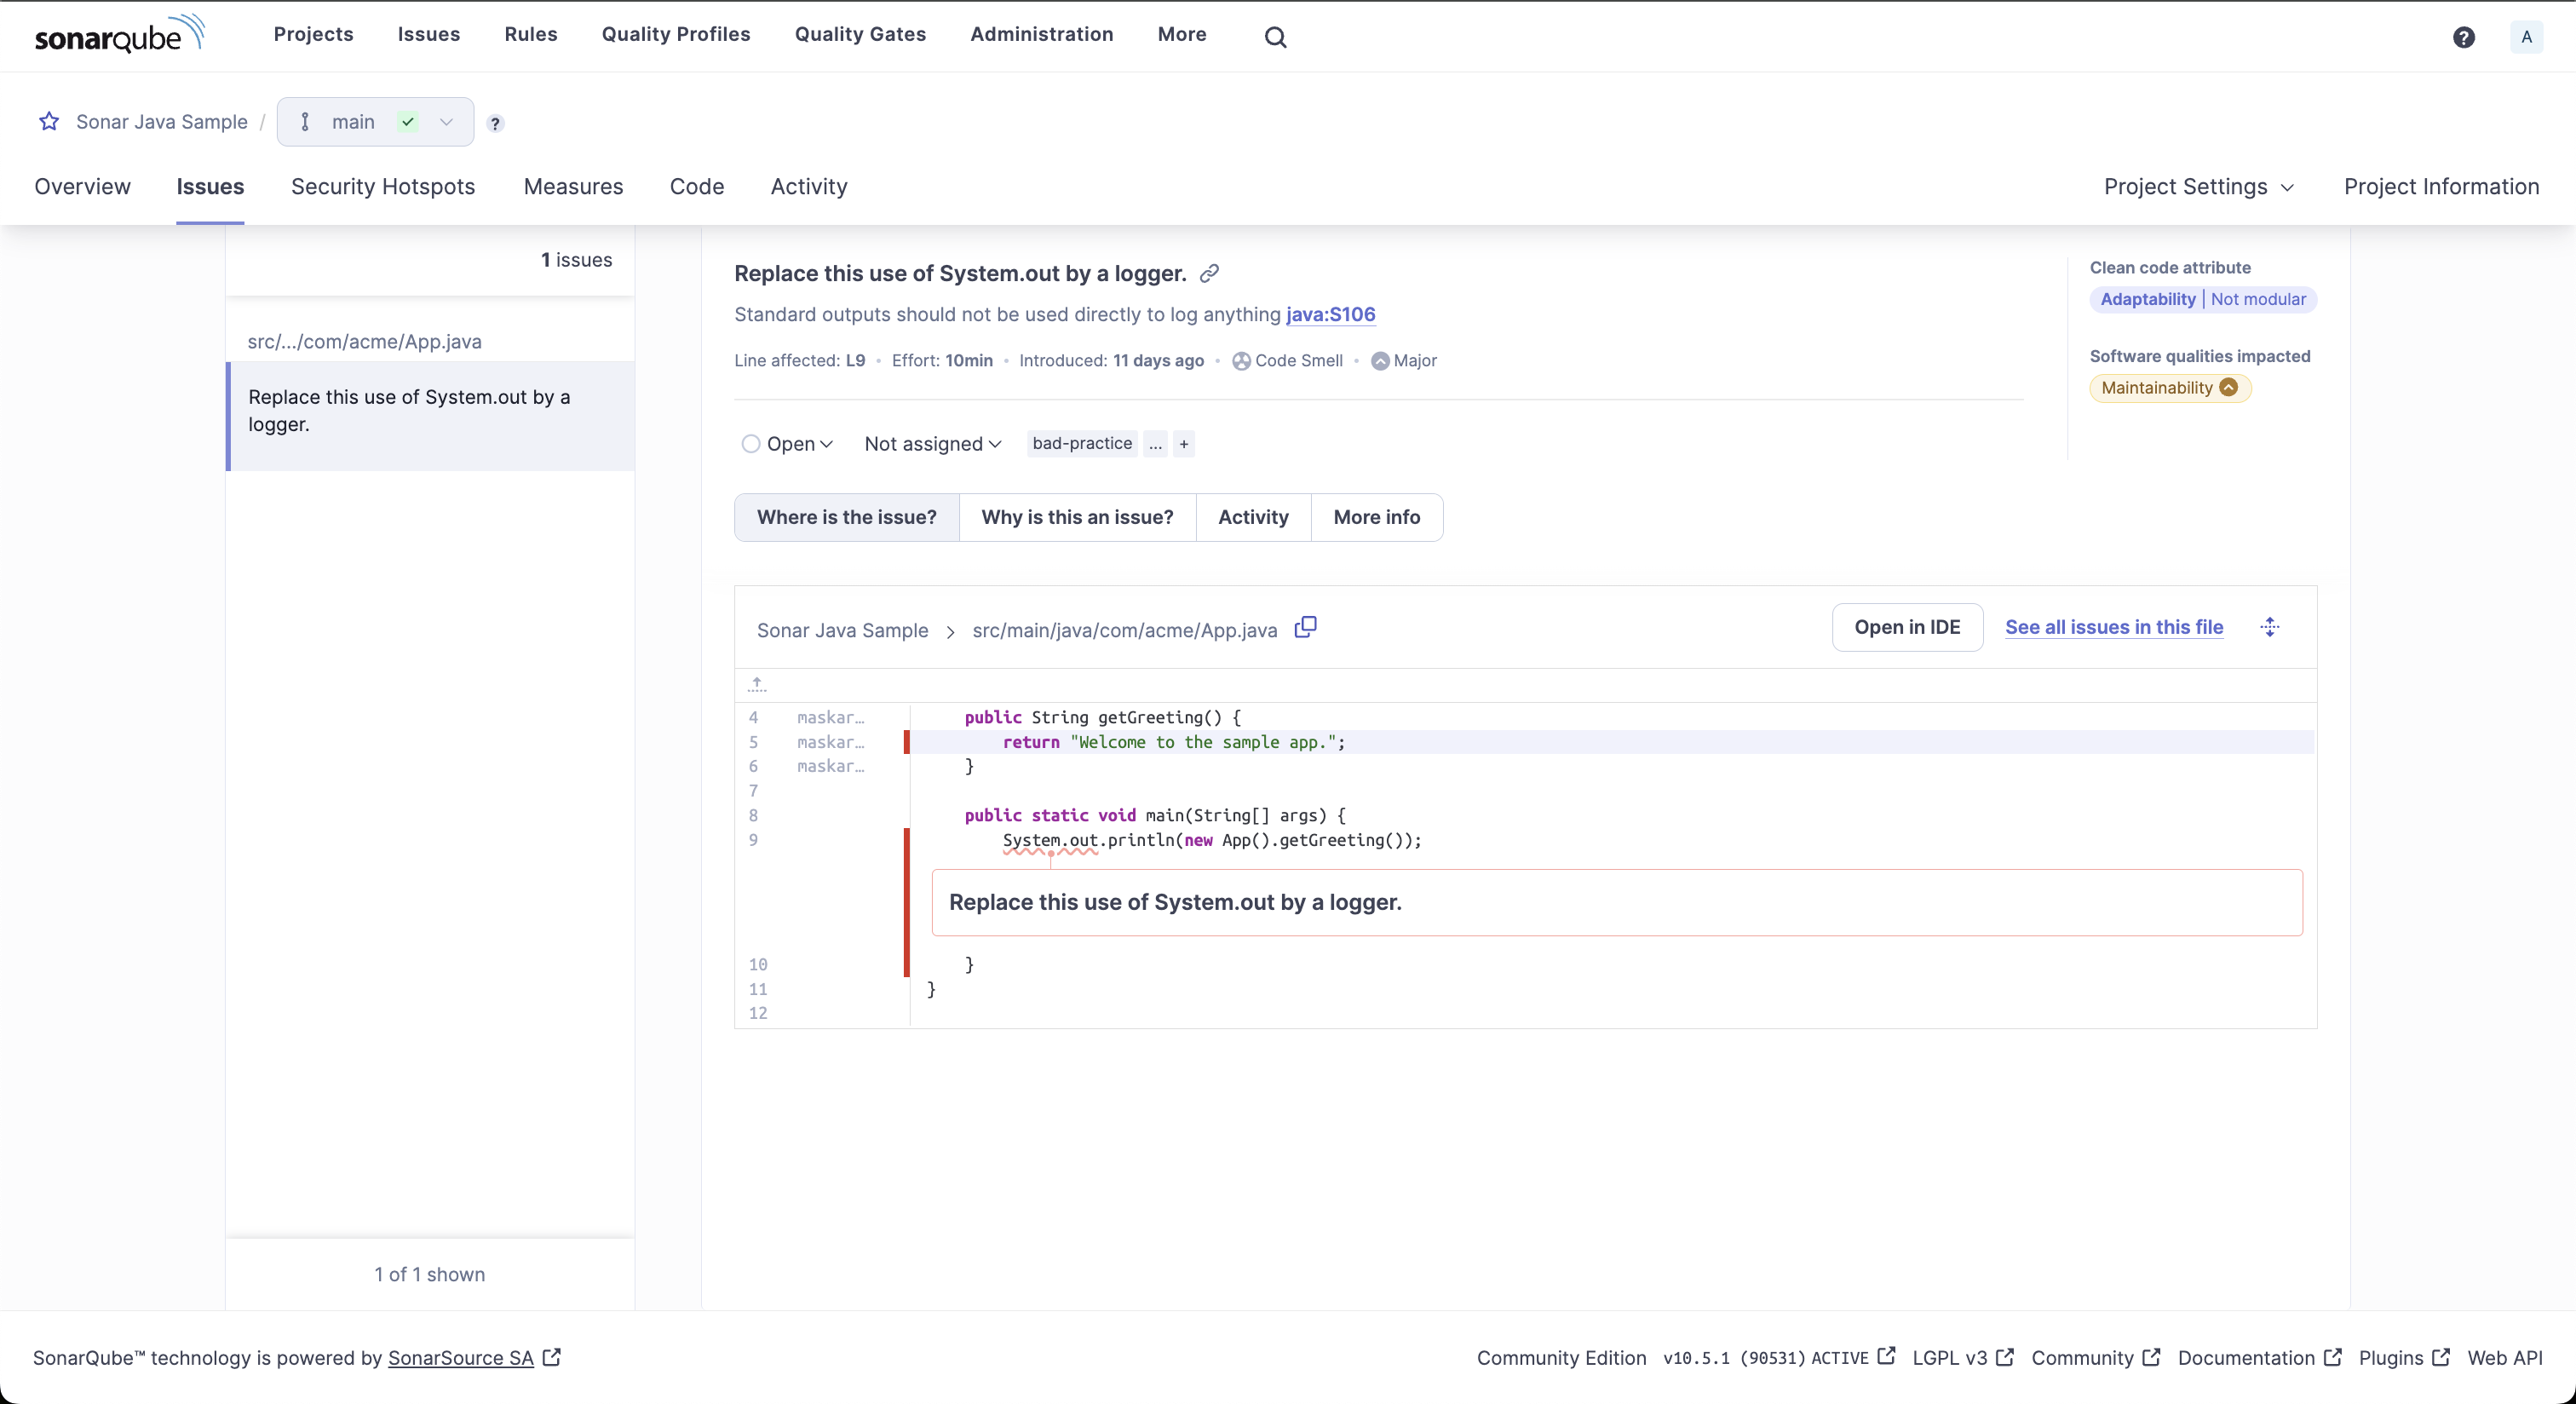
The issue details view displays information on the detected issues and suggests possible mitigations.
For the detected code smell shown in the screenshot above, SonarQube Server suggests replacing the direct usage of System.out with a logger.
The details view also provides information about the estimated effort to fix the issue, the time the code smell was first introduced, and the Java rule under which this issue was detected.
You can also navigate to the Measures tab to get an overview of issues grouped by categories, such as security, maintainability, coverage, etc.
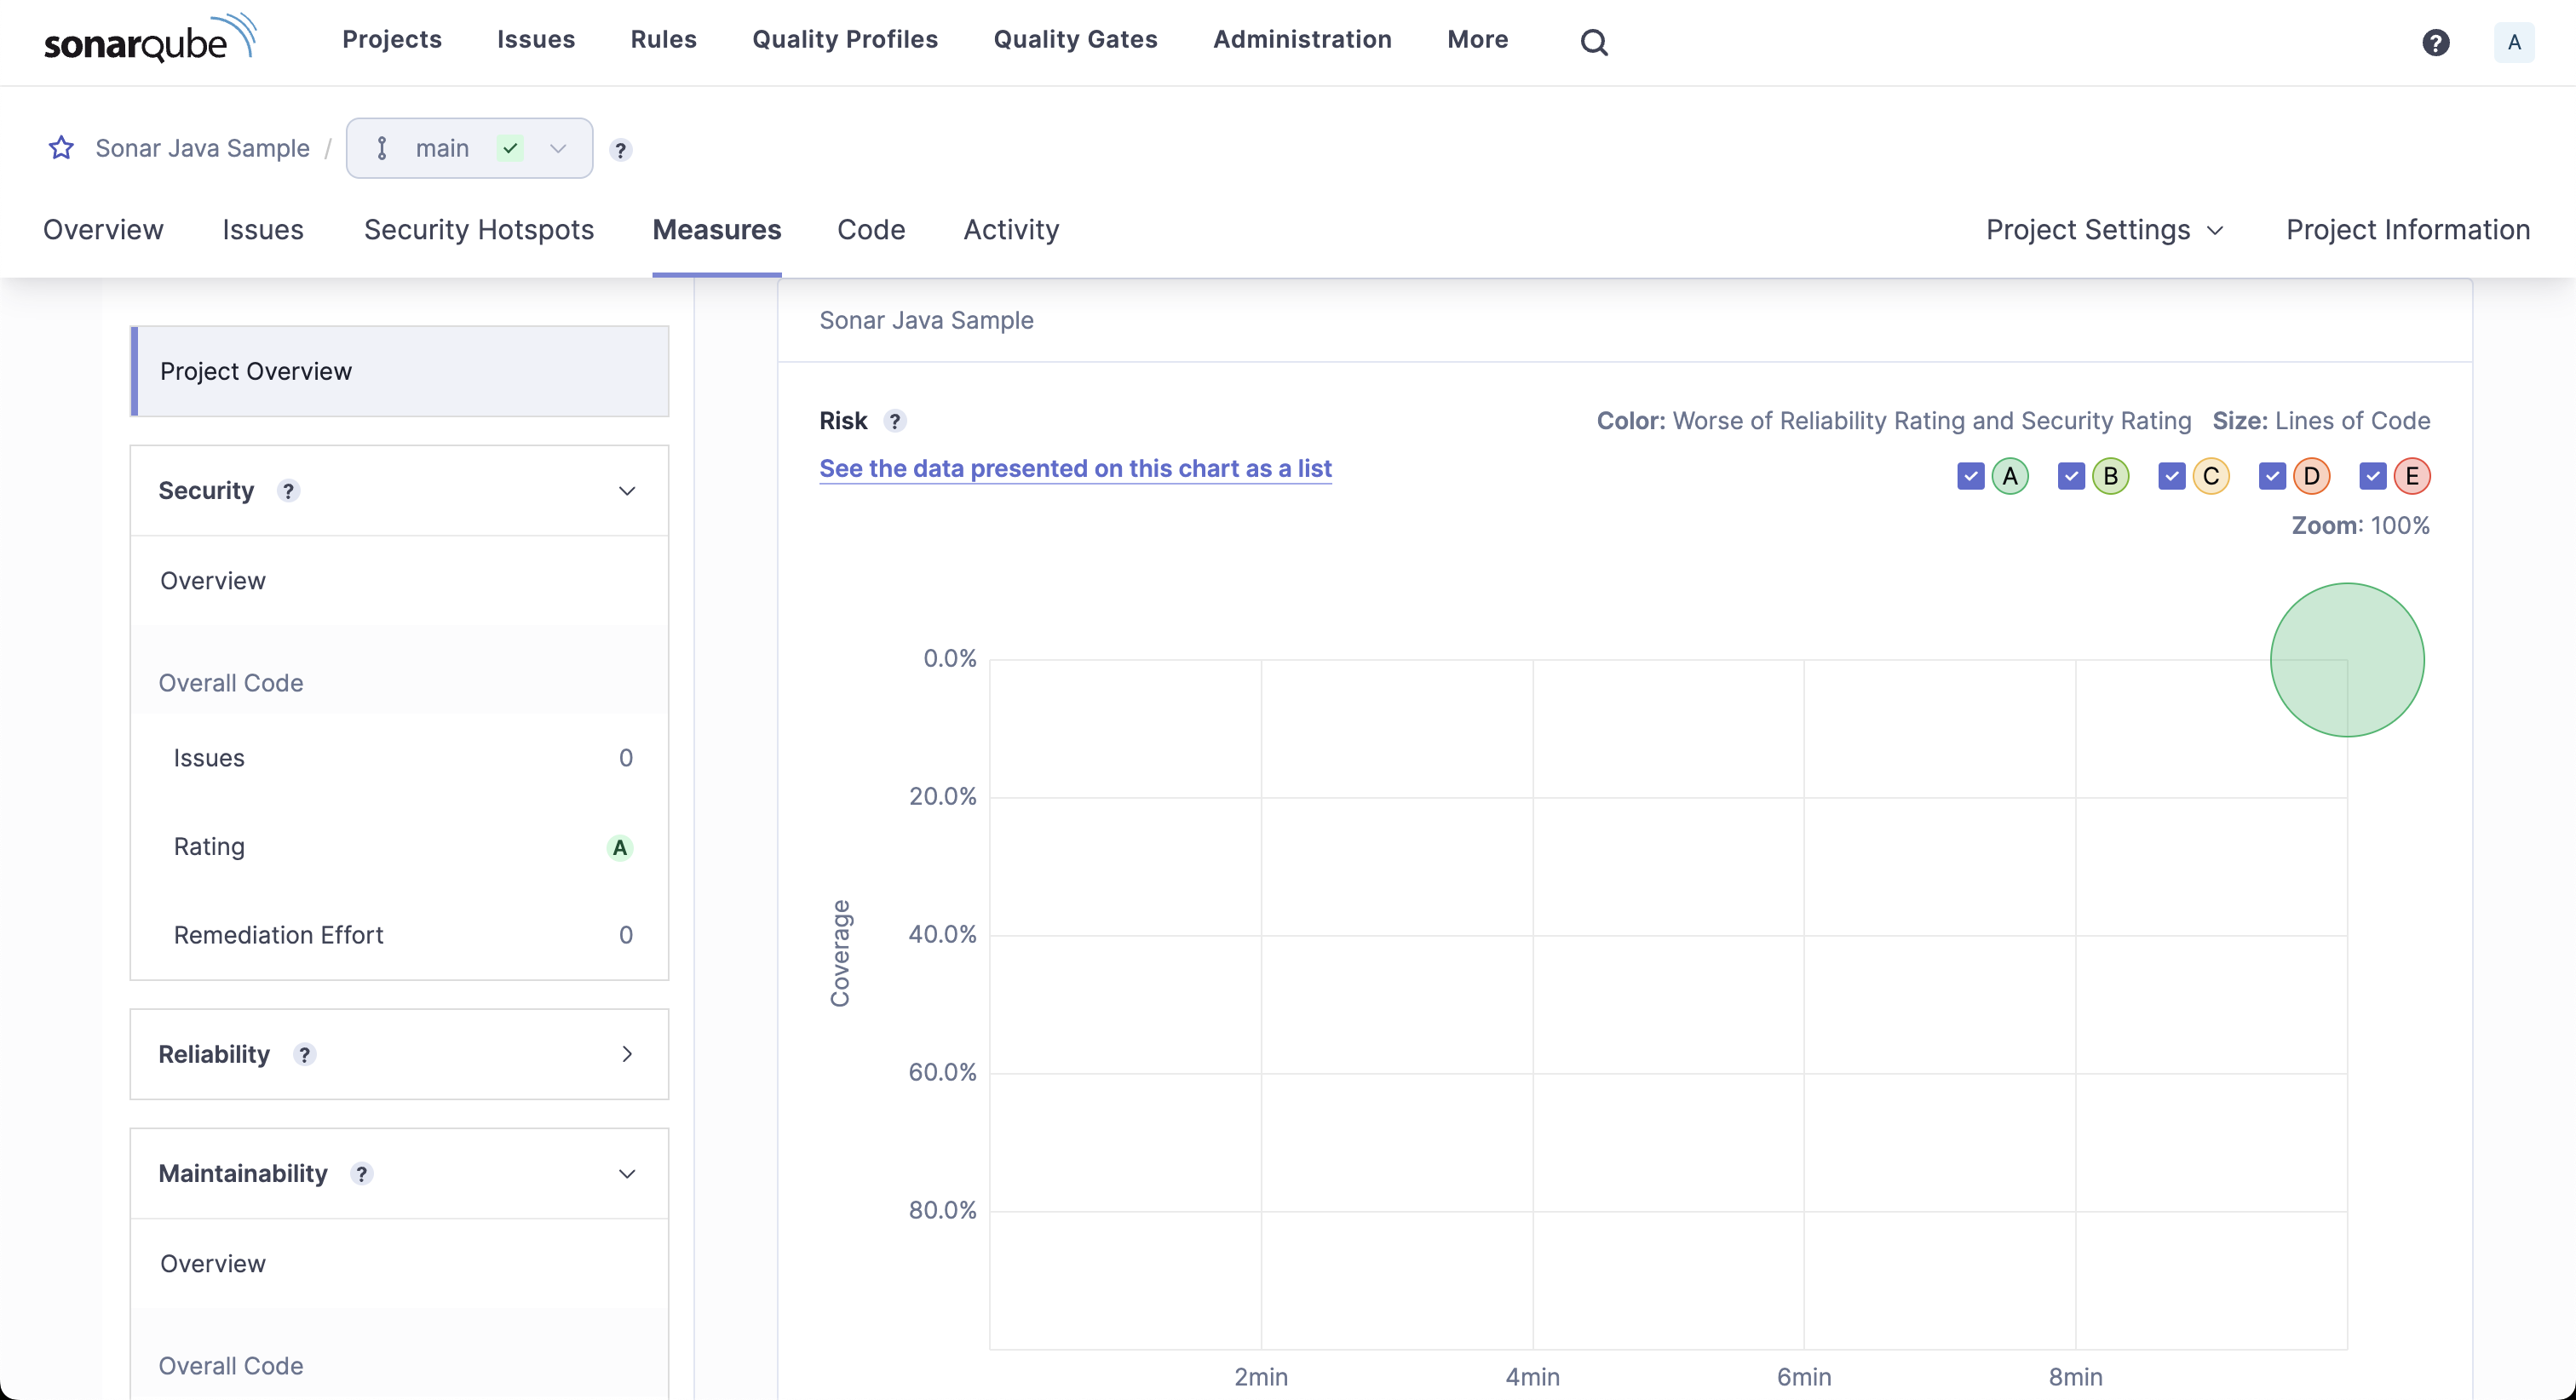
The Activity tab shows trends for issues, code coverage, duplications, and more.
It’s helpful to analyze the quality of the project over time.

Conclusion
Quality gates enforce specific rules to reduce the risk of bugs and vulnerabilities in production. These checks add automatic guardrails, preventing bad code from being deployed and helping improve software reliability and security.
In this article, you learned how to implement quality gates into your CI/CD pipeline using SonarQube Server.
You can find this tutorial’s complete source code on GitHub.
SonarQube Server helps enhance software quality by continuously analyzing code for bugs, vulnerabilities, and code smells across multiple programming languages.
It offers native integrations with popular platforms, such as Jenkins, GitHub, and GitLab, which reduces the integration effort and streamlines the DevOps workflow.
This article was written by Vivek Kumar Maskara as part of the developer guide for Static Code Analysis.
- June 14, 2024