
Table of Contents
 TL;DR overview
- Intro
- What Is SonarQube Server?
- What Is Pull Request Analysis and Branch Analysis?
- Setting Up A SonarQube Server Instance
- Integrate SonarQube Server into GitHub
- Configure GitHub Analysis in SonarQube Server
- Automate SonarQube Server Branch and PR Analysis with GitHub Actions
- Connect SonarQube Server and SonarQube IDE in VS Code
- Summary
Start your free trial
Verify all code. Find and fix issues faster with SonarQube.
Get startedTL;DR overview
- Improving your DevOps pipeline with SonarQube Server's pull request and branch analysis automates code quality and security scanning before code is merged into the main branch.
- Addressing quality issues in pull requests rather than post-merge reduces the cost of fixes and improves the releasability of your main branch for continuous delivery.
- The guide walks through integrating SonarQube Server with GitHub, configuring GitHub Actions for automated scanning, and connecting SonarQube for IDE in VS Code.
- SonarQube supports 30+ programming languages and integrates with GitHub, GitLab, Azure DevOps, and Bitbucket CI/CD workflows.
Improve Your DevOps Pipeline
Maintaining high quality and secure code prevents excessive issues in code and allows you to develop your project steadily while optimizing your time spent resolving the issues discovered by SonarQube. Manually ensuring proper code quality and consistency is a tedious job every developer dreads. In this step-by-step guide, you will learn how to use pull request (PR) analysis and branch analysis with SonarQube integrated into GitHub to run code scanning in branches and pull requests.
With SonarQube, you can set up code-quality scans as part of your regular continuous integration and continuous delivery (CI/CD) workflow using your DevOps platform of choice. Based on your company’s development standards and branching strategy, you can set up pull request (PR) analysis or branch analysis. Doing this helps you address code-quality issues before code is merged into your main branch, where you'd have a harder time chasing and fixing them. More issues solved in PRs and branches also means optimal releasability of your main branch, which is important if your team practices continuous delivery because the team may schedule a new build to be delivered at any given moment.
What Is SonarQube?
SonarQube is an open-source, self-managed static code analysis solution that identifies issues in your application's source code that lead to bugs, vulnerabilities, and technical debt in software and guides you through resolution before your application makes it to production. SonarQube has been around since 2008, and it currently supports more than thirty programming languages, both mainstream and niche, including Java, JavaScript, TypeScript, Python, C++, C#, Kotlin, Swift, PHP, and Go.
SonarQube is one of the three static code analysis solutions by Sonar, along with SonarQube for IDE for advanced code inspection inside the IDE and SonarQube Cloud for static code analysis as a service.
One of SonarQube's many strengths is that it seamlessly integrates with the cloud and self-hosted versions of GitHub, Bitbucket, Azure DevOps, and GitLab. By running code scans as part of the CI/CD pipeline, SonarQube helps ensure that code-quality issues are detected as early as possible when code changes are made.
What Is Pull Request Analysis and Branch Analysis?
When you integrate SonarQube with your DevOps platform, you can choose a code-scanning strategy. One option is to run code-quality scans in your main branch only, which is a good first step towards code-quality control for small projects when you have a simple branch strategy, or for small teams when development activity in your repository is low.
When you have bigger projects, you likely use a more detailed branch strategy. If you're concerned about constently keeping your main branch in a releasable state, you can use two additional code scanning approaches to match your branch strategy: pull request (PR) analysis and branch analysis.
- Pull request analysis detects new code quality issues when you create a PR to merge changes back into your code base. When SonarQube scans the code in your PR, you can see the pass or fail results of the analysis directly in your DevOps platform's pull request UI, including details about what kinds of issues were found and how many. The status results include links back into SonarQube, where further details about the found issues are displayed. Fixing the found issues is a breeze because developers can click through to their IDE from SonarQube directly where the issue exists and fix it immediately without having to search through files and code to find them.
- Branch analysis helps you manage consistent code quality at the branch level for any branch you create. You can continuously monitor code quality and code security while you're working in feature branches and avoid accumulating technical debt before merging. Branch analysis is also useful if you maintain multiple release branches simultaneously: for example, one branch for the release of a new version and one or several branches for maintenance updates of the current version. Branch analysis is even more important if your Git workflow doesn't involve using pull requests at all.
Branch and PR analysis can be used together or separately based on your company’s strategy. To make it easiest on developers and not disrupt their normal workflow, Sonar recommends following an approach of setting up analysis on all new code to make sure new code is the highest quality and mosts secure resulting in code that is free of issues before it is merged back into your code base.
Let's see what it takes to set up and use PR and branch analysis with SonarQube. SonarQube can integrate with several DevOps platforms, but in this guide, you'll see how to integrate with one, GitHub.
Setting Up A SonarQube Instance
The first step is to set up SonarQube.
If you already have a running SonarQube Developer or Enterprise Edition instance, you can skip this section. Additionally, it's important to note that while SonarQube Community Build of SonarQube is free, PR and branch analysis are only available in the Developer Edition and higher. If you want to follow along with this tutorial, you'll need to have SonarQube Developer Edition or higher installed.
Install SonarQube
SonarQube is a self-managed software product, which means you'll need to install it and manage it where you choose using a local server, Docker image, or Kubernetes Cluster before configuring branch and PR analysis.
SonarQube can be installed from a ZIP file or in a Docker container. This developer guide will walk you through deploying with Docker.
To run a Docker container on your local machine, you need to have Docker Desktop installed and running.
Next, create a new directory named `sq-developer-edition`. In it, create a directory named 'sq-logs' and a new file named 'docker-compose.yml' and paste the following script into the file:
version: "3"

services:
    sonarqube:
      image: sonarqube:developer
      ports:
        - "9000:9000"
      depends_on:
        - db
      environment:
        SONAR_JDBC_URL: jdbc:postgresql://db:5432/sonar
        SONAR_JDBC_USERNAME: sonar
        SONAR_JDBC_PASSWORD: sonar
      volumes:
        - sonarqube_data:/opt/sonarqube/data
        - sonarqube_extensions:/opt/sonarqube/extensions
        - ./sq-logs:/opt/sonarqube/logs

    db:
      image: postgres
      ports:
        - 5433:5432
      environment:
        POSTGRES_USER: sonar
        POSTGRES_PASSWORD: sonar
        POSTGRES_DB: sonar
      volumes:
        - postgresql:/var/lib/postgresql
        - postgresql_data:/var/lib/postgresql/data

  volumes:
    sonarqube_data:
    sonarqube_extensions:
    postgresql:
    postgresql_data:
In your terminal, while in the directory 'sq-developer-edition', run the following command:
docker compose up
As soon as Docker Compose outputs `SonarQube is operational`, open SonarQube in your browser at `localhost:9000/`. Log in with the default credentials username `admin` and password `admin`, then change the default password when prompted.
SonarQube will ask you to enter a license. If you don't have a license, click 'Request a trial license' or complete the Developer Edition trial license form. A Sonar sales representative will then contact you with a trial license key.
Exposing SonarQube to the Internet
Now that you have a SonarQube instance up and running locally, you need to make it accessible from the outside. If you're behind a firewall, you'll need to use a tunneling tool like Localtunnel, ngrok, or Cloudflare. An outside connection is required for SonarQube to integrate with a cloud DevOps platform like GitHub.
To install Localtunnel and use it to expose your local SonarQube instance externally, you must first install Node.js on your machine.
Once Node.js is installed, run the following shell command in the terminal to install Localtunnel globally:
npm install -g localtunnel
Run the following shell command to generate a tunnel that will make your local SonarQube installation publicly available:
lt --port 9000 --subdomain sonarqube-installation
Note: You can change `sonarqube-installation` to anything else—it's just a preference for Localtunnel to always use a specific subdomain instead of a randomly generated one.
Localtunnel will then generate and display a URL through which your SonarQube installation is now available. If the `subdomain` parameter is `sonarqube-installation`, the URL is going to be `https://sonarqube-installation.loca.lt/`.
Open `https://sonarqube-installation.loca.lt/` in your browser, and then open `https://loca.lt/mytunnelpassword in another tab`. Copy the code displayed on `https://loca.lt/mytunnelpassword`, paste it into the 'Tunnel Password' field at `https://sonarqube-installation.loca.lt/`, and click 'Submit'.
You only need to do this once. As soon as you've completed the above steps, your SonarQube installation will be available at `https://sonarqube-installation.loca.lt/`.
Integrate SonarQube into GitHub
To integrate SonarQube with GitHub, you first need to create SonarQube as a GitHub App.
When you get to the GitHub Apps registration form, use the following settings:
- GitHub App name: any name that would be unique across GitHub, such as "SonarQube-GitHub for \<your_username>\"
- Homepage URL: any URL, such as the URL of your SonarQube installation: if using Localtunnel in the above step it will be `https://sonarqube-installation.loca.lt/`
- Callback URL: enter the URL of your SonarQube installation: if using Localtunnel in the above step it will be `https://sonarqube-installation.loca.lt/`
- Webhook: uncheck Active.
- Permission & Events tab: expand Repository permissions and set Administration to 'Read only'
- Permission & Events tab: expand Organization permissions and set Administration to 'Read only'
- Permission & Events tab: expand Organization permissions and set Members to 'Read only'
- Permission & Events tab: expand Account permissions and set Email Addresses to 'Read only'
Click Create GitHub App. When GitHub reports a successful app creation, click Install App on the left menu and then Install next to your GitHub account name:


In the view that requests repository permissions, keep All repositories selected, then click Install.
In the next view, click App settings:

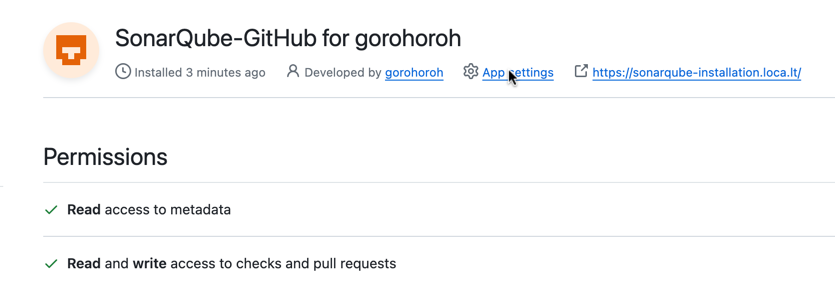
Keep the resulting About page of your application open. You'll need to copy some of the items there to your GitHub configuration in SonarQube, which you'll set up next.
Configure GitHub Analysis in SonarQube
Before SonarQube can analyze code in your repositories, you need to connect it to wherever you host them: in this case, to GitHub. The first time you connect SonarQube to GitHub, you set up a GitHub configuration that will later be reused for all subsequent GitHub repositories that you choose to analyze using SonarQube.
First, navigate to SonarQube's Administration. Under General settings > General find the Server base URL setting and enter the external URL of SonarQube. If using Localtunnel it will be: `https://sonarqube-installation.loca.lt/`.
On the main menu, click Projects. The project setup wizard in SonarQube will ask how you want to create your first project. Select From GitHub.
In the Create Configuration view, complete the following settings:
- Configuration name: Anything that identifies this as configuration, such as a simple "GitHub configuration", should do.
- GitHub API URL: Since you're going to connect to the cloud version of GitHub, enter `https://api.github.com/`.
- GitHub App ID: Use the app ID from your GitHub app's About page.
- Client ID: Use the client ID from your GitHub app's About page.
- Client Secret: In your GitHub app's About page, under Client secrets, click Generate a new client secret. Once it's generated, copy it over to this SonarQube configuration field.
- Private Key: In your GitHub app's About page, scroll down to Private keys, click Generate a private key, and download the generated PEM file. Open the file and copy its entire content over to this SonarQube configuration field.
Keep the Webhook Secret field empty, and click Save configuration.
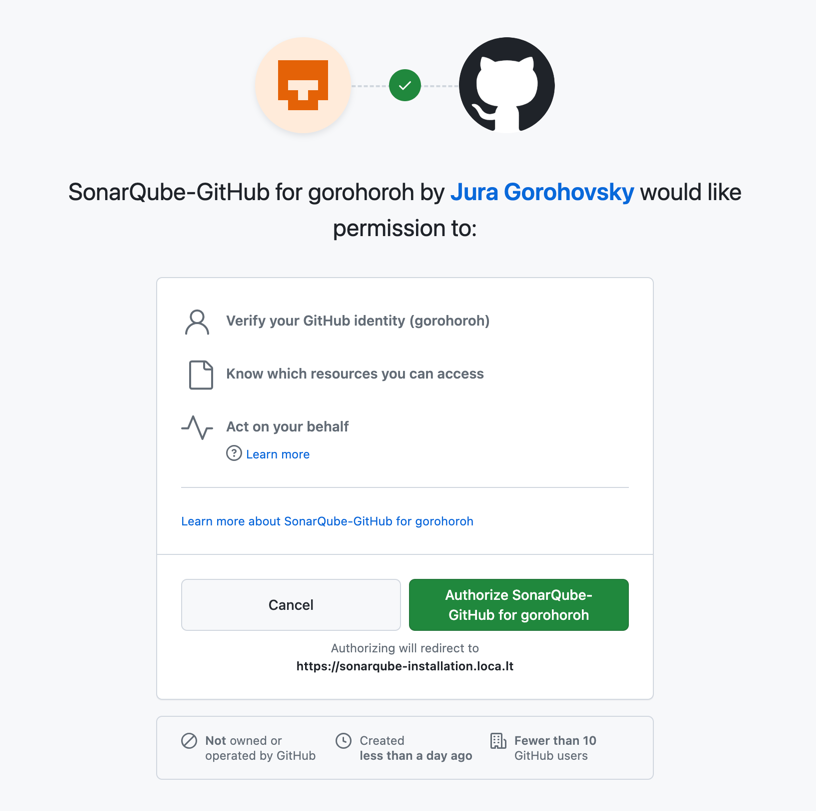
Your GitHub app will now ask for permissions. Click Authorize to provide them:

Automate SonarQube Branch and PR Analysis with GitHub Actions
Now that a GitHub configuration is ready, you can set up individual GitHub repositories that you want to analyze. This involves adding GitHub Actions workflows to your repositories. As you do this, you can define the triggers that let you analyze pull requests and/or branches other than the main branch.
To follow along, create a fork of the RestSharp project, a popular REST and HTTP client written in C#.
Once you've saved the GitHub configuration in the previous step, SonarQube displays a view for GitHub project onboarding. Here's what you need to do:
- Select a GitHub organization if you belong to one and want to connect SonarQube to it. Otherwise, simply select your personal GitHub account.
- Select a GitHub repository to connect SonarQube to. Select your RestSharp fork, then click Set up selected repository.
SonarQube will now show you the project page for your fork of RestSharp:

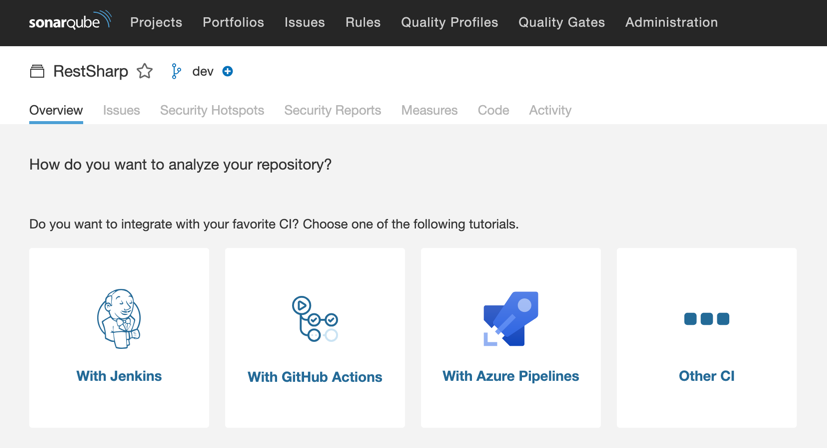
Next, you'll configure automatic code analysis in the repository using GitHub Actions. Since you're using SonarQube Developer Edition, this will also allow pull request and branch analysis based on your configuration of the GitHub Action.
Click With GitHub Actions, and follow SonarQube's instructions for creating two GitHub repository settings, and then click Continue:


Under Create Workflow YAML File, select .NET.
Create a file 'github/workflows/sonarqube.yml' in your RestSharp repository and paste the following code into it:
name: SonarQube
     on:
       push:
       pull_request:
         types: [opened, synchronize, reopened]
     jobs:
       build:
         name: Run SonarQube code quality analysis
         runs-on: windows-latest
         steps:
           - uses: actions/checkout@v2
             with:
               fetch-depth: 0
           - name: Set up JDK 17
             uses: actions/setup-java@v1
             with:
               java-version: 1.17
           - name: Cache SonarQube packages
             uses: actions/cache@v1
             with:
               path: ~\sonar\cache
               key: ${{ runner.os }}-sonar
               restore-keys: ${{ runner.os }}-sonar
           - name: Cache SonarQube scanner
             id: cache-sonar-scanner
             uses: actions/cache@v1
             with:
               path: .\.sonar\scanner
               key: ${{ runner.os }}-sonar-scanner
               restore-keys: ${{ runner.os }}-sonar-scanner
           - name: Install SonarQube scanner
             if: steps.cache-sonar-scanner.outputs.cache-hit != 'true'
             shell: powershell
             run: |
               New-Item -Path .\.sonar\scanner -ItemType Directory
               dotnet tool update dotnet-sonarscanner --tool-path .\.sonar\scanner
           - name: Run SonarQube scanner
             env:
               GITHUB_TOKEN: ${{ secrets.GITHUB_TOKEN }}
             shell: powershell
             run: |
               .\.sonar\scanner\dotnet-sonarscanner begin /k:"YOUR_PROJECT_KEY" /d:sonar.login="${{ secrets.SONAR_TOKEN }}" /d:sonar.host.url="${{ secrets.SONAR_HOST_URL }}"
               dotnet build
               .\.sonar\scanner\dotnet-sonarscanner end /d:sonar.login="${{ secrets.SONAR_TOKEN }}"
Near the end of the file, replace `YOUR_PROJECT_KEY` with your own project key, which you can find in the YML file that SonarQube suggests.
Commit and push the workflow file to the default branch in your RestSharp fork, which is called `dev`.
Back in SonarQube, click Finish this tutorial.
Note that the 'sonarqube.yml' workflow file defines the following triggers:
 on:
   push:
   pull_request:
     types: [opened, synchronize, reopened]
This means that the SonarQube workflow will run on the following:
- New pushes to any branch will automatically trigger SonarQube to perform analysis on the branch
- Pull requests when they're opened and reopened, as well as when new commits are added to the pull request branch
The SonarQube configuration is now complete. Following the push of your changes, a GitHub Actions workflow starts to run. To view its status, go to your RestSharp fork on GitHub, select Actions, and click SonarQube on the left menu:

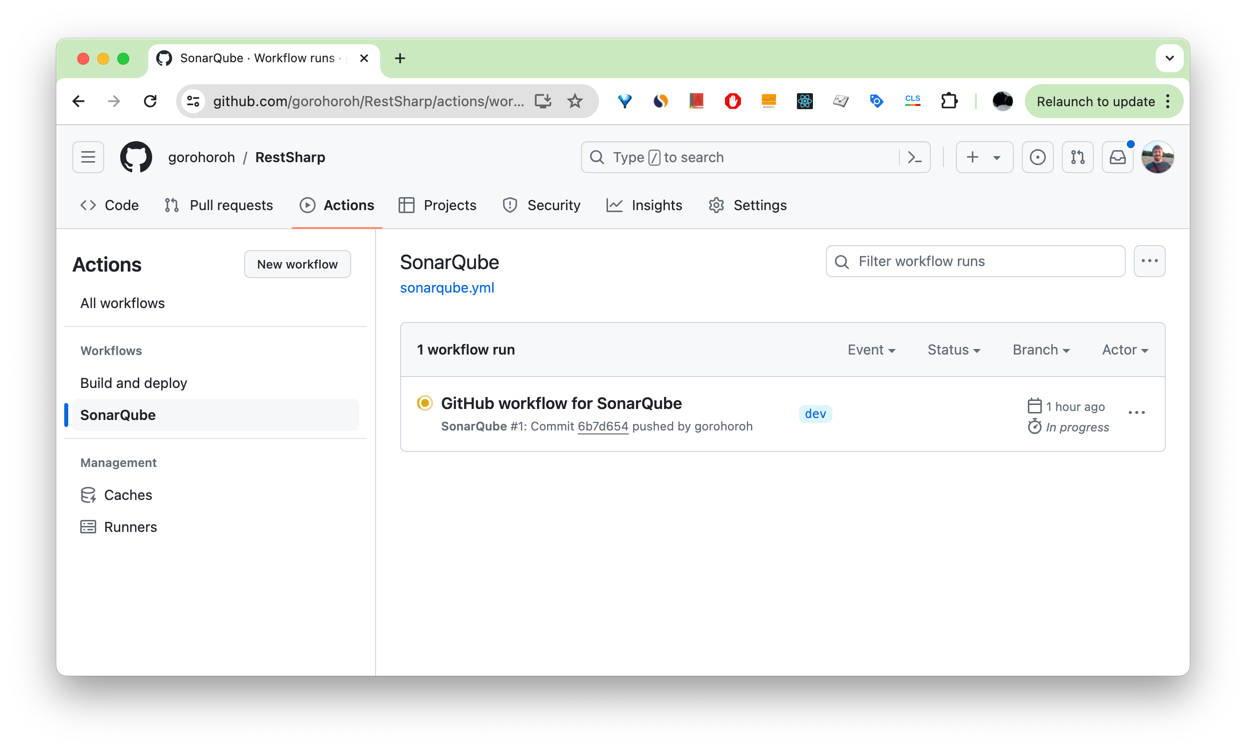
This same workflow will now run on all subsequent commits to any branch and on pull requests.
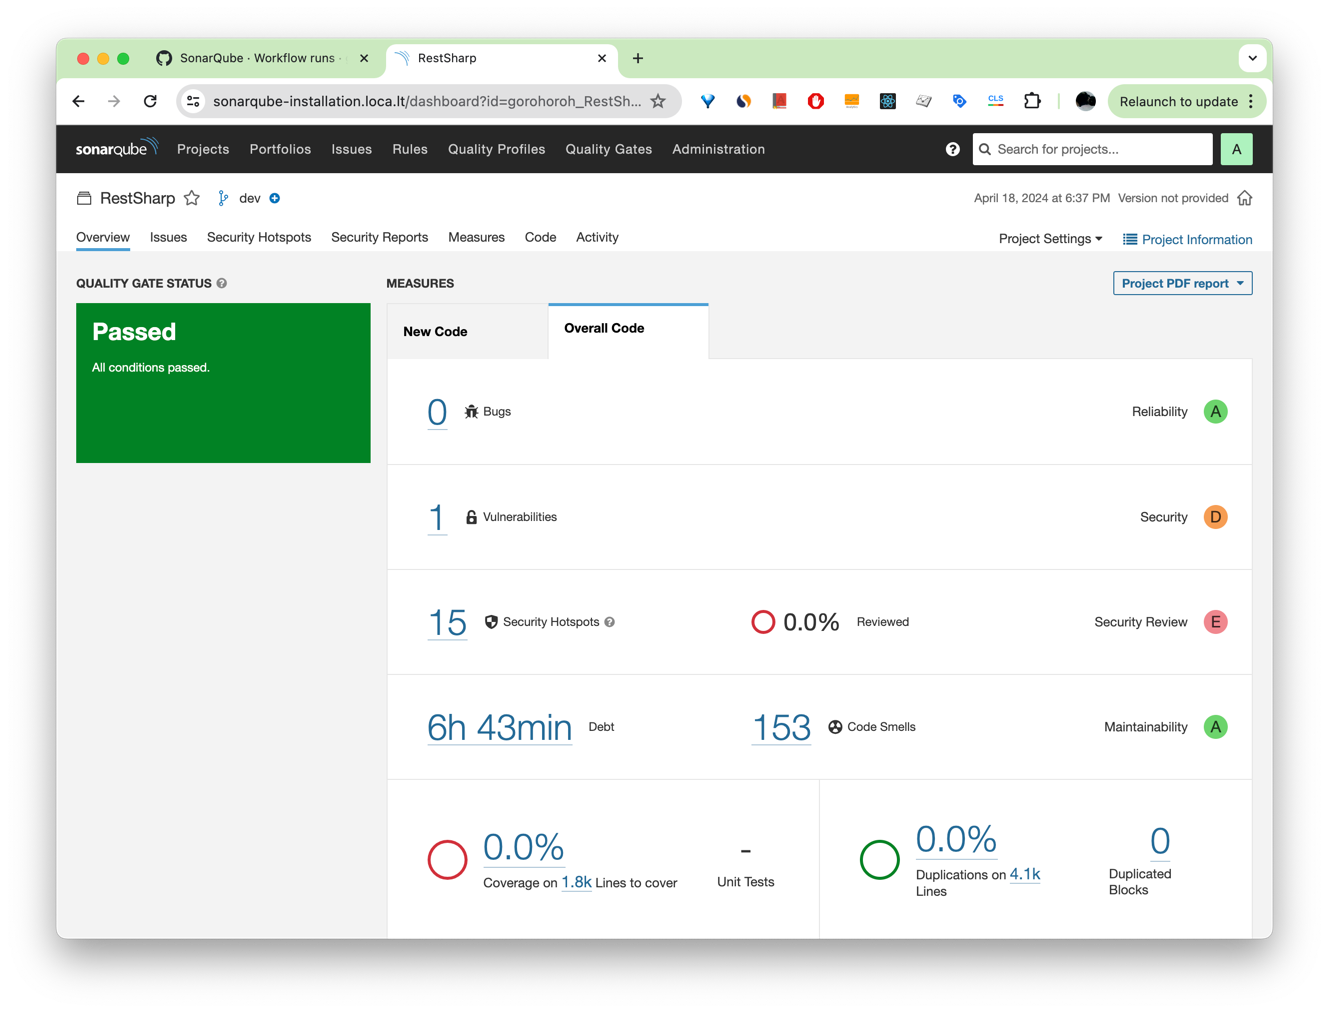
When the initial code scan completes, navigate back to SonarQube, open the RestSharp project from the list of projects, and see the results:

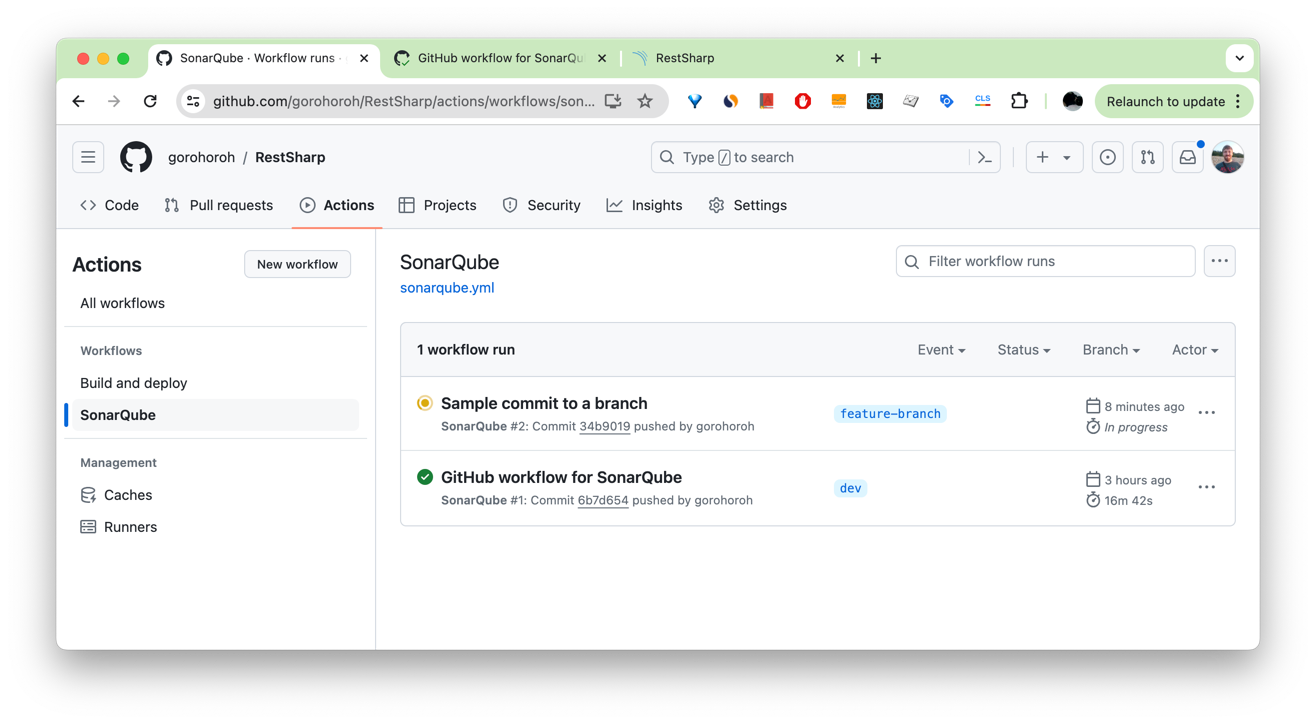
If you create a new branch, commit changes, and push them, SonarQube will run analysis in the new branch as well, as you can see on the list of workflow runs on GitHub:

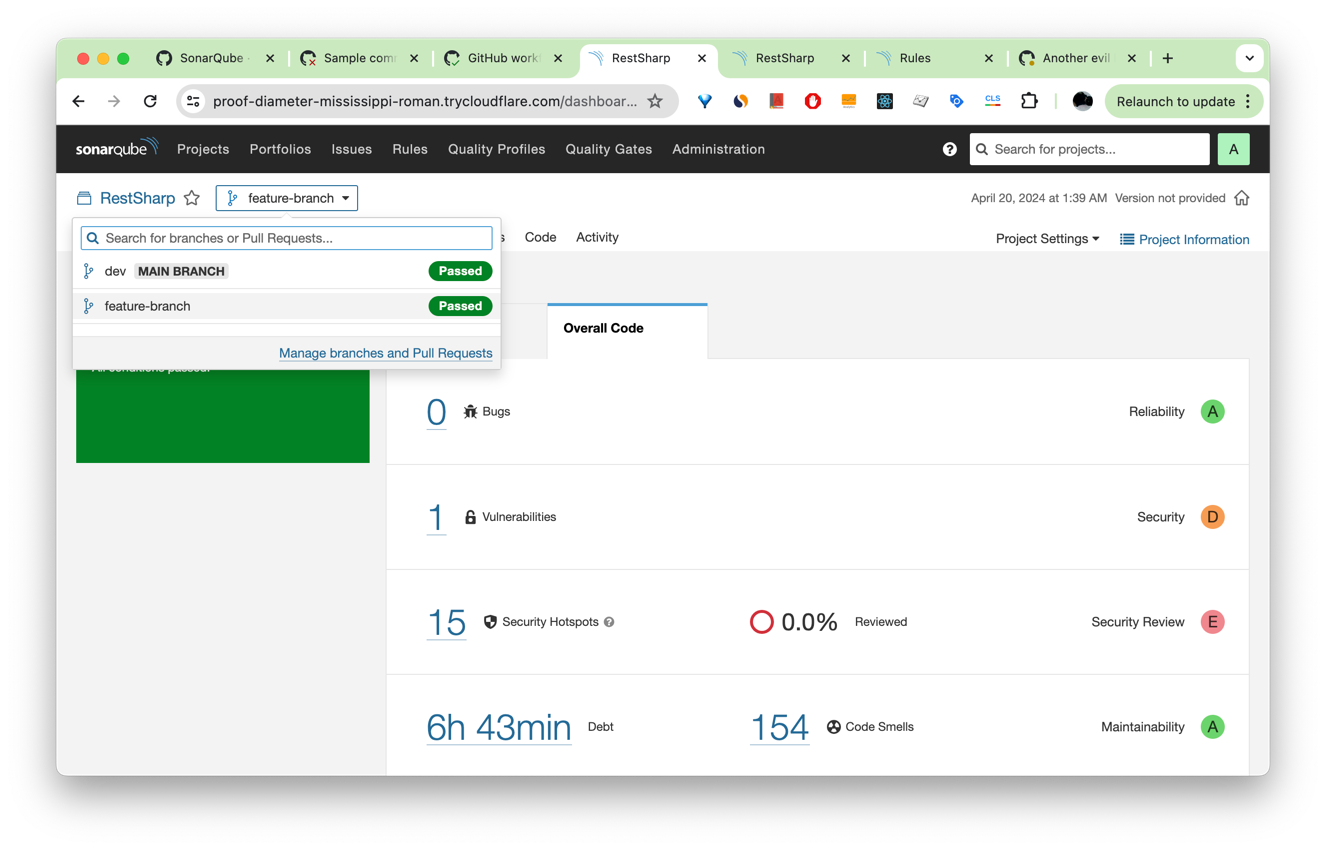
As soon as the analysis is completed, the results will be reported back to SonarQube. When SonarQube analyzes multiple branches, you can switch between them using the branch selector at the top of your project page near the project name:

When you create a PR from your feature branch to your main branch, a SonarQube scan will also run. The results will be reported in the GitHub PR UI as part of the list of checks, and there'll be a separate summary comment made by the GitHub app that you previously created:

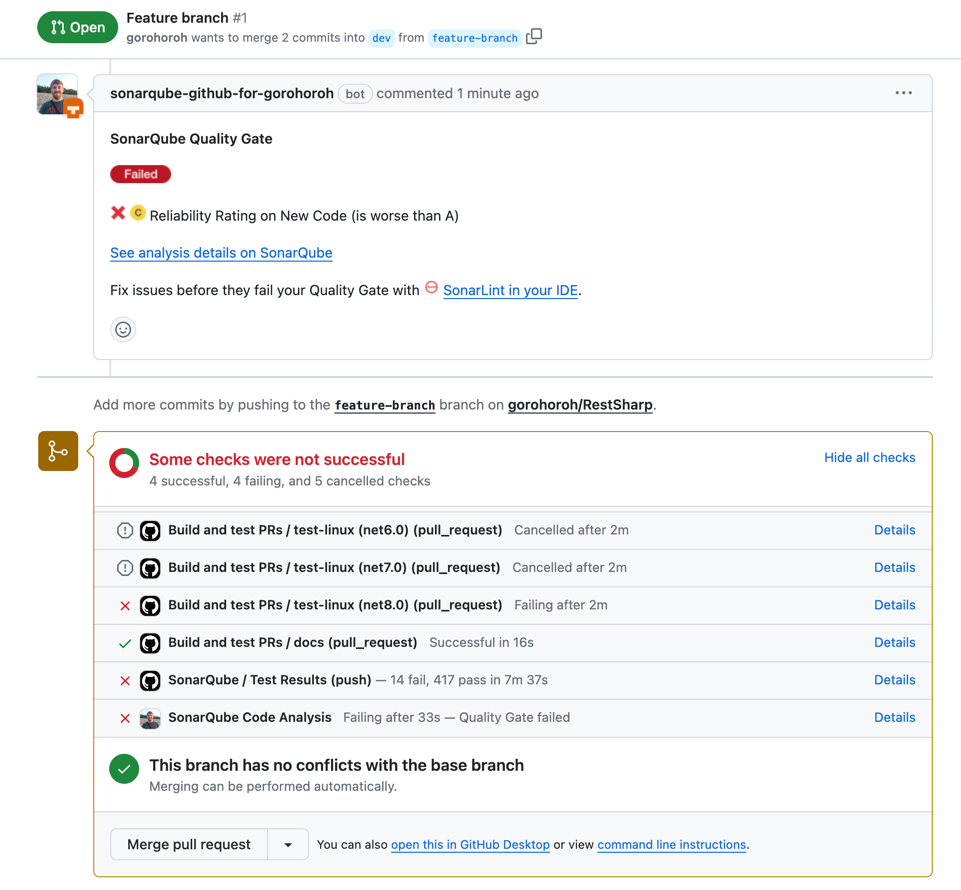
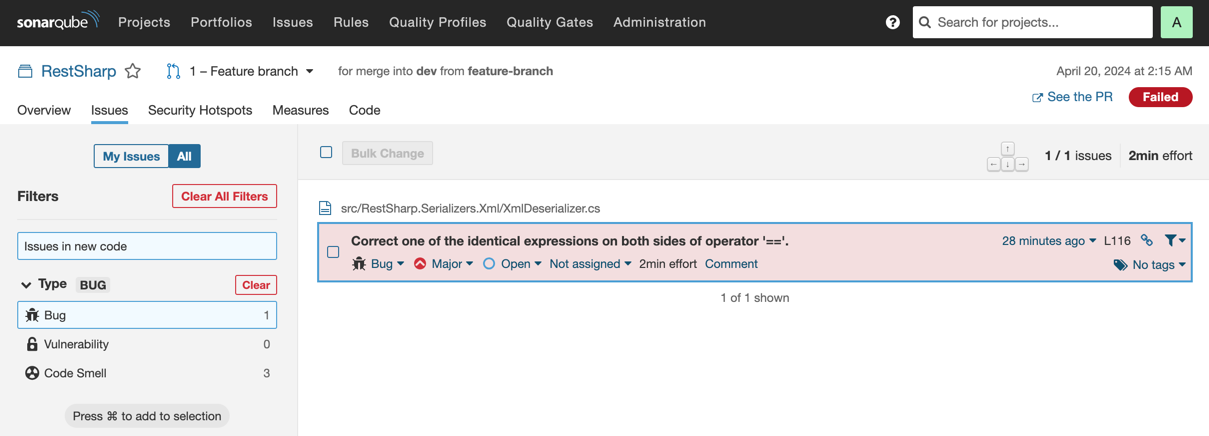
In this case, the SonarQube scan failed because the code in the PR does not have the required reliability score. For details on how to fix the reliability score, you can click See analysis details on SonarQube from the comment. In the SonarQube UI, you can now see that the PR introduces a comparison of two identical expressions, which is clearly a bug that needs to be fixed before merging the PR:

Connect SonarQube and SonarQube for IDE in VS Code
SonarQube provides a solid code-quality gate for code that's already committed to source control, whether it's your main or feature branch or a pull request. However, you can do one better: have instant code-quality feedback right in your code editor. In addition to native code inspections available in many code editors and IDEs, you can install SonarQube for IDE: a free advanced linter extension that helps maintain high quality and secure code as you are coding and before you commit.
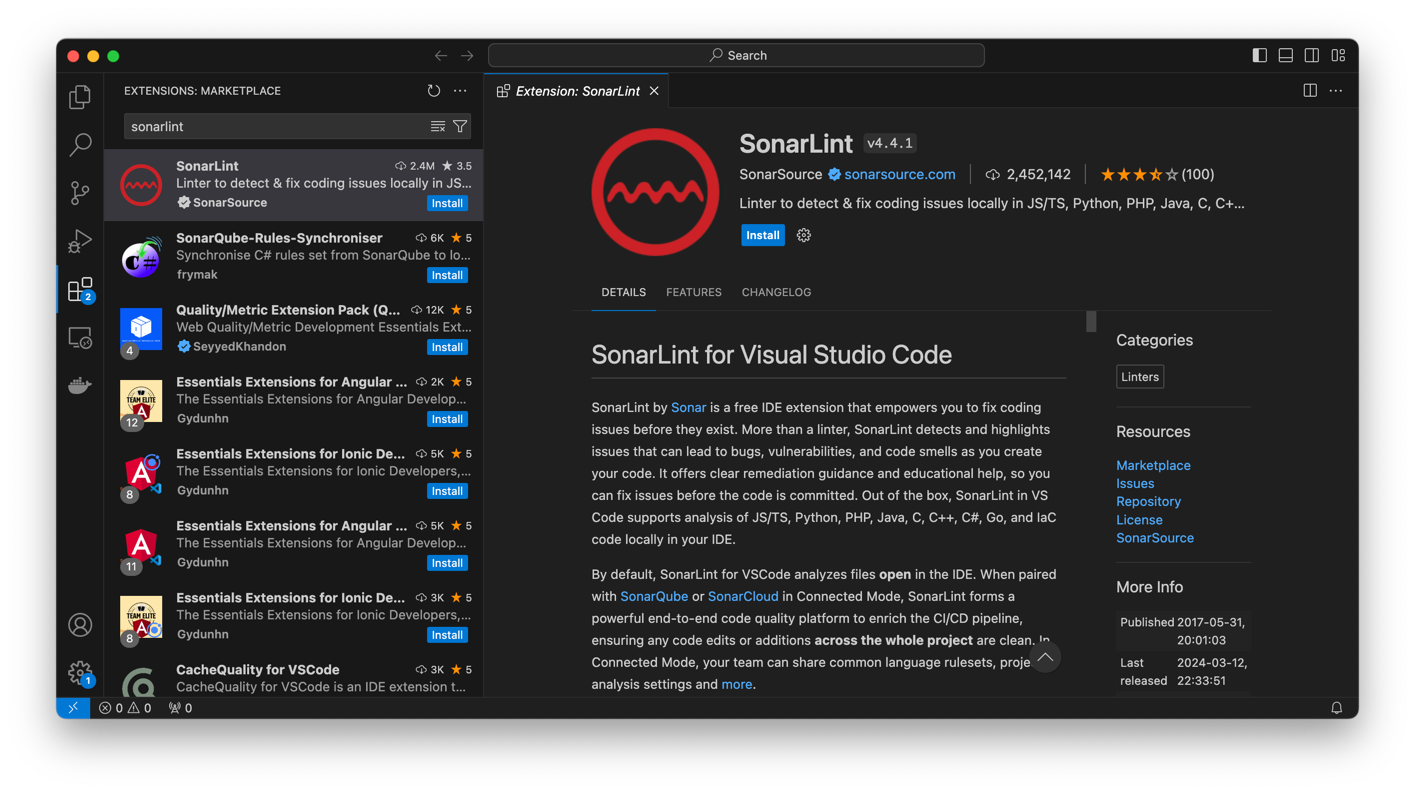
For example, if you're using Visual Studio Code, you can install SonarQube for IDE: Visual Studio Code. Open Visual Studio Code's Extensions pane, search for 'SonarQube for IDE', and install the SonarQube for IDE extension by SonarSource when it shows up in the search results.

You'll see code analysis results similar to those that you run on the server right in the code editor before you commit and push your changes:

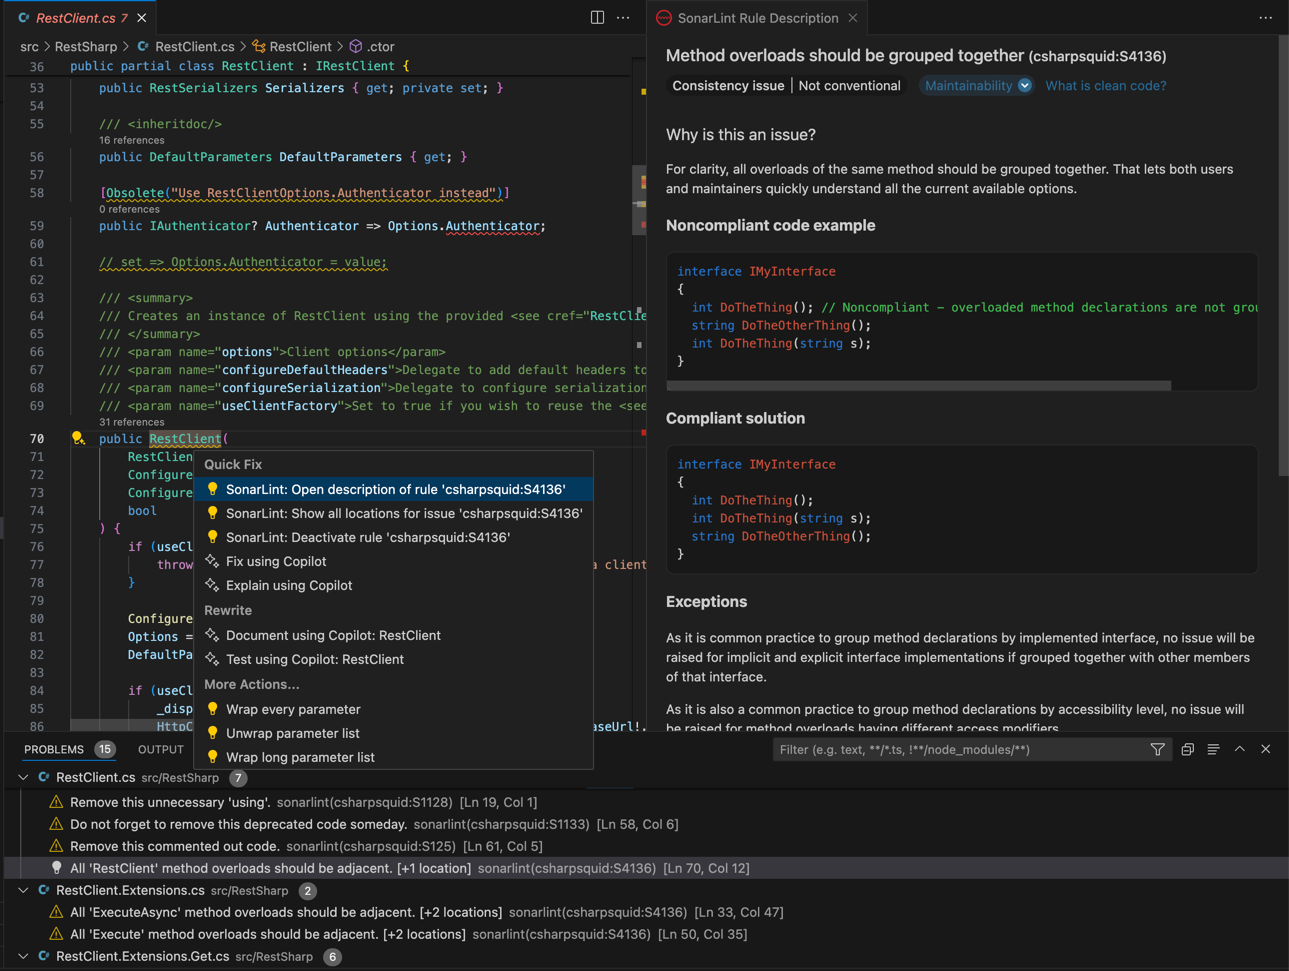
If you're using both SonarQube for IDE for in-editor code analysis and SonarQube for server-side code analysis, consider enabling Connected Mode in SonarQube for IDE. Connected Mode pairs SonarQube for IDE with your SonarQube or SonarQube Cloud instance to ensure that both your local edits and the commits you push to the repository are inspected for code quality using the same analysis settings shared across your team.
Summary
SonarQube is a code quality and security tool that scans code before it is merged into your code base and helps your team maintain a high-quality standard of high quality and secure code.
As you saw in this guide, SonarQube Developer Edition and above allow code scanning not only in the main branch of your repository but also in other branches and pull requests, which helps detect and address code-quality issues before they leak into your trunk.
Want to try it for yourself? Request a free trial to see SonarQube in action.
This guide was written by Jura Gorohovsky.
- August 2, 2024