
Start your free trial
Verify all code. Find and fix issues faster with SonarQube.
Get startedIntro
Ensuring code quality and security in Java applications is a complex task. Poor coding practices, such as code duplication, complex structures, or lack of documentation, can compromise your code's maintainability, readability, and efficiency. In addition, malicious entities can exploit vulnerabilities, leading to unauthorized access, data breaches, and service interruptions.
Static code analysis and vulnerability scanning help you maintain the integrity and security of software applications you develop at the earliest point in the Software Development Life Cycle (SDLC), reducing the work and lowering the cost to test, find, and fix issues found later in the SDLC. Static code analysis identifies issues in the codebase that lead to unstable and unmaintainable software. Vulnerability scanning, also known as Static Application Security Testing (SAST), identifies security weaknesses, which is especially useful as cyber threats become more sophisticated.
That is where SonarQube Cloud comes into play.SonarCloud is a cloud-based solution that offers a comprehensive code quality and security analysis, including automatic analysis, bug detection, security vulnerability detection, and technical debt detection in Java projects and beyond
In this step-by-step guide, you'll learn how to use SonarQube Cloud to continuously scan a project in GitHub using a GitHub Action workflow.
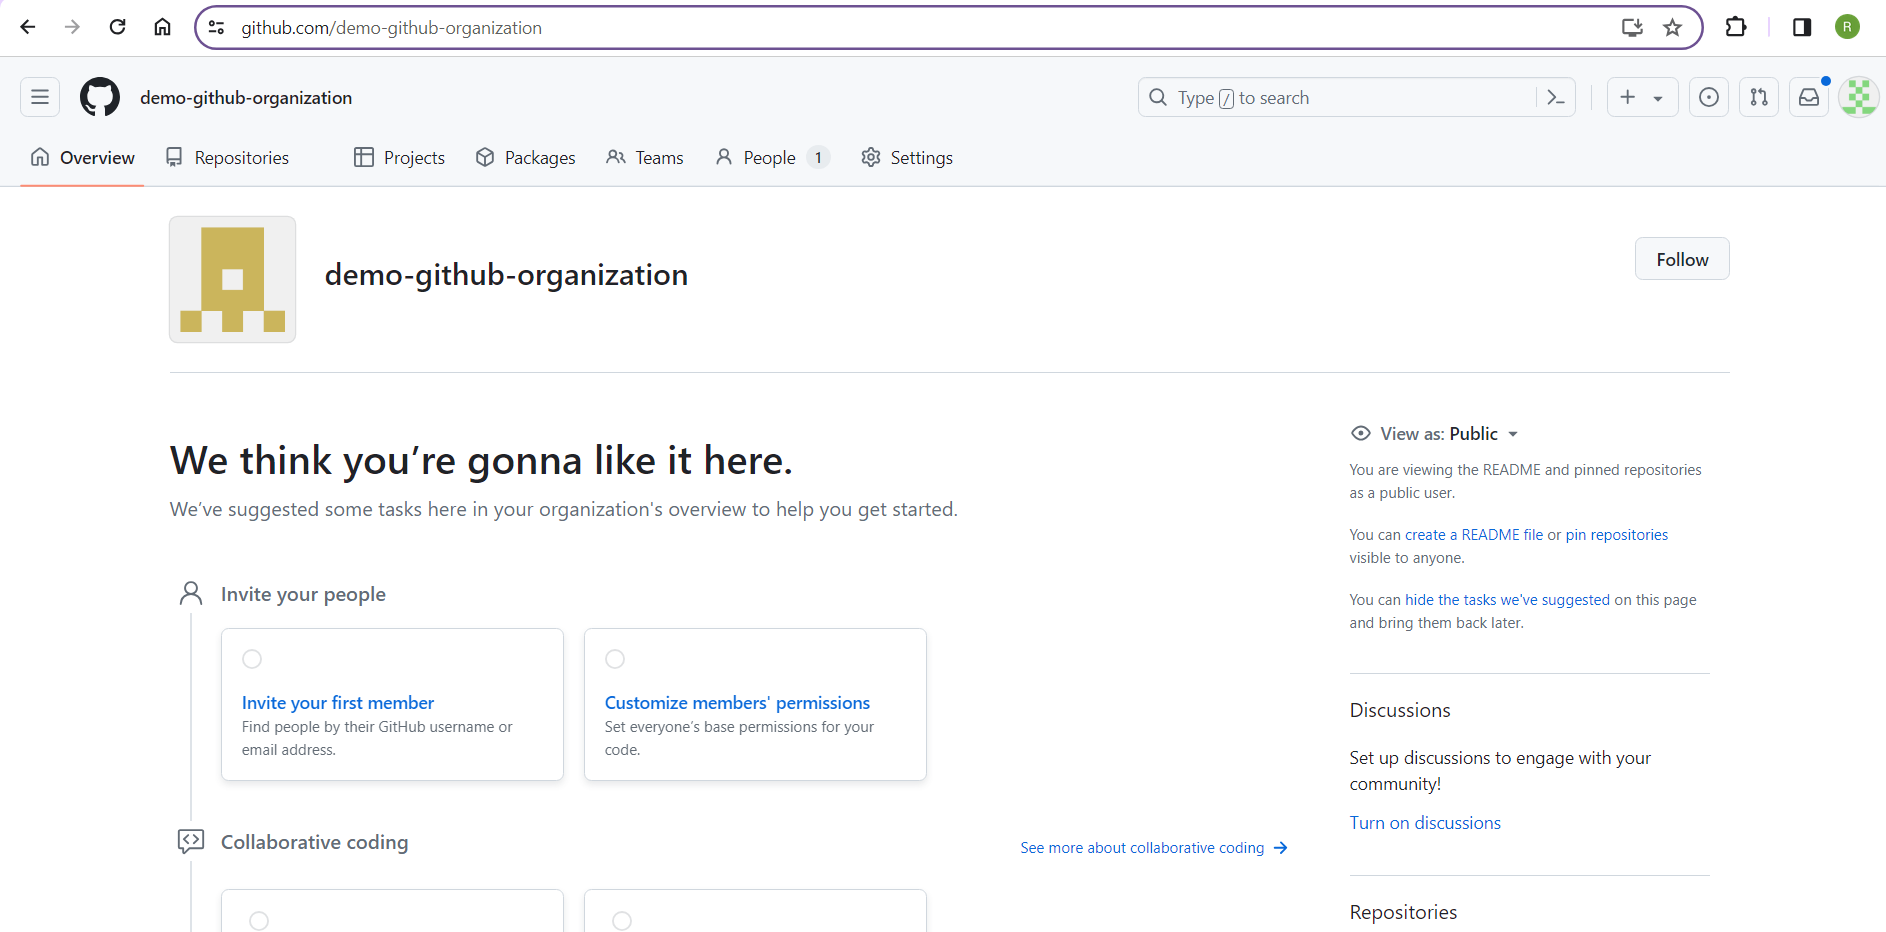
Create an Organization on GitHub
To integrate SonarQube Cloud with GitHub, you must first set up a GitHub Organization.
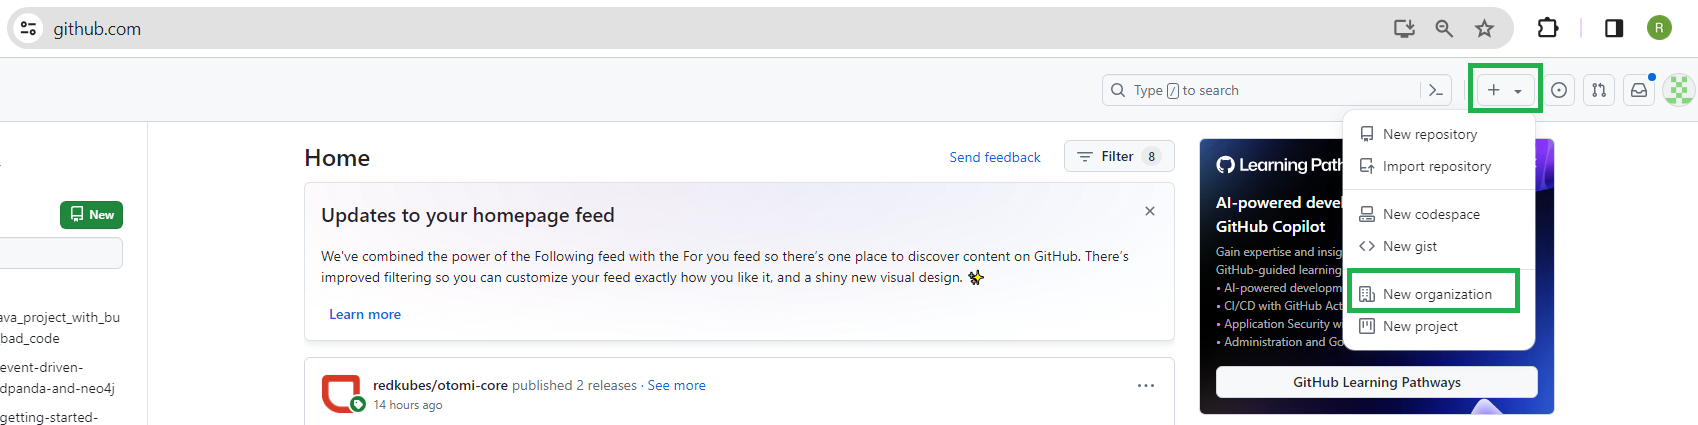
Log in to your GitHub account (or create a new one). At the top right of the GitHub home page, click on + and select New organization:

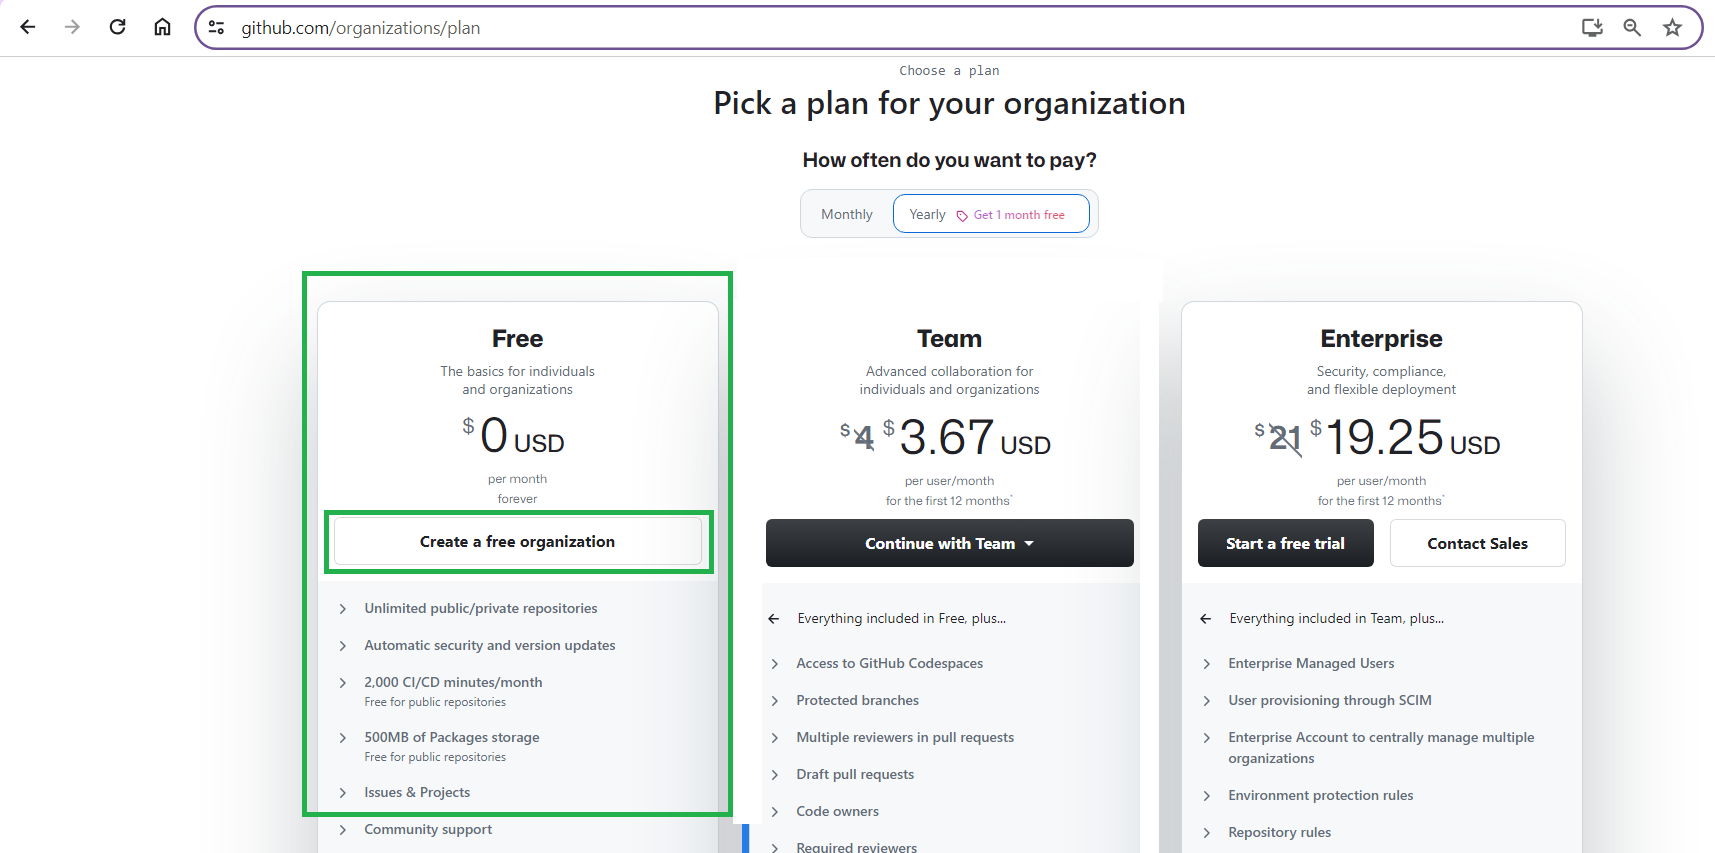
Choose Create a free organization:

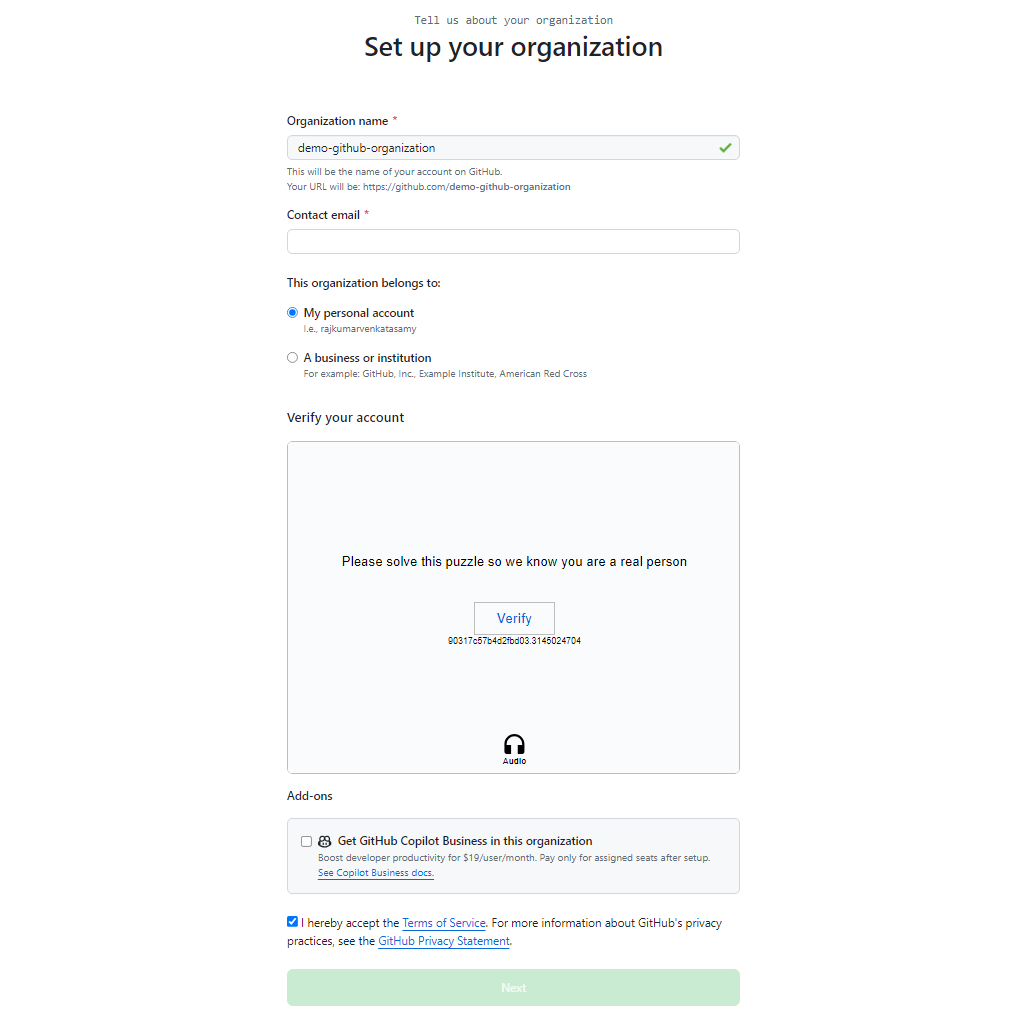
Name your organization. Pick any name you like. Throughout the rest of this guide, the name demo-github-organization will be used. Simply replace it with the name you chose as you cut and paste from this guide.
Add your contact email and indicate that this organization belongs to your personal account. Verify your account and accept the terms of service:

Click Next to see the new organization page.

Fork a Demo Repository
For the purpose of this tutorial, you'll fork this repository containing the source code of a sample Java application with bugs, vulnerabilities, and bad code. Later in this tutorial, you'll see how SonarQube Cloud finds these issues.
Open the repository in a browser and click Fork:


In the Owner drop-down, choose the GitHub organization you created earlier from the options listed:

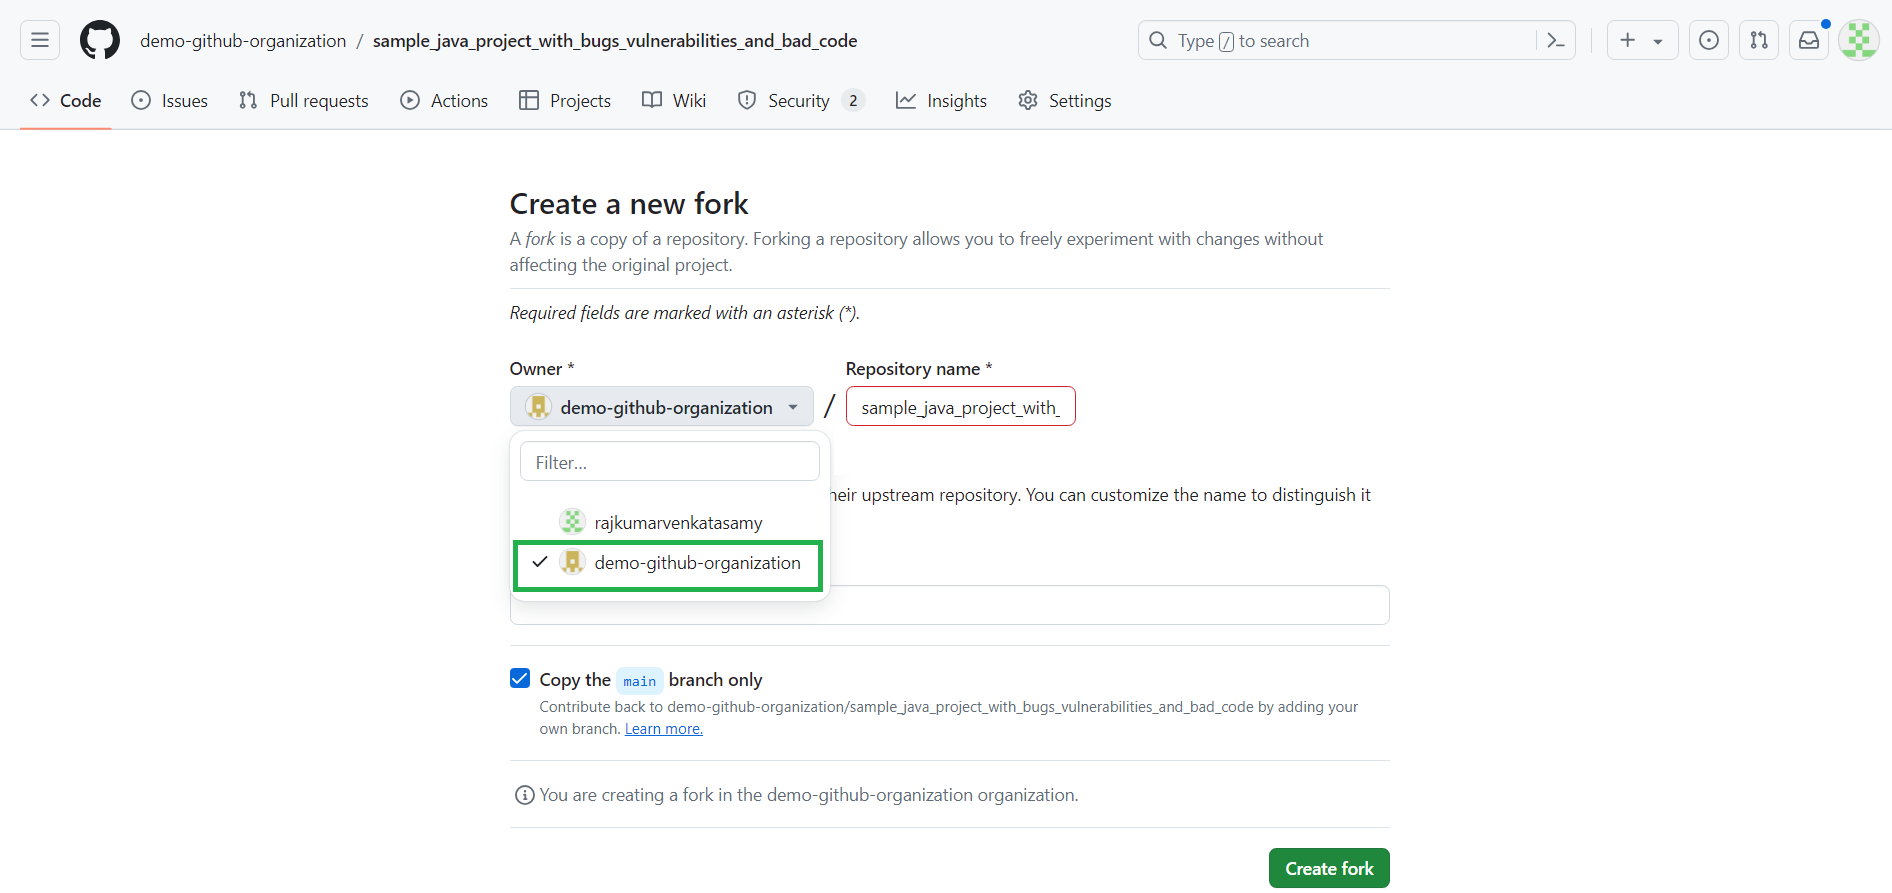
Check Copy the main branch only and click Create fork.
Set Up SonarQube Cloud
Next, you'll set up your SonarQube Cloud account and organization and configure SonarQube Cloud to analyze the project repository.
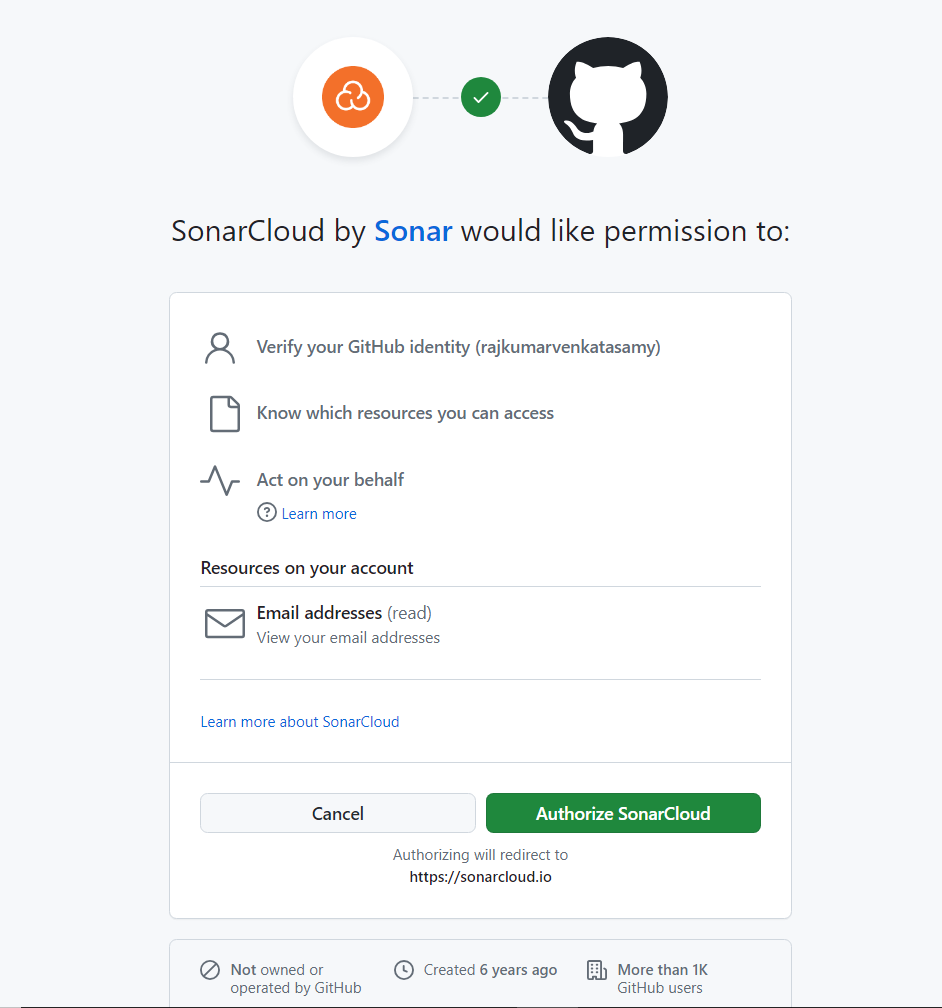
Sign up for a free SonarQube Cloud account using your GitHub account. Authorize SonarQube Cloud to verify your GitHub account when prompted:

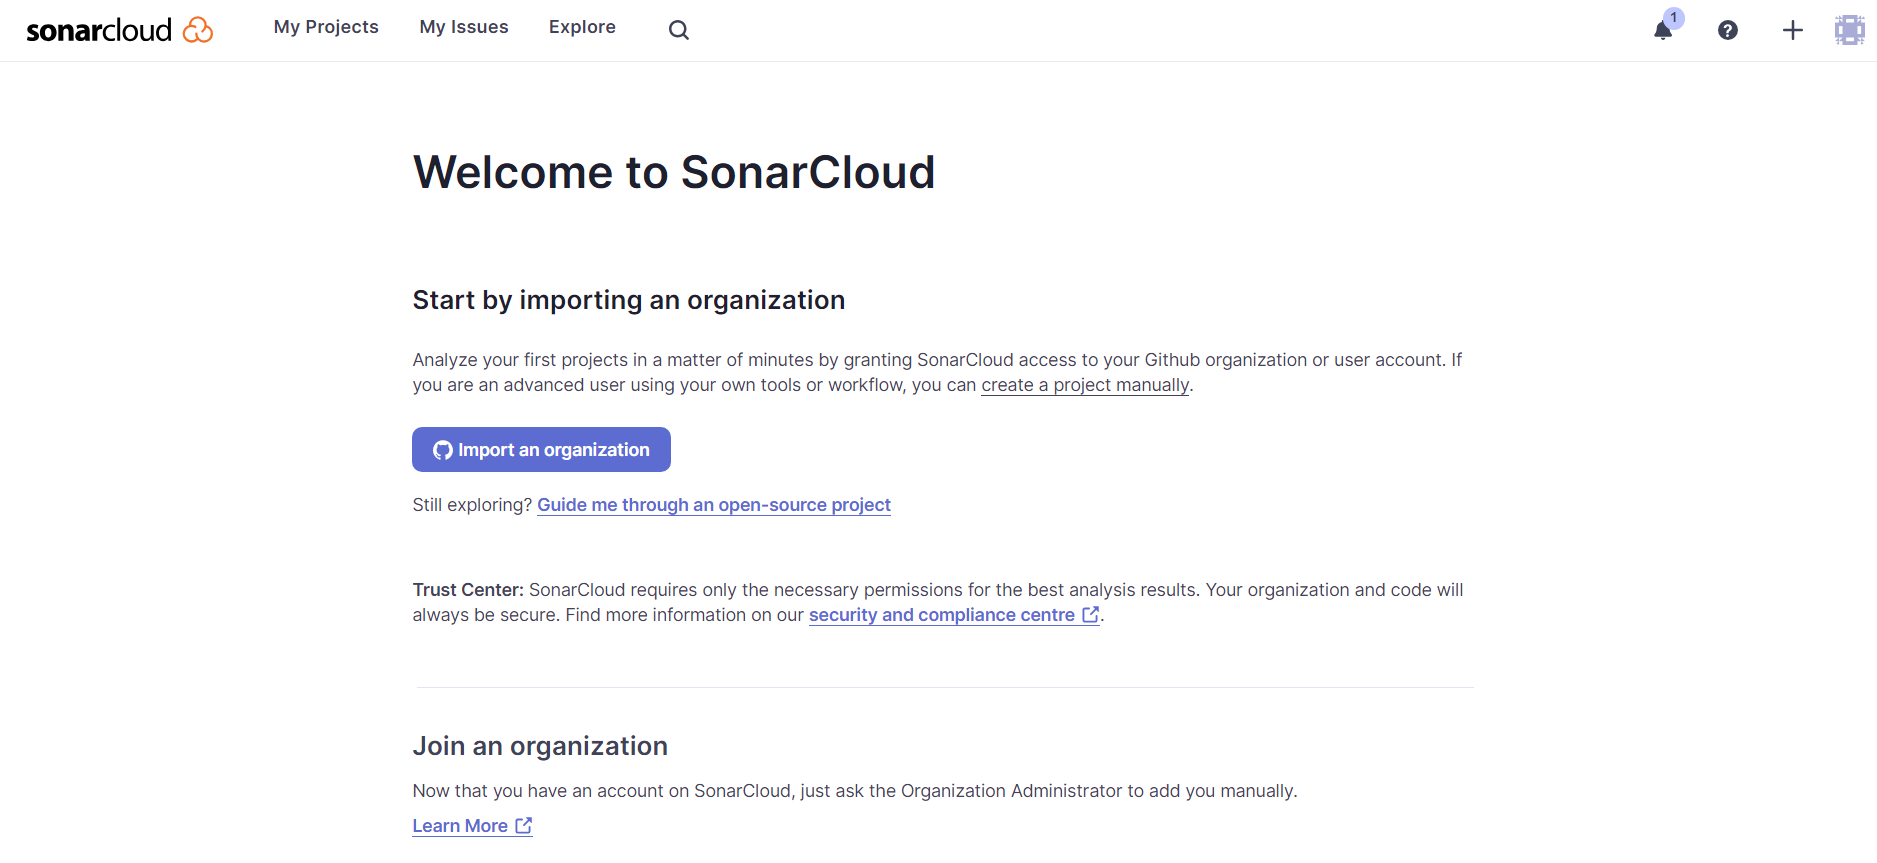
On the welcome page, click Import an organization:

On the next screen, you'll see your GitHub organization, which, in this case, is demo-github-organization. Select it:

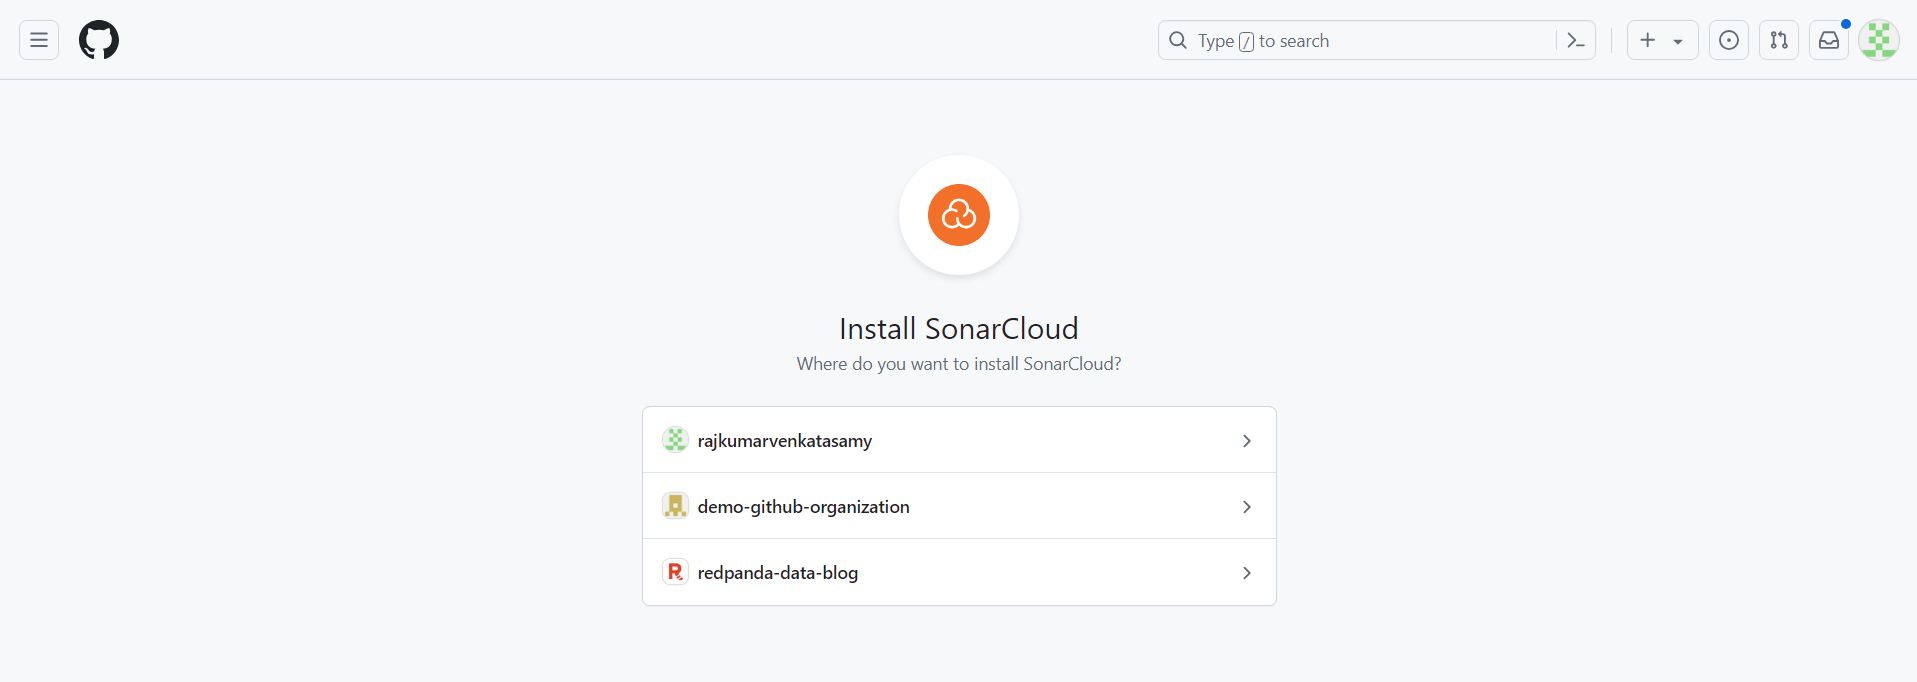
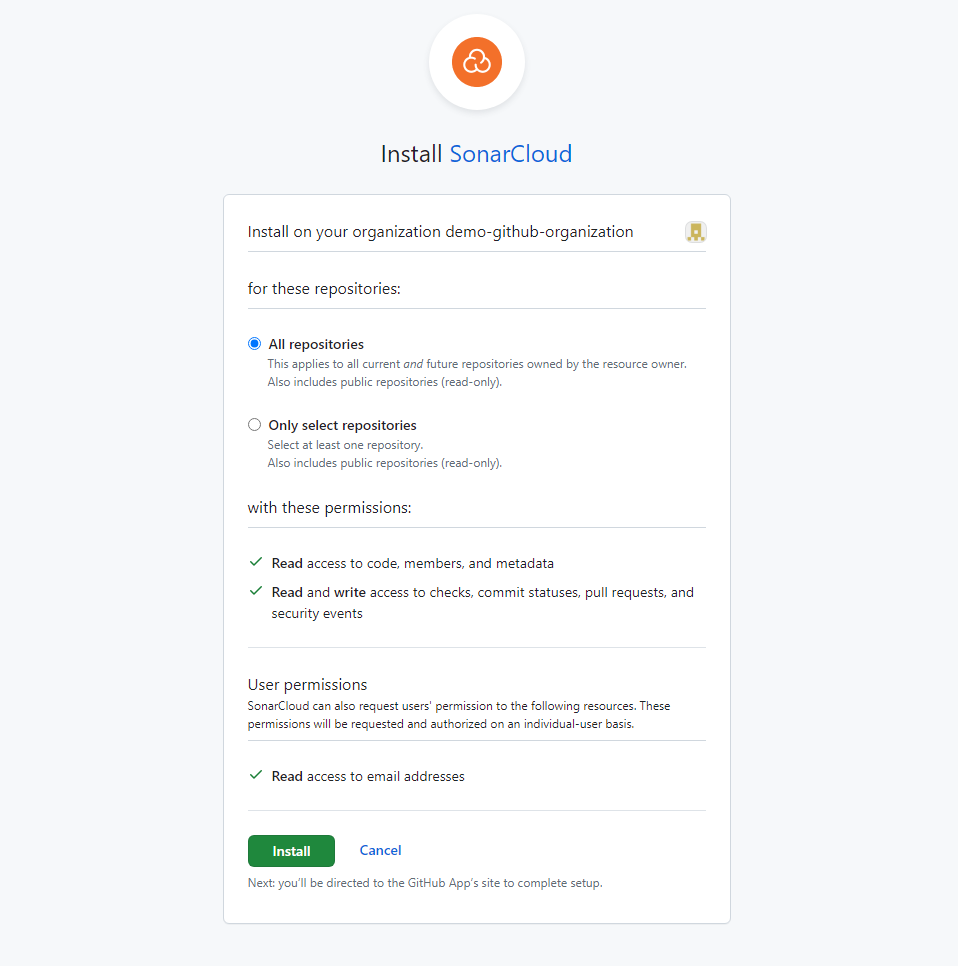
The next screen asks you to select the repositories on which SonarQube Cloud needs to act. Choose All repositories for this tutorial and click Install:

On the next page, choose the free plan and click Create Organization to create an organization in SonarQube Cloud:


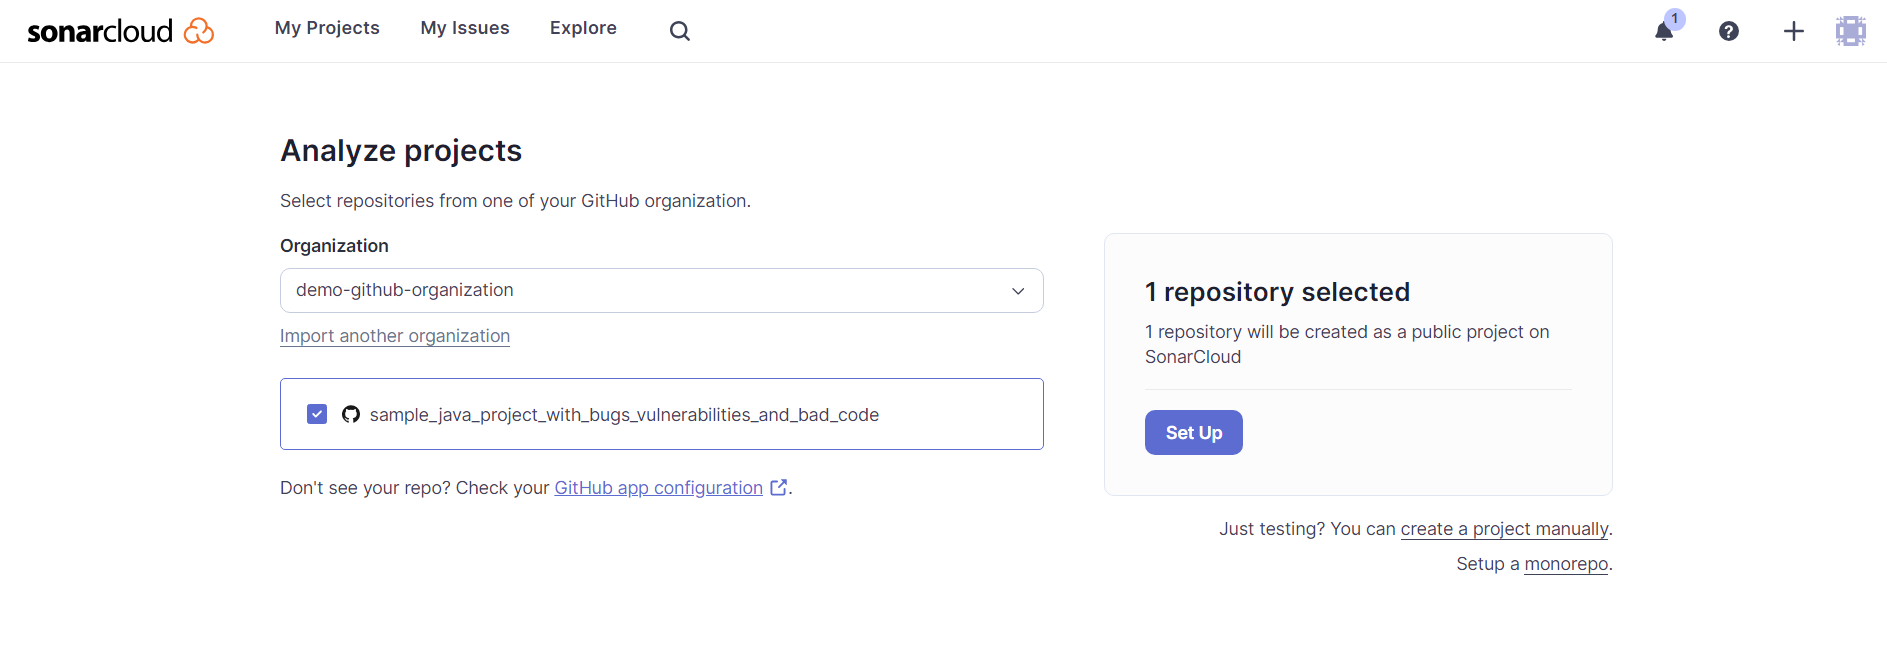
In the Analyze projects screen, you'll see the forked repository. Select it and click Set Up:

In the project setup screen, you must choose what the new code for this project will be based on. Choose Previous version and click Create project:


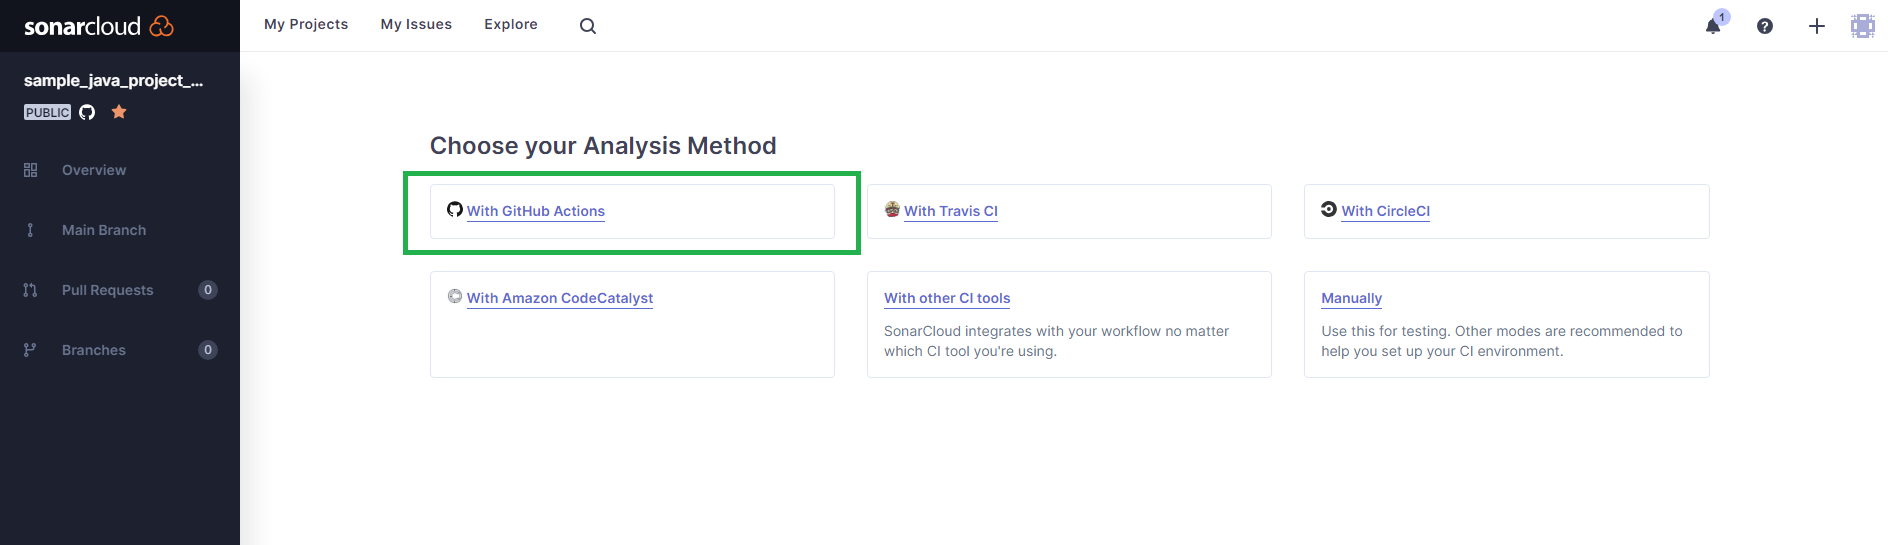
When prompted to choose the analysis method, select With GitHub Actions since you're integrating SonarQube Cloud analysis with GitHub Actions in this tutorial.

The next screen will show a secret value for the field SONAR_TOKEN.


Note that part of the value in this screenshot was removed for security reasons.
Copy the entire token value since you'll need it to configure the secret in the GitHub repository. Then, navigate to your GitHub repository, click Settings, select Secrets and variables from the side menu, and click Actions.

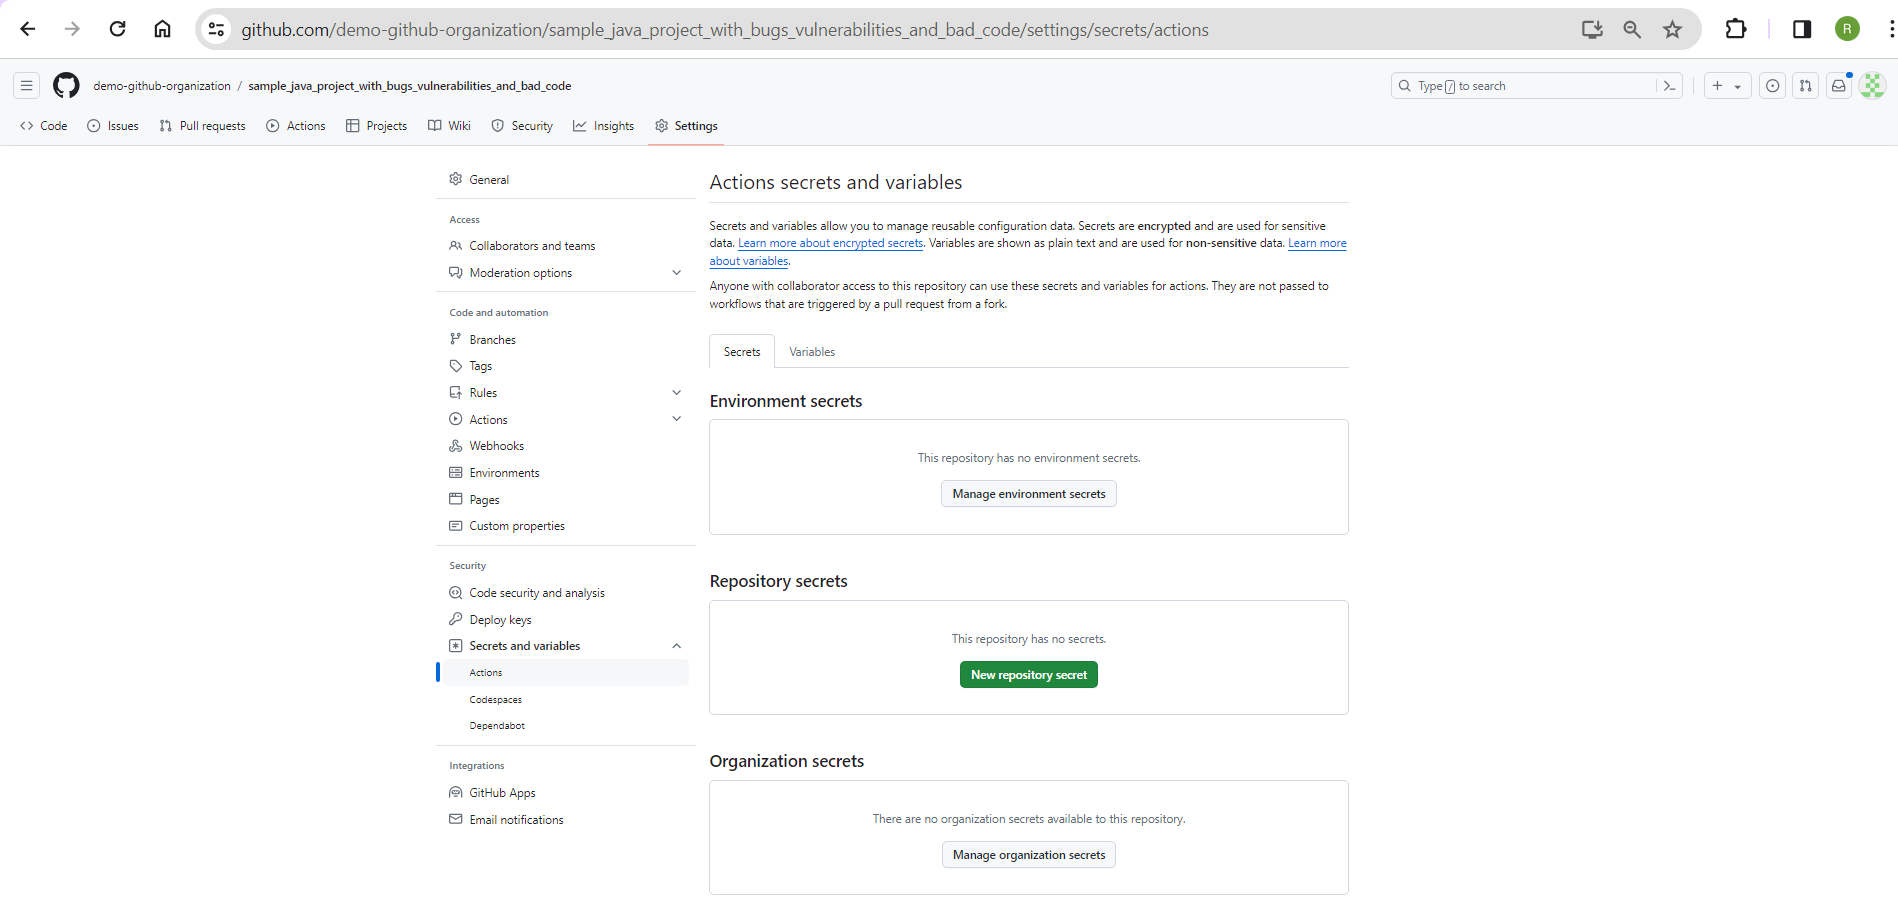
Click New repository secret and add `SONAR_TOKEN` as your repository secret.


Set Up Build Integration with SonarQube Cloud
Next, you need to define a GitHub Actions workflow YML file to integrate SonarQube Cloud into your build pipeline.
Clone your repository onto your local machine using this command:
git clone https://github.com/demo-github-organization/sample_java_project_with_bugs_vulnerabilities_and_bad_code.git
Switch to the project directory 'sample_java_project_with_bugs_vulnerabilities_and_bad_code', create a new directory named '.github,' and create another directory in this one named 'workflows.' In the 'workflows' directory, create a new file named 'build.yml' and place the content below in it to integrate SonarQube Cloud with the build pipeline:
# The name of the workflow
name: SonarCloud

# Defines when the action should run
on:

  # Triggers the workflow on push events to the main branch
  push:
    branches:
      - main

  # Also triggers the workflow on pull request events
  pull_request:
    types: [opened, synchronize, reopened]

# A workflow run is made up of one or more jobs
jobs:

  # This workflow contains a single job called "build"
  build:

    # The name of the job
    name: Build and analyze

    # The type of runner that the job will run on
    runs-on: ubuntu-latest

    # A sequence of tasks that will be executed as part of the job
    steps:

      # Checks out a copy of your repository on the ubuntu-latest machine
      - uses: actions/checkout@v3
        with:
          fetch-depth: 0  # Shallow clones should be disabled for a better relevancy of analysis

      # Sets up a JDK 17 environment for the job with the 'zulu' distribution
      - name: Set up JDK 17
        uses: actions/setup-java@v3
        with:
          java-version: 17
          distribution: 'zulu' # Alternative distribution options are available

      # Caches SonarCloud packages to speed up workflow execution
      - name: Cache SonarCloud packages
        uses: actions/cache@v3
        with:
          path: ~/.sonar/cache
          key: ${{ runner.os }}-sonar
          restore-keys: ${{ runner.os }}-sonar

      # Caches Gradle packages to speed up workflow execution
      - name: Cache Gradle packages
        uses: actions/cache@v3
        with:
          path: ~/.gradle/caches
          key: ${{ runner.os }}-gradle-${{ hashFiles('**/*.gradle') }}
          restore-keys: ${{ runner.os }}-gradle

      # Grants execute permission for gradlew
      - name: Grant execute permission for gradlew
        run: chmod +x ./demo/gradlew

      # Builds and analyzes the code
      - name: Build and analyze
        env:

          # Needed to get PR information, if any. This token is auto created/managed by GitHub
          GITHUB_TOKEN: ${{ secrets.GITHUB_TOKEN }}

          # SonarCloud token for authentication
          SONAR_TOKEN: ${{ secrets.SONAR_TOKEN }}

        # Specifies that the working directory for the following step is './demo'
        working-directory: ./demo

        # Runs the command for building and analyzing the code
        run: ./gradlew build sonar --info -x test
Next, edit the file build.gradle in the demo project directory to configure your SonarQube Cloud's sonar.organization and sonar.projectKey variables.
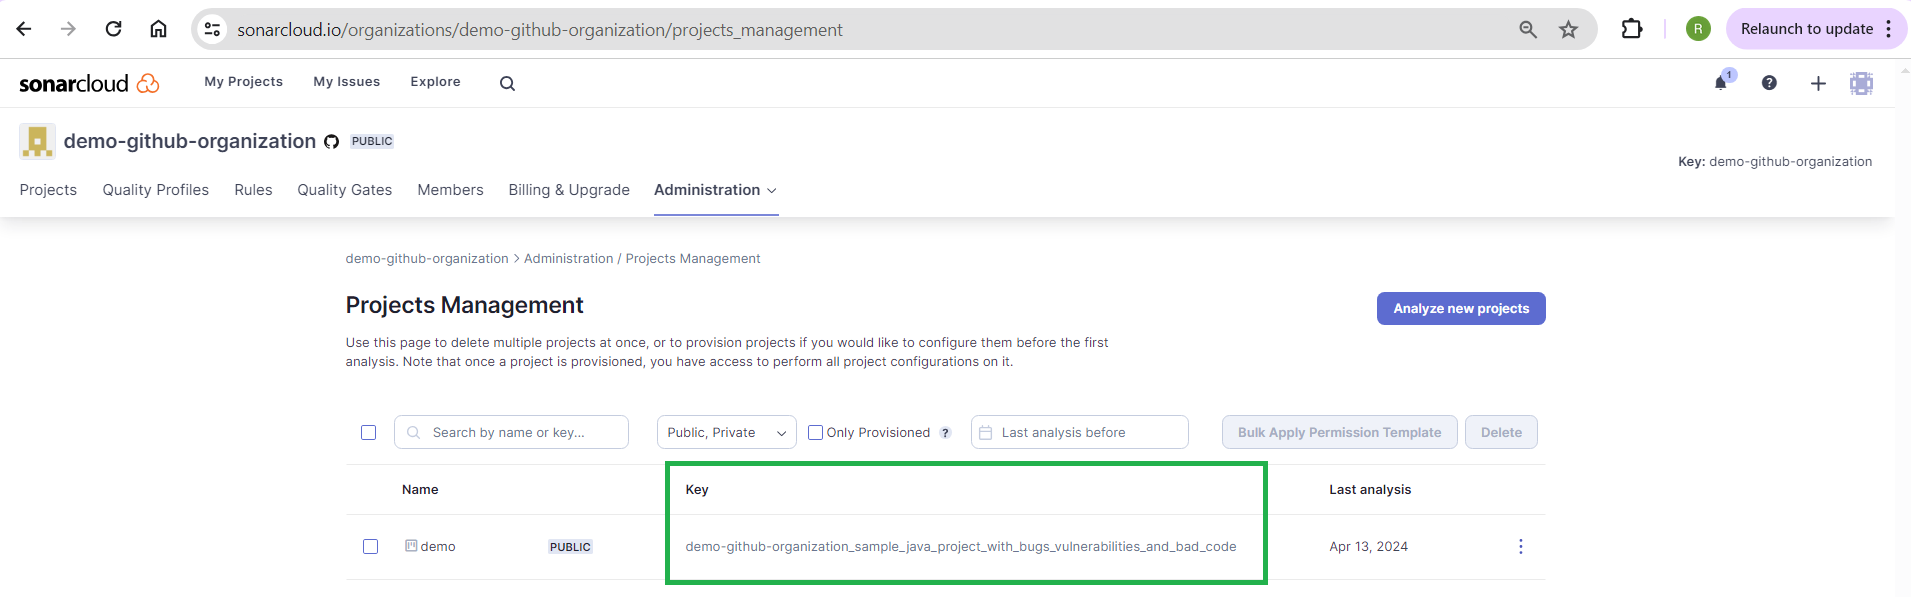
Replace the value of sonar.projectKey <demo-github-organization_sample_java_project_with_bugs_vulnerabilities_and_bad_code> with your unique project key. You can get the project key information by navigating to <https://sonarcloud.io/organizations/demo-github-organization/projects_management> in a browser. Remember to replace the 'demo-github-organization' with your organization value. You should see a screen as below:

Replace the value of sonar.organization <demo-github-organization> with your organization key. By default, the organization key is your organization's name.
Stage these changes, then commit and push the changes to your repository using the following commands:
git add .
git commit -am "Integrate SonarQube Cloud with GitHub Actions Workflow"
git push
Go to your repository in a browser and choose the Actions tab. Your workflow will be triggered automatically after a while.


GitHub will generate a runner to execute your action workflow. Depending on the runner's availability on the free plan, it might take a few to several minutes.
Wait for the build to complete.


Examine Analysis Results in SonarQube Cloud
Once the build is successful, head to your SonarQube Cloud account in your browser, where you'll see a screen that displays your GitHub repository with a summary of analysis results.

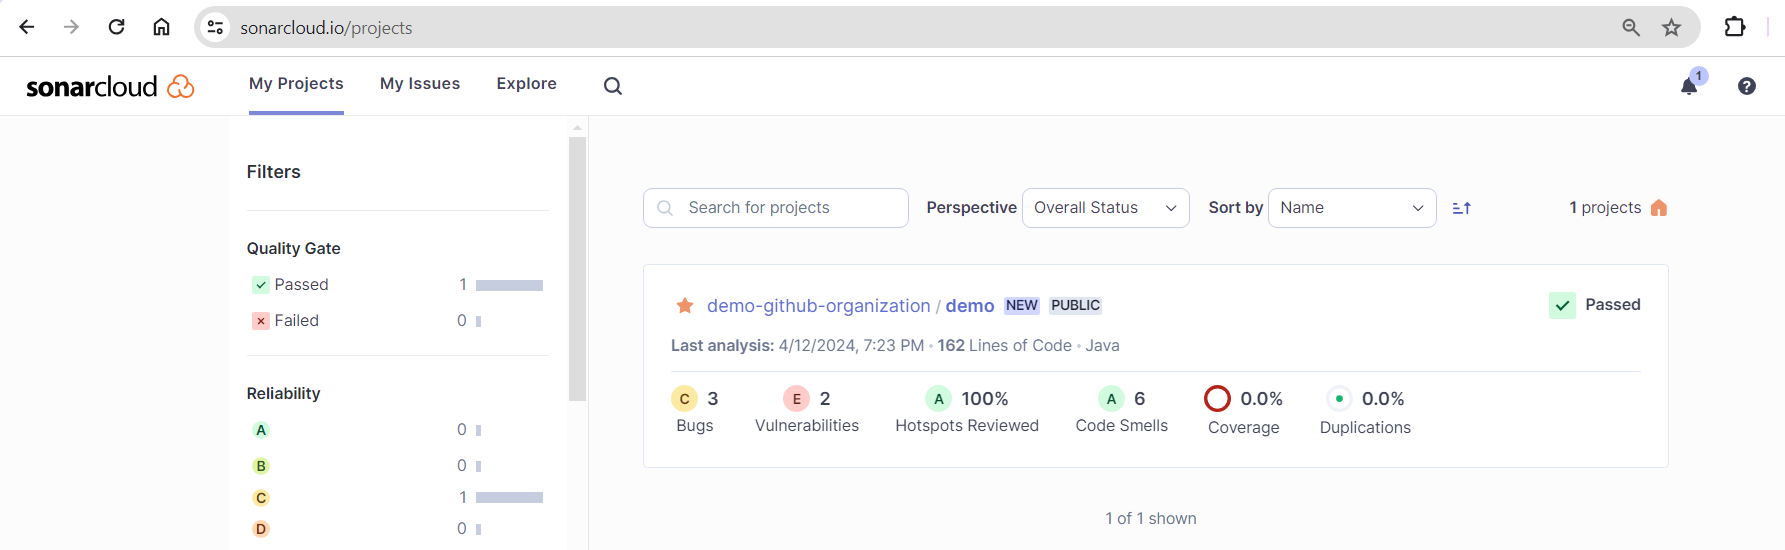
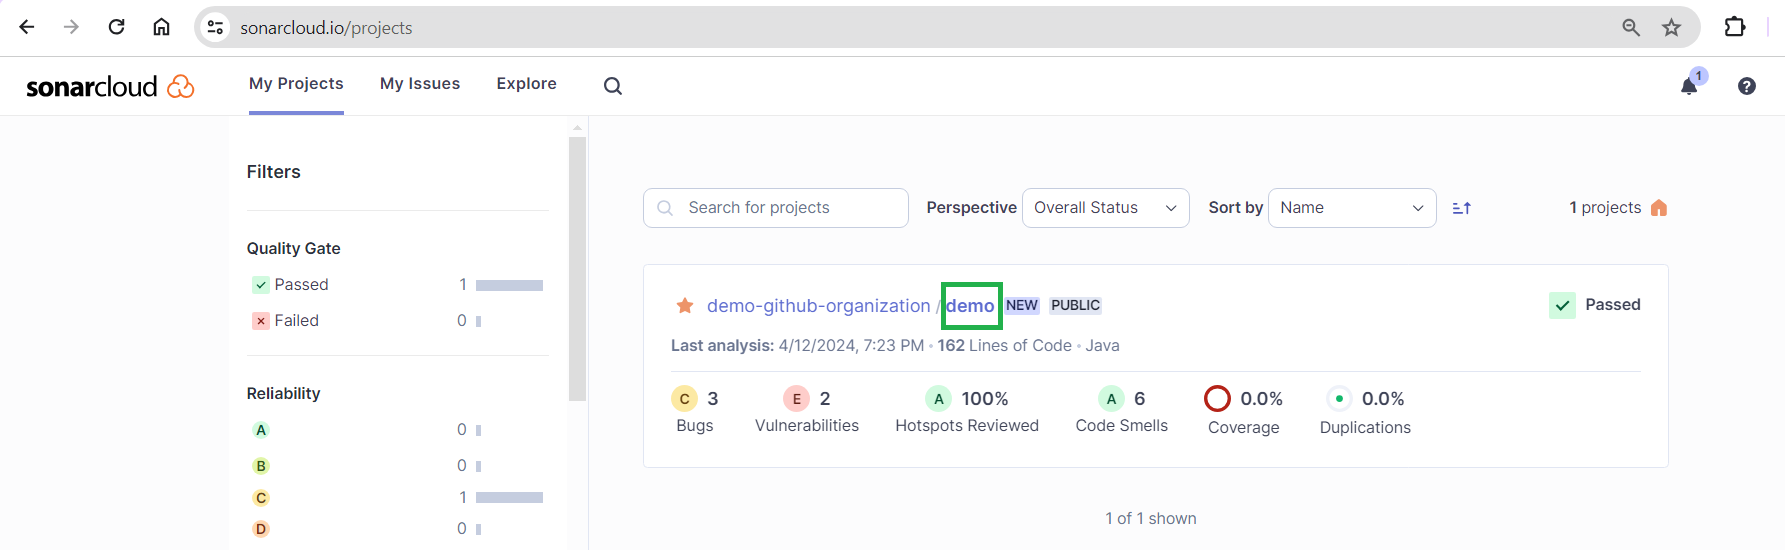
Click on the demo project's repository link to get an overview page of the project:
Click on the link in the number of issues reported in the main branch:

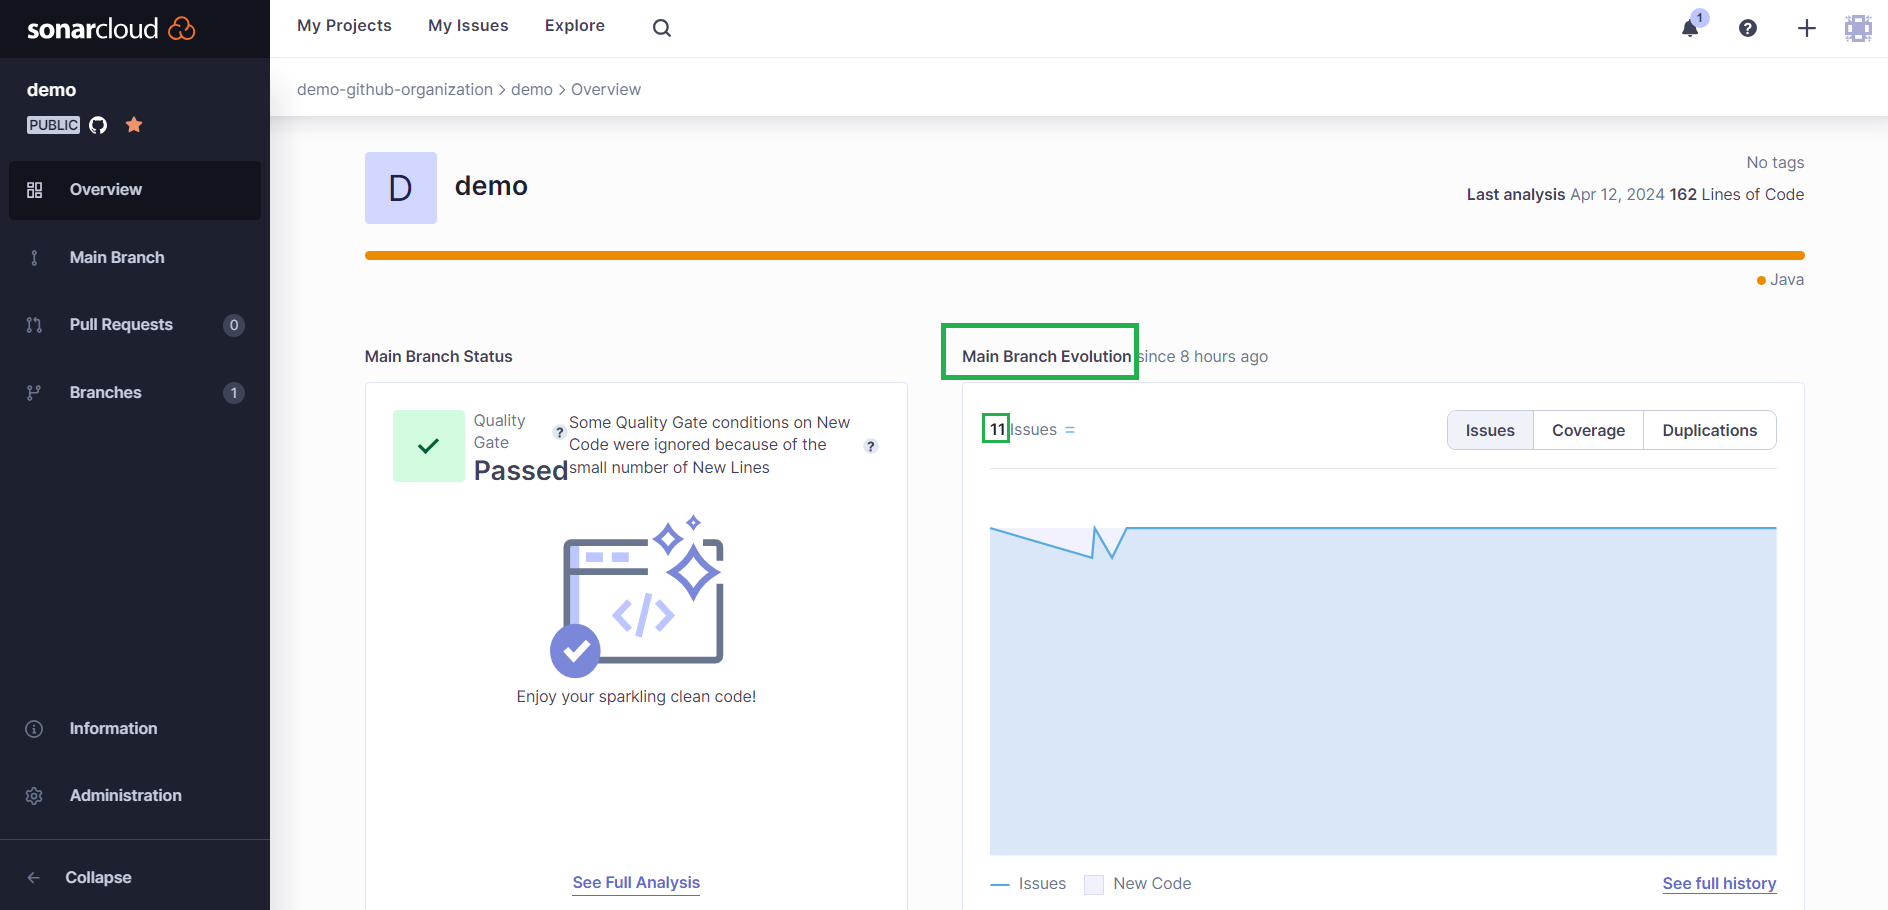
It will take you to a screen where you can view the list of all issues reported by SonarQube Cloud:

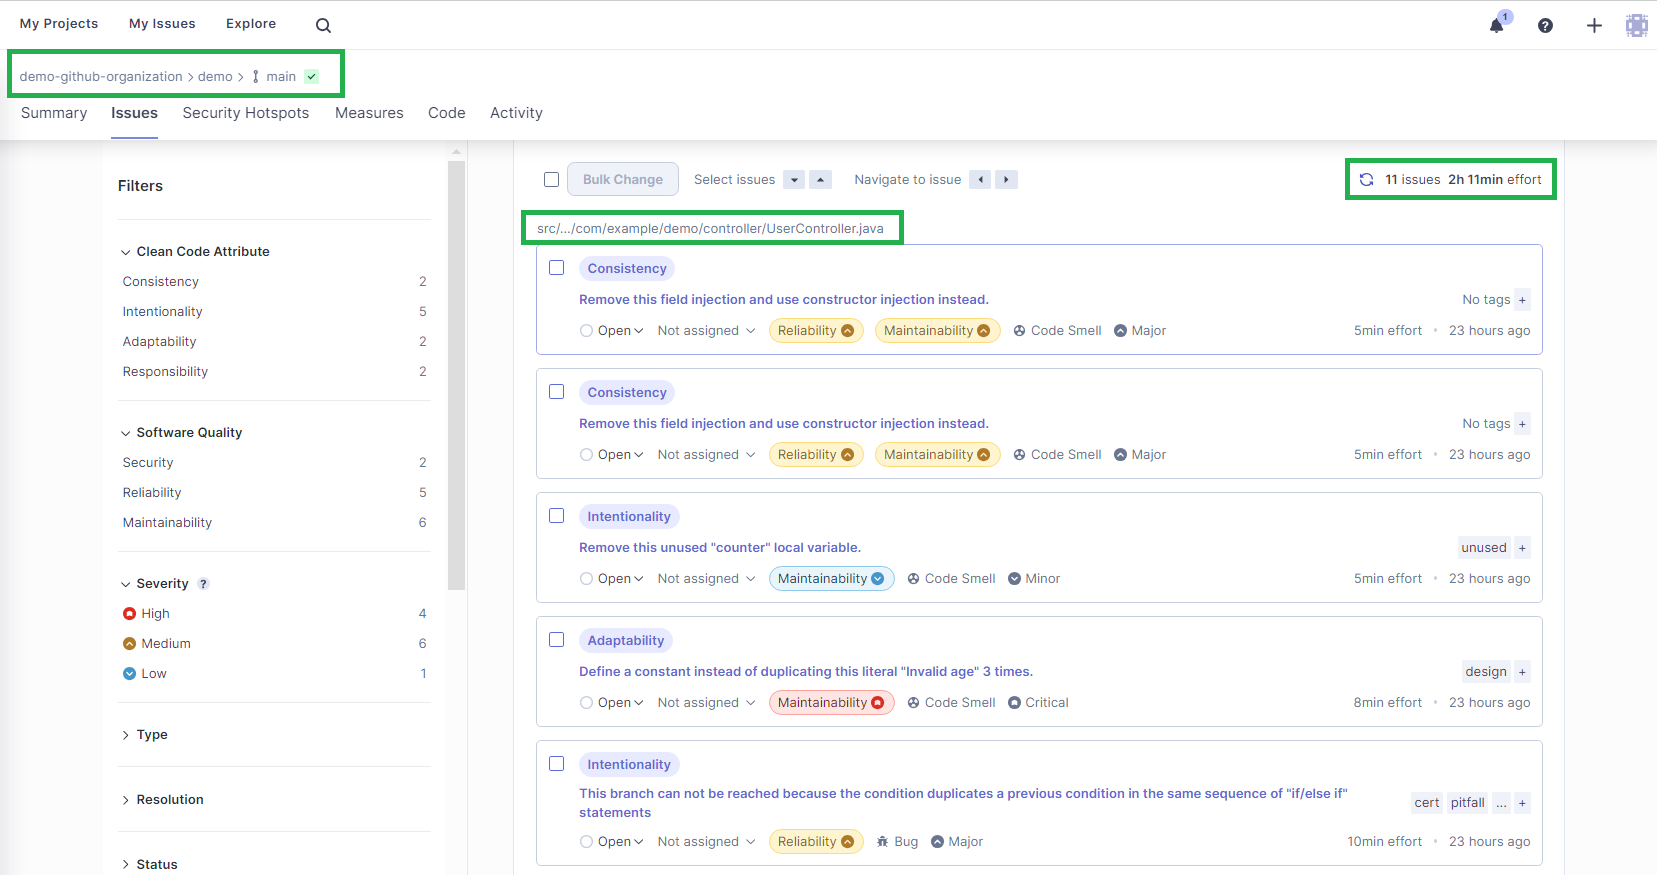
As you can see, SonarQube Cloud analyzed the repository's main branch. SonarQube Cloud reported eleven issues, all in UserController.java, which will take an estimated two hours and eleven minutes to fix. All the issues are listed along with their descriptions. You can click on each issue for more details on the findings.
Fix a Reported Issue
Let's look at one of the reported security issues and fix it by creating a pull request.
To see only the security issues reported, use the left-hand Filters pane and select Security from the Software Quality menu.

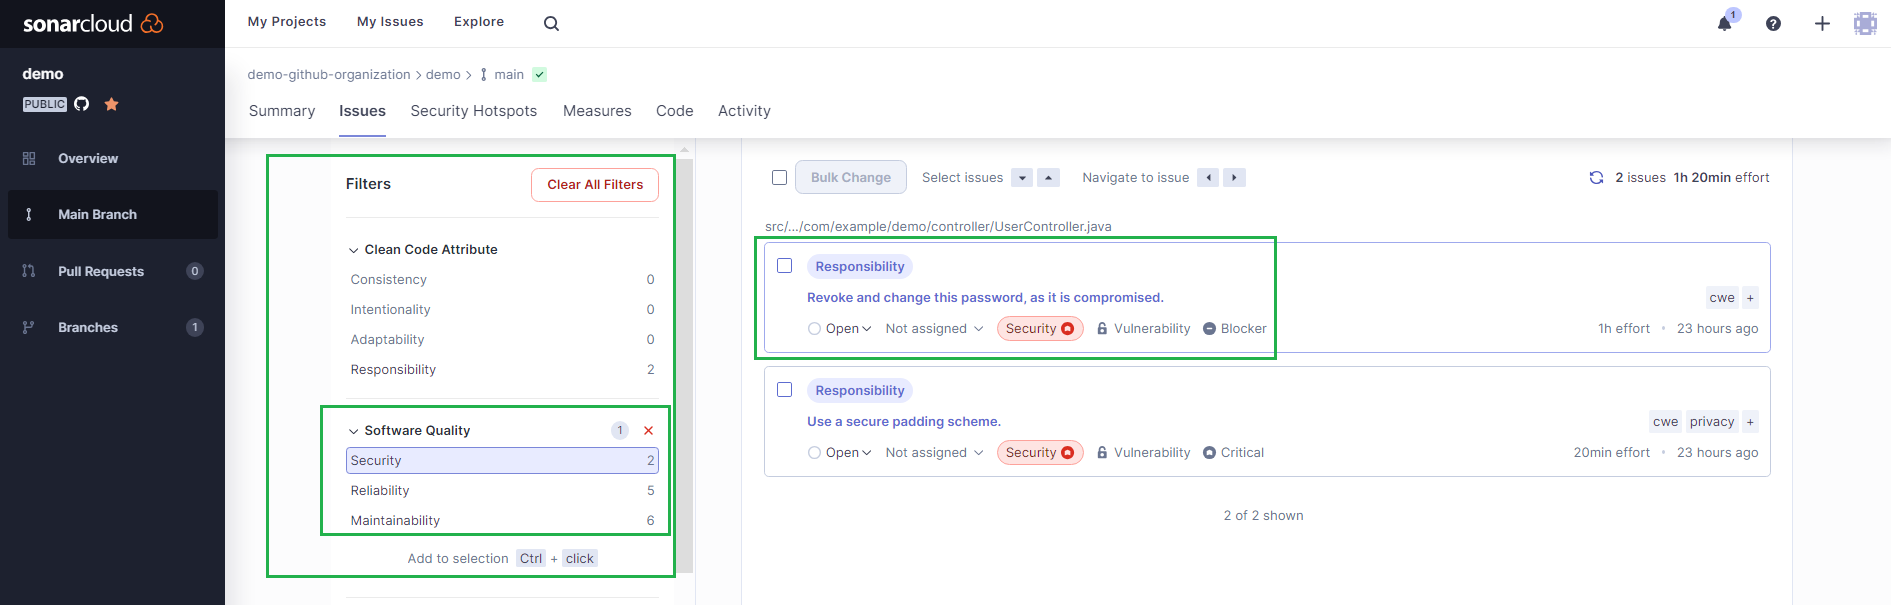
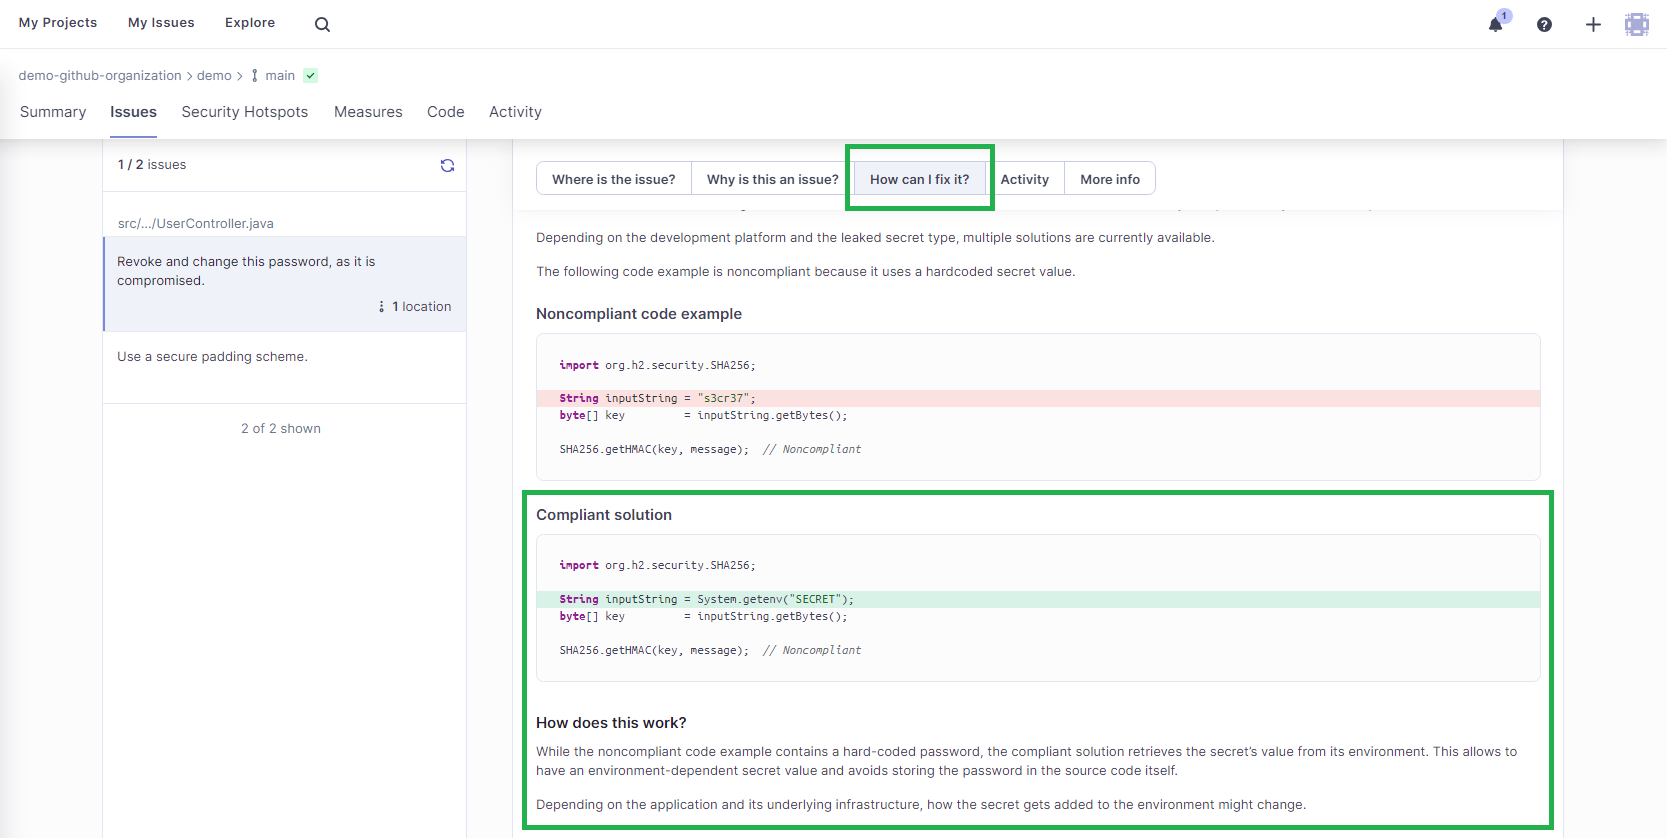
Click on the first issue, Revoke and change the password, as it is compromised, for more details.

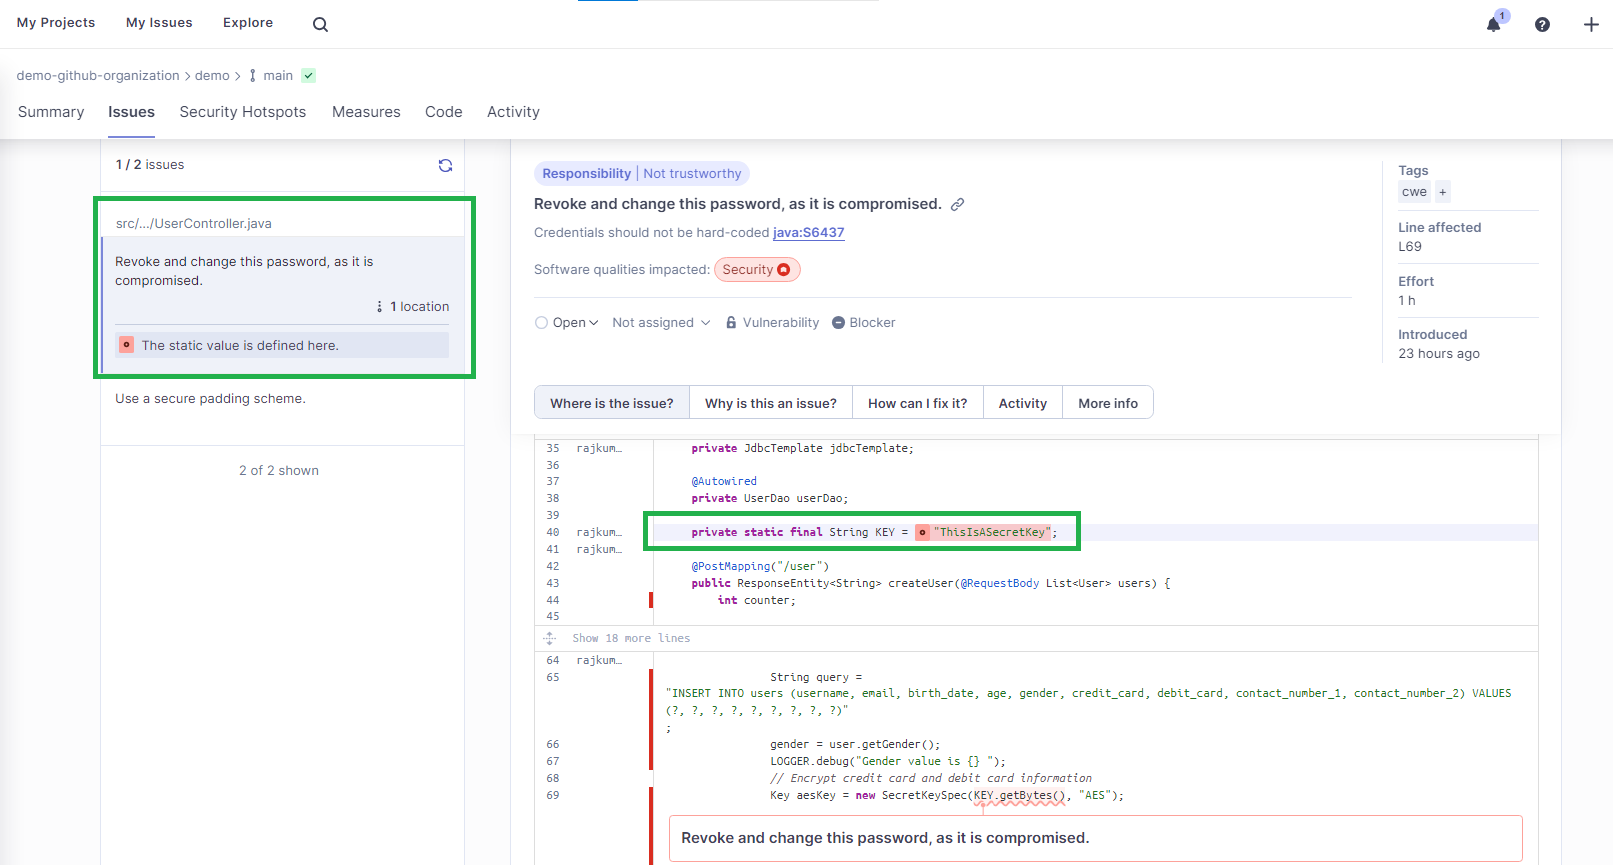
The root cause of this issue is that the key/secret value is hard-coded in the UserController.java file. If you click How can I fix it?, you will see a compliant solution suggested by SonarQube Cloud. In this case, it tells you to get the secret key value from the system environment.

To develop a fix for this security issue, open a terminal and set the directory to your local cloned repository. Then, create a branch using the command below:
git checkout -b security_fix/get_the_key_from_environment
Open the UserController.java file in your favorite IDE and find the following statement:
private static final String KEY = "ThisIsASecretKey";
Change it to the following:
private static final String KEY = System.getenv("ENCRYPTION_KEY");
A system environment variable ENCRYPTION_KEY will now be used for getting the value for the secret KEY.
Stage these changes, then commit and push the changes to your repository using the following commands in the terminal:
git add .
git commit -am "Security fix to replace hard coded key with system environment"
git push origin security_fix/get_the_key_from_environment
Analyze A Pull Request Using SonarQube Cloud
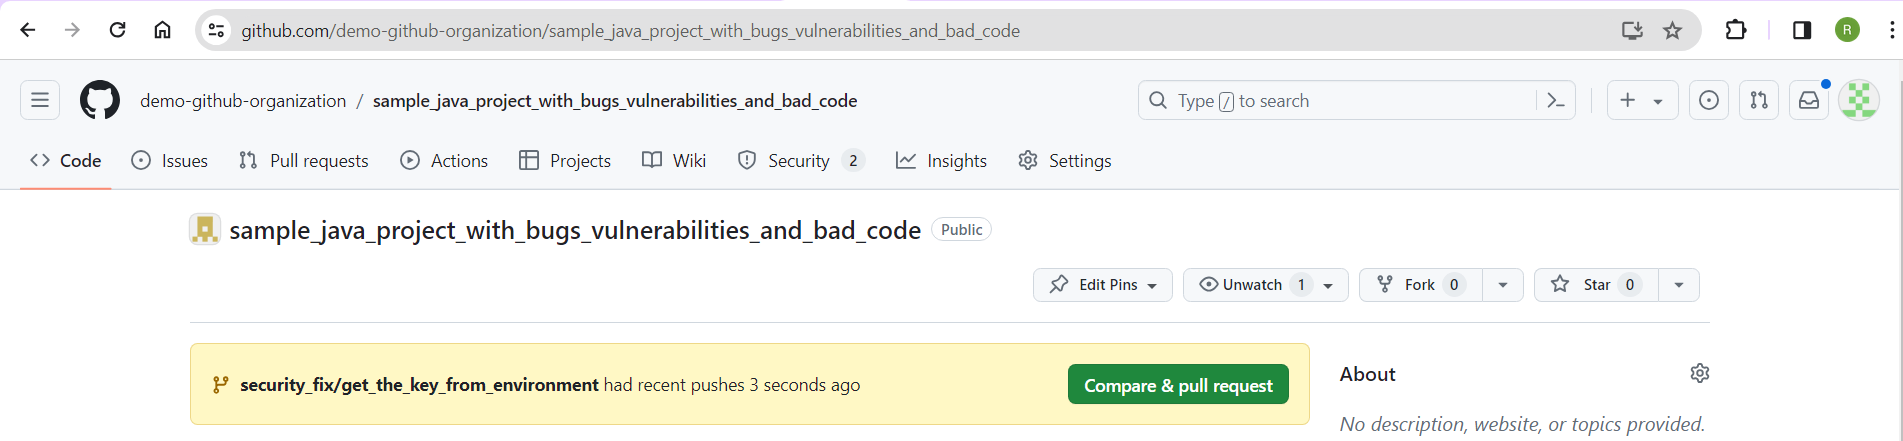
Head to your GitHub repository in a browser. You'll see a highlighted box that says you have a new branch and a possible pull request to create:

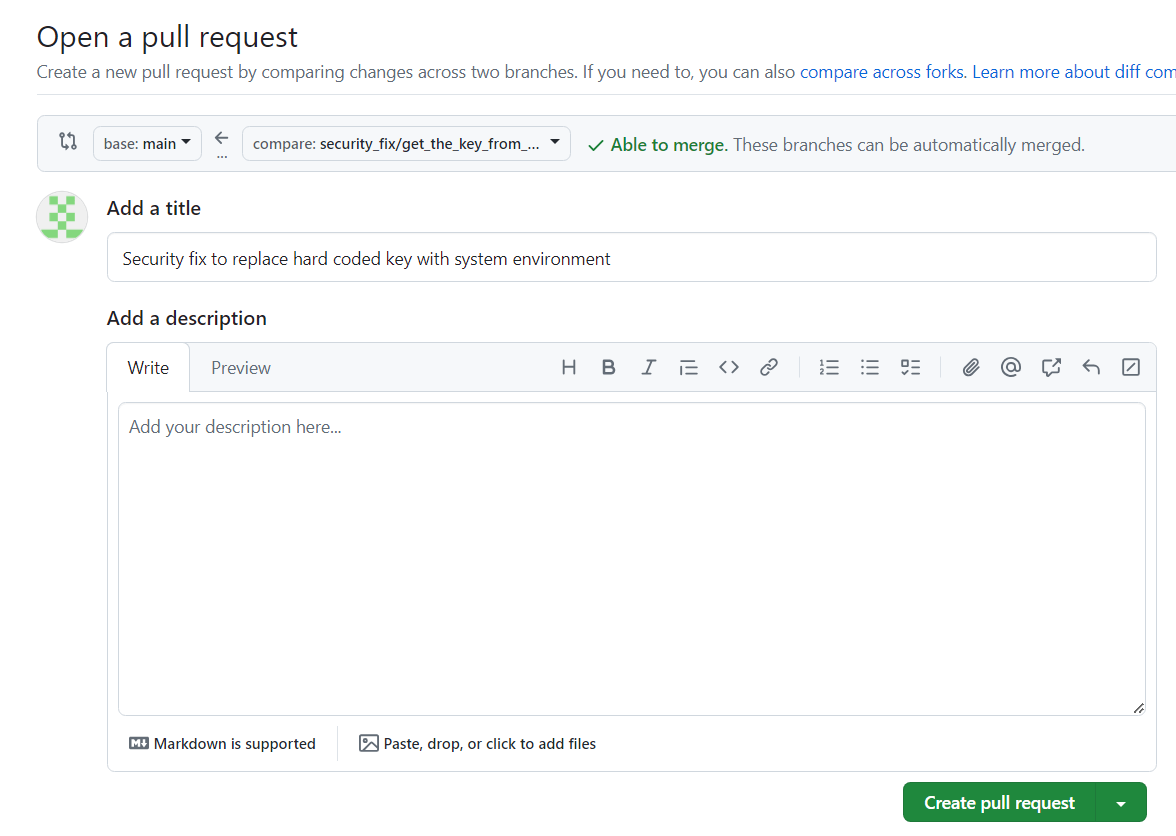
Create a pull request by clicking Compare & pull request and then Create pull request:

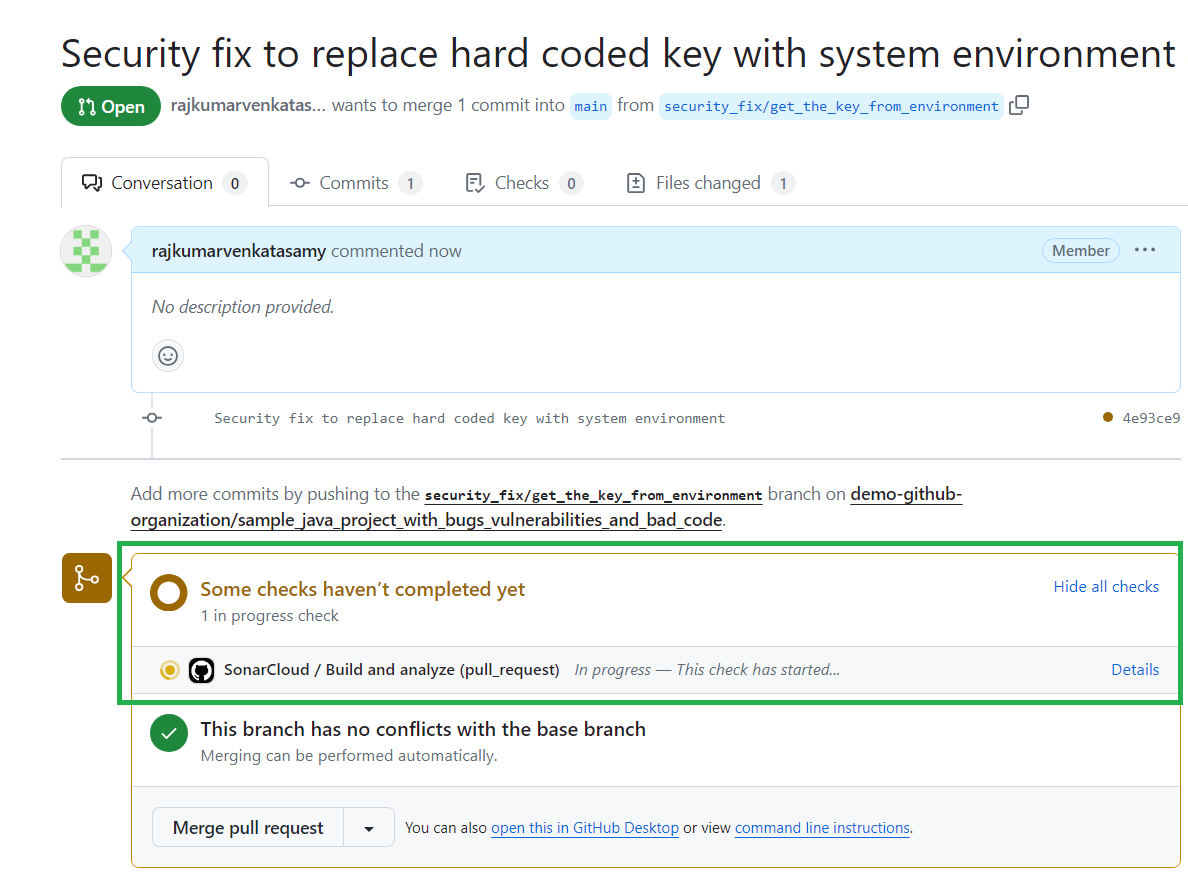
The next screen shows details of the pull request. Towards the bottom, you can see that the GitHub Actions workflow for the pull request has started:

After the workflow is successful, you will see the analysis results from SonarQube Cloud showing that there are no new issues reported on the code in the pull request:

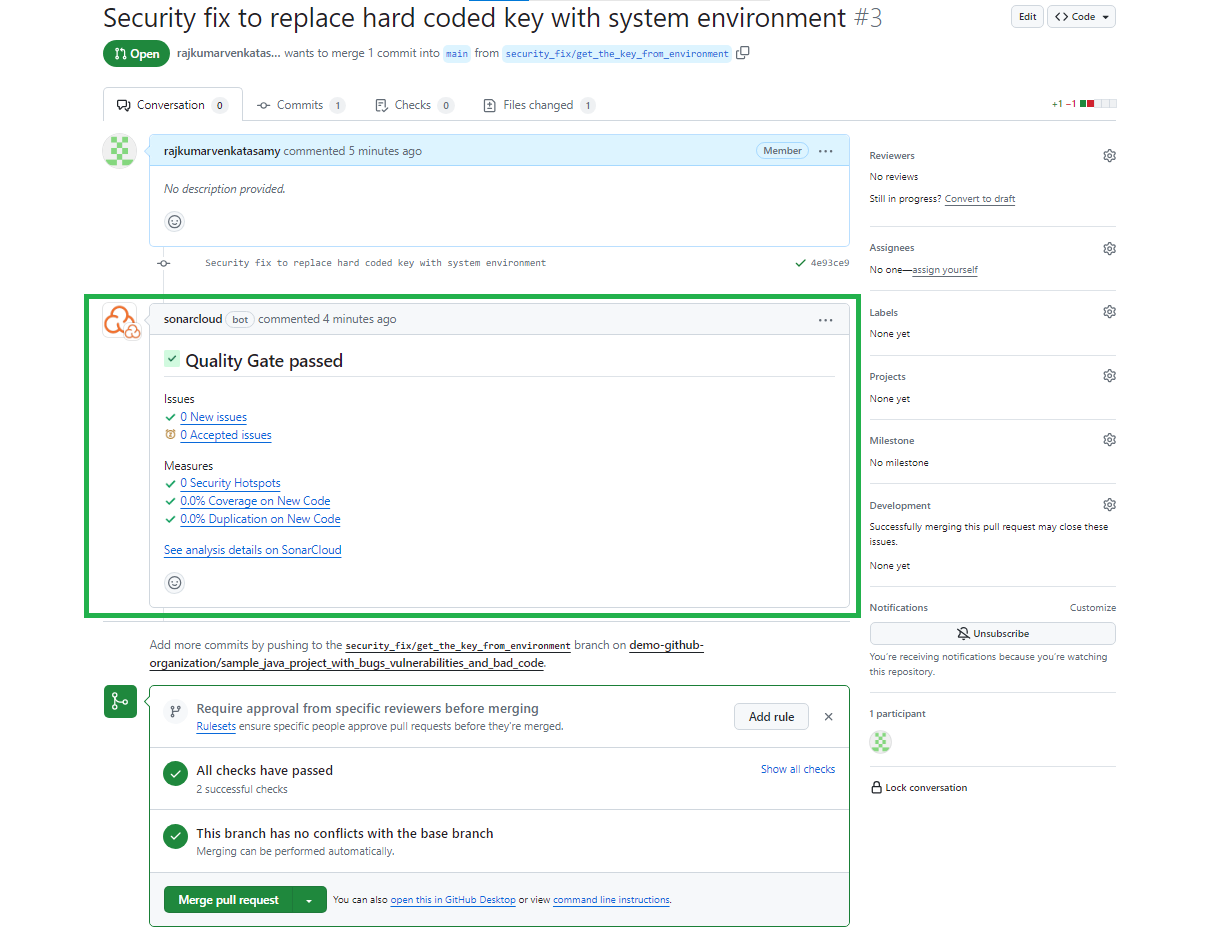
Proceed by clicking Merge pull request at the bottom of the screen to merge your changes to the main branch. This action will trigger another workflow execution on the main branch.
Once the workflow action is completed, head to the screen in SonarQube Cloud that shows the reported issues. The total number of issues is now down to ten:

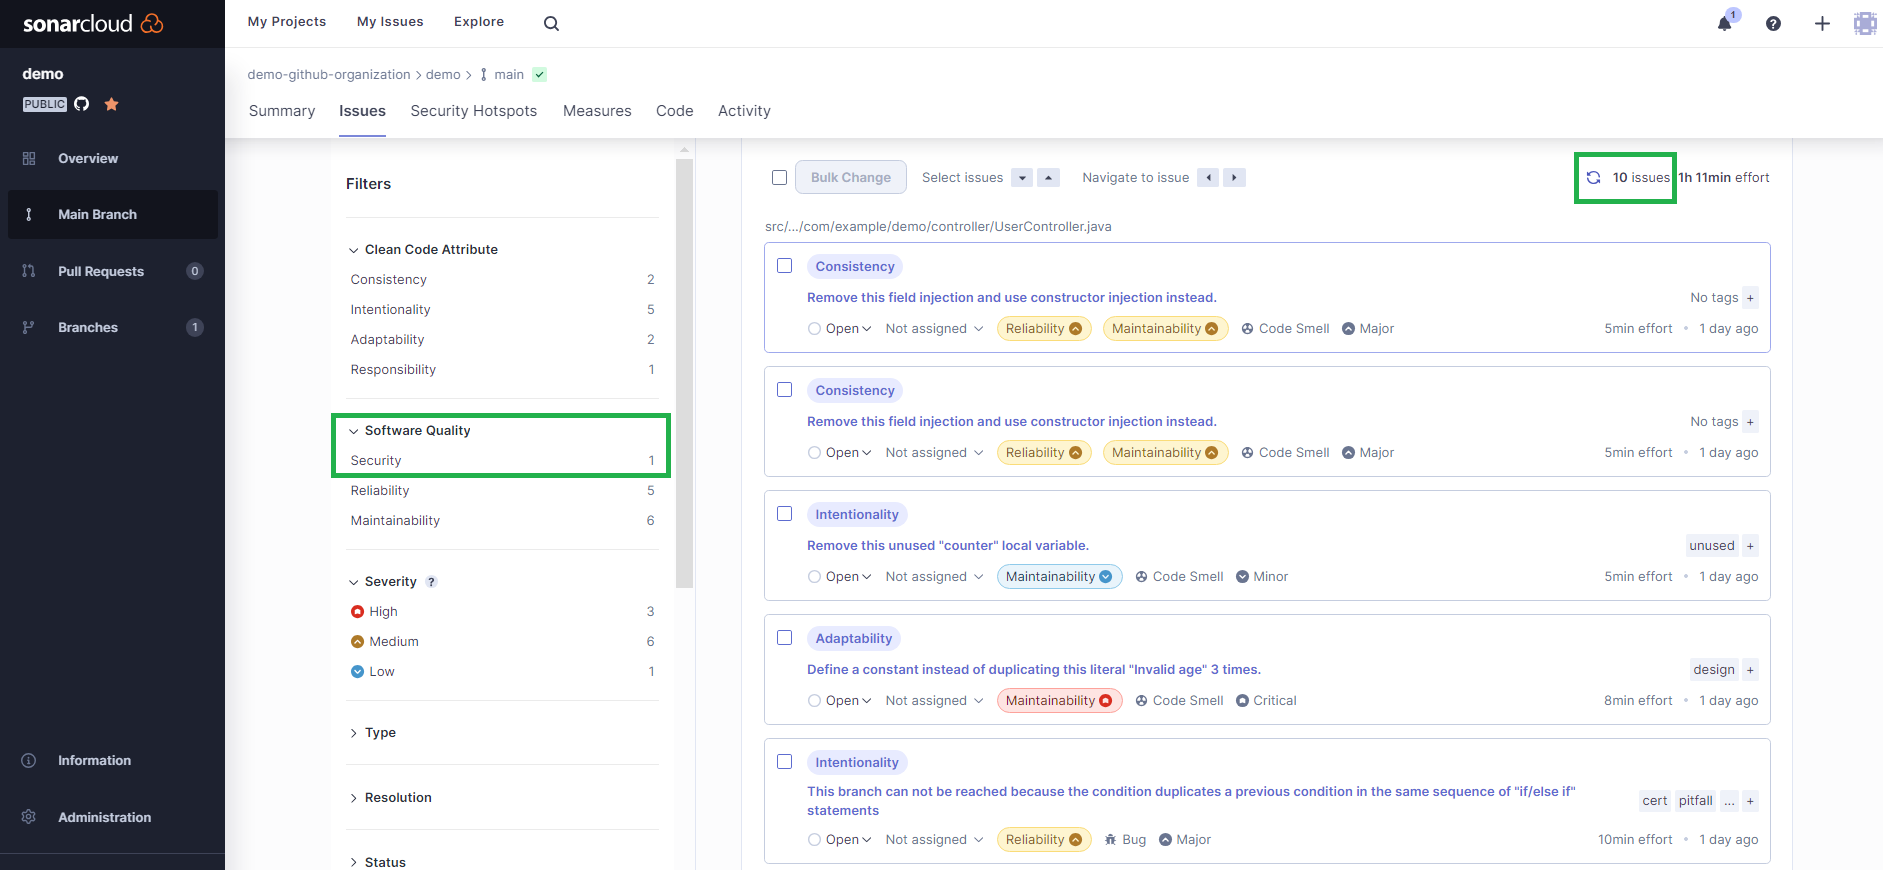
And there's only one security issue left:


You can follow this same process to understand the other issues—whether bugs, code smells, or the other security vulnerability—and address them using SonarQube Cloud.
Conclusion
Congratulations! You now know how to complete a SonarQube Cloud analysis of a Java project stored on GitHub.
As you can see, integrating SonarQube Cloud into your development workflow can help maintain high code quality and ensure the security of your Java applications.
In addition to uncovering bugs and security weaknesses, SonarQube Cloud helps you implement Code Quality principles and realize the benefits of Code Quality early in the development cycle, saving you time and money and improving your security posture.
This guide was written by Rajkumar Venkatasamy at Draft.dev.
- August 5, 2024